Showing posts with label Trish. Show all posts

Thursday, 25 August 2016

Butterfly House by Trish

Hello!

Another day.. another house!

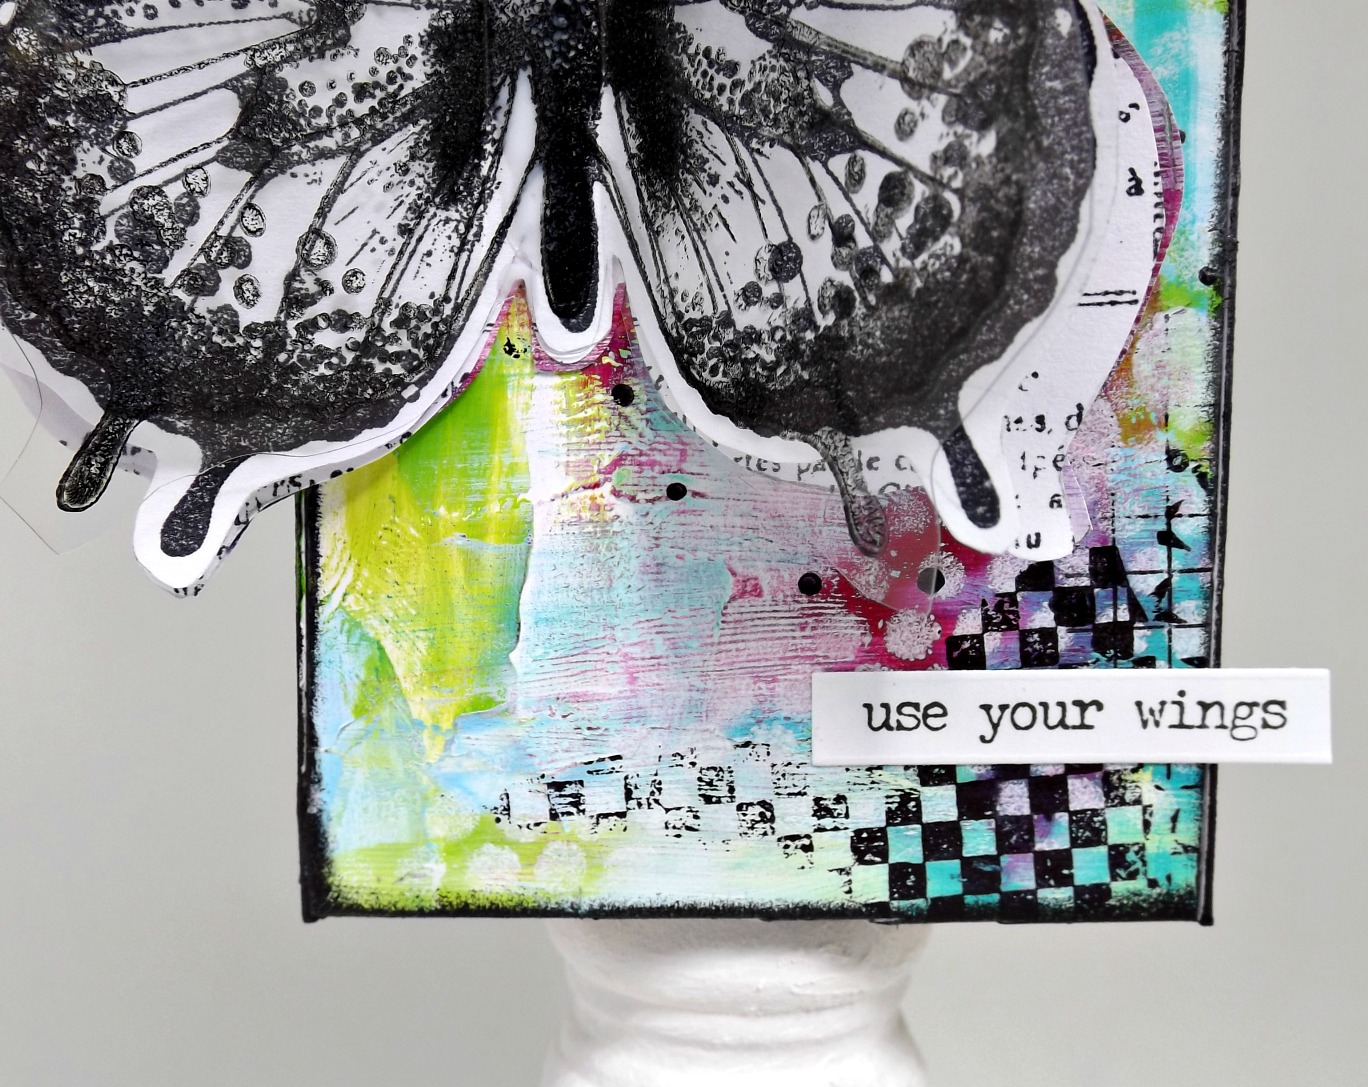
This time, I've used the tall house with a wonky roof to create a butterfly assemblage :)


Once the house was glued together, I created a painty background on a piece of card. This was then cut up and glued to the house. As its so chunky, it gives a fab 3D look..


I created the butterfly by stamping it onto both a bit of acetate, and a bit of copy paper. I then traced the shape onto some stamped paper and painted paper, then cut everything out and glued them together. The finished result is a layered butterfly, with lots of detail going on!


I put the house onto a small candlestick base to give it a bit of height, then added a phrase to finish. I hope you like it!

Trish x

CCP used:
Tall house with wonky roof (large version)

Thursday, 11 August 2016

Happy Houses! by Trish

I thought I would use three of the smallest houses to create a (very) 3D piece of wall art!


A simple colour scheme, letting the houses take centre stage! From an angle, you can seee just how 3D this really is...


I stamped text background onto card, then cut it out and glued it to the front and sides of the houses. Red dotty card was then punched into loads of circle shapes and added as the roof. More punched shapes and a bit of cord were used as decoration to the front of the houses...


The three houses I used were (from left to right...)

Framed Style Tall House (Mini sized, I turned this around so the open side is effectively hidden)
Block Style Cube house (Mini)
Block Style wide wirh wonky roof house (Mini)

I hope you like it!

Trish x

CCP used:

Framed Style Tall House (Mini)
Block Style Cube house (Mini)
Block Style wide wirh wonky roof house (Mini)

Thursday, 28 July 2016

More Colourful Houses!

Hello!

My post on Saturday was about colourful houses... how you can create a (reasonably) simple creation just by gluing colourful backgrounds to the sides of the house. My post today goes a few steps further on.... :)


So... the colourful house has had a few additions!

I gave it windows and a shiny red door....


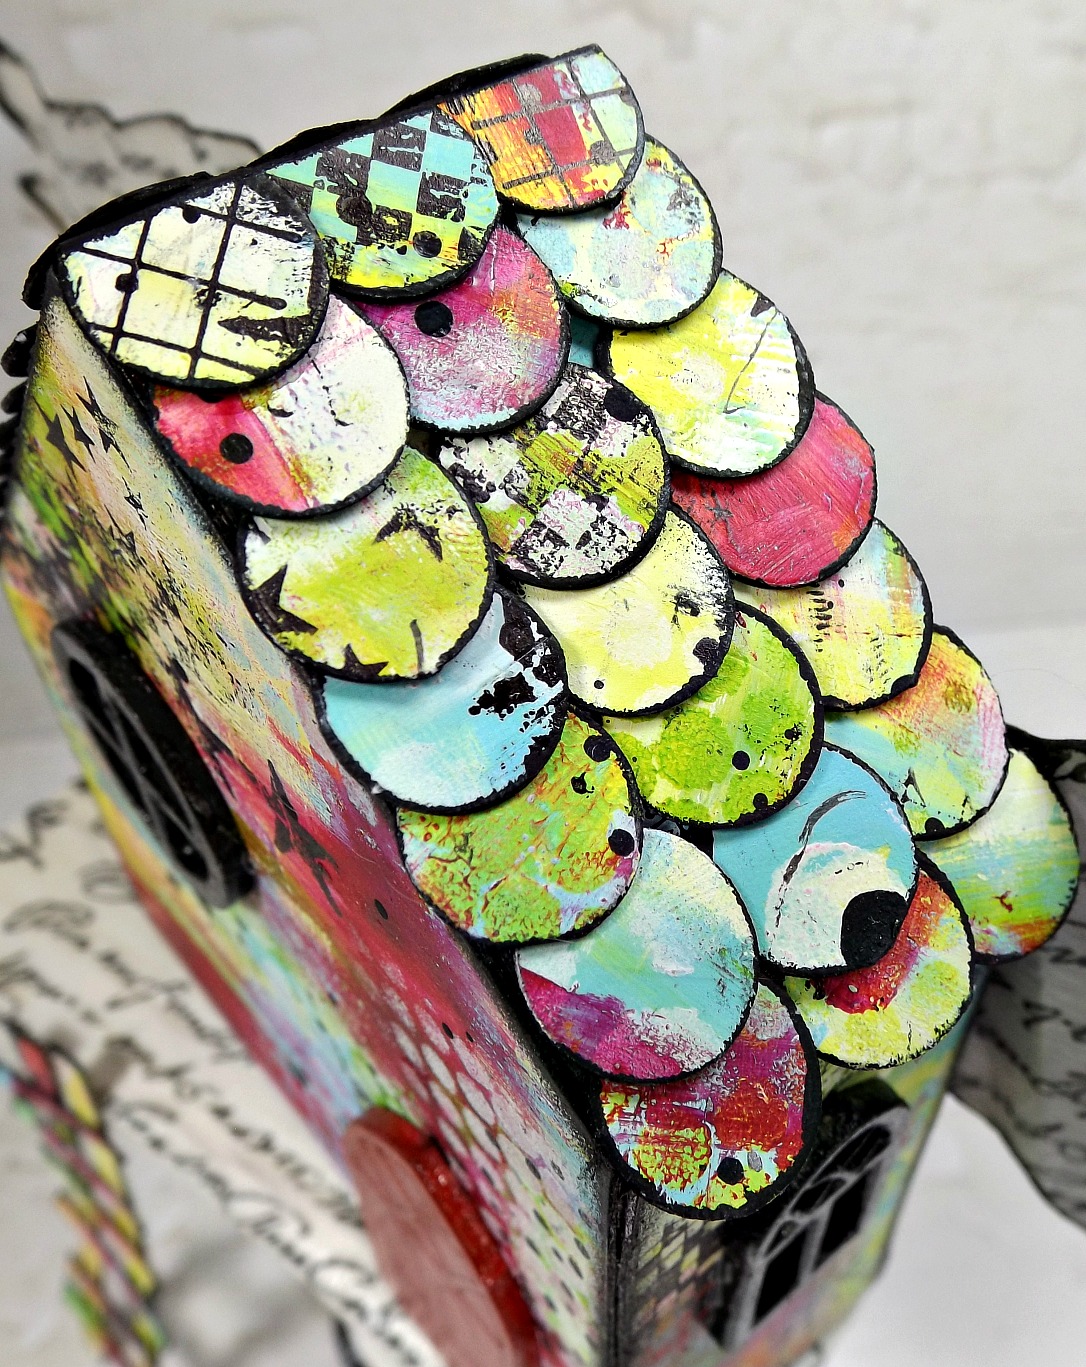
And I gave it a more complex roof by adding 'tiles'... circles punched from left over bits of painty background card!


The house was given wings, and placed onto a wooden base. Both of these were painted white, then covered with black stamped text.


The base was then glued to a small candlestick. As the house is now raised up off the ground, you need a ladder to reach it :)


More scrap bits of painty background!

So.... the simple house gets a major 3D makeover!

Hope you like it!
Trish xx


Calico Craft Parts used:

Wonky house (this is the large version)
Windows
Doors

Saturday, 23 July 2016

Colourful houses: Part One! By Trish

Hello!

I'm sharing the first part in a short series today... sharing ideas on how to decorate the fabulous new house shapes!

I've used the wide with wonky roof houses, in all 3 sizes!

I find it really helps to get an idea of the size of the houses, so I thought a picture may be of use..


That is a regular sized ink pad, so you can see that the large one isn't massive, and the small one not too teeny either!

To start with, I wanted to give all the houses some colour. Two ways really of doing this, either colour directly onto the houses, or stick on something coloured! I went with the latter this time :)

I created a couple of masterboard sheets, my usual painty messy backgrounds. It's an easy job to draw around the shapes of all the sides, then cut them out.


Lots of glue later, all the houses were covered! I went over the edges with a black ink pad, in order to finish off the white edges of the cut, white cardstock that was showing.


To finish off this first part, I added a die cut word to one of the houses.


Of course, this could be the point where you stop! I really like them so far, but I'm going to add some more extra details... so join me again on Thursday, and I'll show you what happens next!

Wonky Roof houses can be found HERE

Have a great weekend,
Trish xx

Thursday, 30 June 2016

Home Is Where The Heart Is - by Trish

Hello!

Have you seen all the FABULOUS houses in the Calico Craft Parts shop? Love love love them :) The mini houses are just totally adorable..... and led me to think a little outside the box for my project today!

Jewellery!


Another view....


It's not as hard as you might think to create either!

Firstly, glue all the bits together APART from the bottom!


When TOTALLY dry, drill a hole through the apex of the roof! This is easily done using an Archimedes drill. (really cheap from Ebay!)


The main 'stem' part of the drill remains in a vertical position, and you use your fingers to move the bit at the top (the bit that looks like it has rings around it) up and down. Drills holes through MDF like butter :)


See?!

To make the bail, twist the end of some wire into a large 'lump' (any shape that won't go through the hole!)


Then thread it through the hole....


Twist the top into a loop shape and trim off any excess wire...


Then you can glue on the bottom!


I then covered the whole thing with book pages...


All ready to decorate!

I kept it fairly simple, a clear glaze with added brown dye ink to age the house slightly, then a large red heart attached by wrapping wire around both it and the house..


The finishing touch was a cut out word: 'home'.

So.... Home Is Where The Heart Is. Geddit?!?!

There will be many more houses to follow.... so brace yourselves :)

Trish xxx

CCP used:
Block Style MDF House Kit Short : mini version

Thursday, 16 June 2016

Simplistic Beach Huts By Trish

Hello!

I've gone very simplistic both in terms of colour scheme and actual finished article today :) I know, a bit out of my comfort zone!

I have created a simple, whitewashed beach hut home decor piece, just right to hang on the wall..


I used the lid from an old box as my base, painted it white then covered with a layer of textue crackle paste....


I love the effect this thick kind of crackle paste gives, nice and chunky, lots of ridges as well as the crackle!

I gave the whole thing a swipe with a baby wipe with brown ink dripped onto it, I find this a good way of getting a very thin layer of colour into the cracks. Of course, you can layer up the colour to create a more intense look if you wish!

The beach huts were sponged with white paint, then blue paint, then a little dry brushing with brown paint...


Sponging rather than actually painting with a brush will give a thinner layer, so the detail can still be seen. I finished off with a few 3D balls in differing sizes!

Not sure this pale and interesting look is really me... back to colour from now on :)
Trish x

Calico Craft Parts used:
Beach Huts

Thursday, 2 June 2016

Callie Spoon and her underwater adventure! by Trish

Hello!

My favourite Art Doll, Callie Spoon is back for another adventure!


This time, Callie is snorkelling, in amongst the weeds and fishes :)

I created my art doll in the same way as I have before, the details can be found in this post from a few months ago..  http://calicocraftparts.blogspot.co.uk/2016/03/callie-spoon-is-back.html

I used 2 lots of Wild Grass style 4, and a larger Wild Grass style 1 as the weeds, then a Crucian Carp, a Zander and a Dace fish (size small) to swim around the scene!


I don't think these fish are really those colours though...... :)

Callie herself is holding some starfish she has collected, and is wearing a rather fetching set of glitter goggles alongside her snorkel..


It's so much fun dreaming up these scenes, I hope you like them too!

Trish x

Calico Craft Parts Used:
Wild Grasses
Fish
Starfish


Thursday, 19 May 2016

Trinket box shrine- By Trish

Hello!

So.... I ordered a trinket box, with all kinds of box ideas going on in my head. Then it arrived, and I decided to make a shrine with it! Bit fickle, me... :)

So, my 'take flight' shrine...


I think the main reason for just using the base/box part of the trinket box was that I really want to use the lid and the feet/handle parts for another project! A have a fab idea for those....

Anyhoo....

I glued the box together, then covered it with book pages. I used the 'stamp on tissue paper then Mod Podge it to a background' technique to get the flourish onto the back of the shrine. The whole thing was then covered with a green glaze, all I did was add a drop of green dye ink to some ready made glaze, to give a shiny transparent look.

I created a couple of primitive bird shapes from clay...


Again, the design was done by stamping (in green) onto tissue, then using Mod Podge to glue it into place.

The birds were put on wires, then the wires atached to the box.

Teeny tiny letter stickers were used for the title of the piece...


The shrine was finished by placing it onto a wooden strip. A bit less bonkers colour wise from me today, but it's always good to have a change sometimes!

See you soon!
Trish xx

Trinket Box Kit

Thursday, 5 May 2016

Pen pot: Extreme style :) by Trish

Hello!

The ATB cube kits with apertures make wonderful containers, so I wondered just how bonkers I could go with that theme! The result... bit of an extreme pen pot!


Fully functional..... but decorative as well :)

The pen pot is made from two square aperture cubes, a larger one to hold the pens, and a medium sized one to act as the head part. I covered the assembled cubes with book pages, then decorated them!


Both cubes were coloured in the same way, paint smeared on with my fingers, then a little stencilling and stamping. I added two large spools to the bottom cube to act as decorative feet, or even 'wheels'!


I positioned the smaller cube at an angle, off set a little to give more room in the pen pot part! It needed a face....


The finishing touch is the explosion of hearts popping out of her head!


These are painted hearts from the mini shapes set, glued onto wire then glued onto the base of the cube.

Not sure whether this represents love for her art exploding out of her.... or maybe just a funky hat type thing :)

The pens can then be placed in the pot....


And it can be placed on your desk!

Join me next time, for part 147 of  ' how many weird things can you make with ATB cube kits' :)

Love Trish xx

CCP used:
ATB cube kits: Square Aperture
Mini shapes: Hearts

Thursday, 21 April 2016

'Jill in the box'! By Trish

Hello!

Me again, with another idea for an ATB cube kit! How about turning one into a box with a hinged lid?

You can have all sorts of everything popping out... just like this one.....


So... how to turn a cube kit into one of these? Like this....

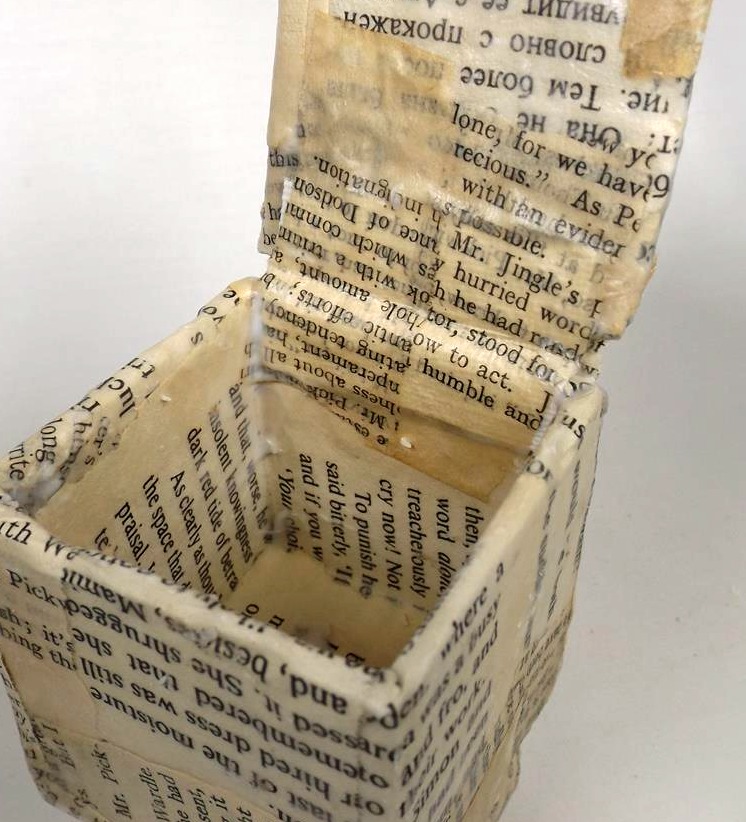
First, glue together a cube, minus the top...


Next (This bit is optional!), add any legs/feet or anything you want to the bottom. I wanted to cover everything in one go when it came to the book page part, so glued on the beads at this point. You could glue them on afterwards, or not at all :)


Cover the whole thing with book pages or paper. Folding it carefully over the top will leave a level edge, rather than the tabbed edges of the unfinished cube...


Cover the remaining side with book pages or paper as well, again folding carefully to give a neat (ish!) square...


To attach the lid to the box, attach a strip of canvas to both. Remember to leave a small gap, as this is the bit that will be folded. I used canvas as it is really strong, yet very flexible!


Do the same on the other side...


This can now be covered to blend in with the rest of the box...


If you wanted, you could attach a loop and bead type fastening to keep the box closed, as currently it won't stay shut unless my finger is holding it down....


I wanted it to stay open though, so didn't need to fiddle about with closures. Another project for another day I think :)

I gave the box a quick painty treatment, then added some stencilling and stamping..


I then drew my 'Jill' figure, and put her in the box!


 I think she looks rather happy to be let out, don't you?!


Have a great day everyone!
Trish xx

Calico Craft Parts used:
ATB cube kit (small)