Showing posts with label Upcycled. Show all posts

Thursday, 1 February 2024

Spring greetings - Homedecor


 Hello everyone!


The last month of winter has begun, and the longing for spring is great.

 Today, I present to you a new upcycling project. 

I found it in an old scramble box; it was missing two rabbits, but I liked it very much.

 So, I had the idea to make the whole thing prettier with a few Calico Craft shapes.


I used leftover wood-paper wallpaper to cover the rabbits, and aged the edges with walnut ink.

 Then, I created a spring landscape using only a few pieces, 

leaving the shapes in their original colours and highlighting them 

with a small amount of white acrylic paint.


With a matching Easter egg from my stock I filled in the missing part.


some close up's


 used MDF shapes


Fallen Tree Branch

Tall Picket Fence Panel

Snowdrop - MDF Floral Wood Shape

Alert Rabbit

Daffodil Flower


 Thanks for stopping by..

a new lantern project will follow 😀


Kerstin


Saturday, 12 November 2022

Altered Art - Xmas Bottle


 Hello everyone!
 
Although Halloween is over,  these are the magical times of the year, 
we start with the preparations for christmas and 
long dark evenings invite again to tell stories.
 
I was inspired to create a new christmas gift project, 
it's a bottle in Altered Art.
 
I worked with Decoupage technique and combined this mixed media piece
 with MDF shapes, outcast's from silicone moulds and a lot of snow texture.


used MDF shapes from Calico Craft Parts


Fleur De Lis Wrought Iron Style Fence Panel

 Sheet of Mini MDF Street Lamps

Holly Leaf & Berry Flourish - MDF Lace Cut Wood Shape

Holly & Berry Border Flourish - MDF Lace Cut Wood Shape

Sheet of Mini MDF Christmas Wood Shapes - Snowflakes 1


some details


I hope you find inspiration!

 Have a good time!


Thanks for stopping by...until next time


Kerstin


Saturday, 24 July 2021

Sea Adventures - Altered Bottle by Kerstin


Welcome everyone!


I was inspired to create a glass bottle in altered art. 

  I simply love to work 

with moulds and modelling clay

and an Under the Sea theme is always one of my favourites. 


  An upcyling idea, I used a liquor bottle as base

 and modeled with silicone moulds and theme suitable MDF shapes.


some close up's


Illustrated step by step guide


some outcast's made with silicone moulds and airdrying clay

glued as frame with assembly adhesives

supplemented with MDF shapes

and gauze


ship lantern was pressed into the still wet modelling clay with a piece of wire, 

it can move freely,

a perfect rocking element in heavy seas :-)

after the drying process everything was painted over with black gesso,

only for the middle part I used grey chalky paint


coloured with green gold metallic wax and white acrylic paint

+ Art stones in various sizes


highlighted with golden metallic wax


used Calico Craft Parts


Ship's Lantern

 Spider Web

Coin Seaweed - MDF Wood Shape Style 5

Galleon Boat MDF Wood Shape - Style 10

Sheet of Mini MDF Nautical Motifs Style 1


Thanks for your visit!

Happy crafting!

Kerstin

Saturday, 28 November 2020

Altered Art Bottle - Winter Magic by Kerstin


 Welcome, creative friends!


I was inspired to create another glass bottle in Altered Art style

suitable for the magic of Christmas time.


Tips & Tricks


Firstly I covered the whole bottle with Weathered Wood, a crackle medium from DecoArt,then, after a drying time, I painted that with Chalky Finish 'Serene'. 

The middle section was painted with diluted paint for better visibility of the door windows. 


I love to decorate the flat MDF shapes with 3D effects using a silicone cake mould ('Gothic window')

and air drying clay (only the outer frame of the mould was used in this case).


One of the

Sheet of Mini MDF Street Lamps 

was perfect for a hanging lantern above the window!
To have it well fixed, it was pressed into the not yet completely dried clay
 and additionally fixed with construction adhesive - this glue fixes the MDF shapes
 very well on glass, but you should note that it has to dry overnight for a stable hold.


Below the window I glued a

Rectangle Shape

 in small size as a terrace, which gets additional hold through the swirls of the

Winter Trees & Snow Swirls.


Some close up's


Calico Craft Parts used: 


Gothic Stone Window - MDF Wood Shape


Winter Trees & Snow Swirls

Sheet of Mini MDF Street Lamps

Picket Fence Panel MDF Wood Shape - Style 3

Fir Boughs - MDF Wood Corner

Mini Star Wreath

Sheet of Mini MDF Acorns & Oakleaves

 Rectangle Shape - MDF Mixed Media Board


Other materials:

Snow -Tex DecoArt

white acrylic paint

brown jute


Wishing you a happy advent season!

Kerstin

Saturday, 7 March 2020

Shadow Box Country Life by Kerstin

Hello creative friends!


I was inspired to create a new home decor piece suitable to 
my shabby chic Spring decoration this year.

It's an altered art project - a wooden box with an "inner life".
I love the vintage look and because the parts were given a very unique used touch,
 they didn't look too expressionless and cold.


 With only a few means, some stamps, Distress ink, Art Stones, old book pages, some fabric leftovers, eggs, feathers
 and sisal my little chicken farm was quickly completed. 

I was amazed when I discovered these beautiful chicken shapes and found it almost impossible to decide  in which colours to paint them, because there are so many different kinds of beautiful chicken.


 some close up's


I chose only white, black and a silver metallic paint for the feathering and of course not to forget red for the cockscomb.


 I'm always in love with this wonderful filigree ivy wood shape! I've been using it a lot as it's just perfect for a natural romantic look. I have left it in its original condition and only applied some metallic wax from DecoArt (Metallic Lustre 'Champagne Ice').


Calico Craft Parts used:

Ivy Leaf Garland

 Hen & Cockrell Beak to Beak

Cockrell Foraging


And this is what the box looks like from the outside.
 I used the same technique as in my last home decor spring project to paint its lid.

Many thanks for your visit!
Kerstin

Monday, 24 February 2020

Spring Altered Book by Jannet


I was recently looking through some old books in a charity store, when I I came across an old Enid Blyton book “ Brer Rabbit Again” I thought this would be perfect to use with the cute little Calico rabbits.


I thought it would be nice to create a little scene in the book. I began by turning over the first page, as I decided this would become a tree trunk later. I began by sketching out some hills, and tore the pages from the outside edge towards the spine to create the hills. After edging the hills with various shades of green ink, I adhered the torn pages together.

The empty hills needed some rabbits so I painted three different sizes of rabbits. I completed the bunnies by adding flowersoft to each tail, which, made them nice and fluffy. I glued the rabbits onto the hills, some tucked into the tops of the torn pages and some sitting in front. I also added a selection of dried flowers into the hills. A little twig became a branch on top of the page, and a little Bird happily sat amongst the leaves. 

I returned to the first page, and I used a bark texture stamp all over it. When the ink was dry I rolled the page up, and adhered it to the left side of the scene.


There were lots of beautiful illustrations in the book so I lightly coloured them with coloured  pencils, and fussy cut them. One of the images from the book was of the rabbit swinging from a tree I glued him onto some card to add some strength to the fragile paper. After colouring and fussy cutting him I adhered him around the tree trunk so he appeared to be swinging over the scene.
The inside cover was looking a bit sorry for itself so I cheered it up with some of the coloured images and painted Calico Craft Parts mini hares, birds and leaves. 

Thank you for visiting xx

The Calico Craft Products I used


Mini Garden Birds


Monday, 6 January 2020

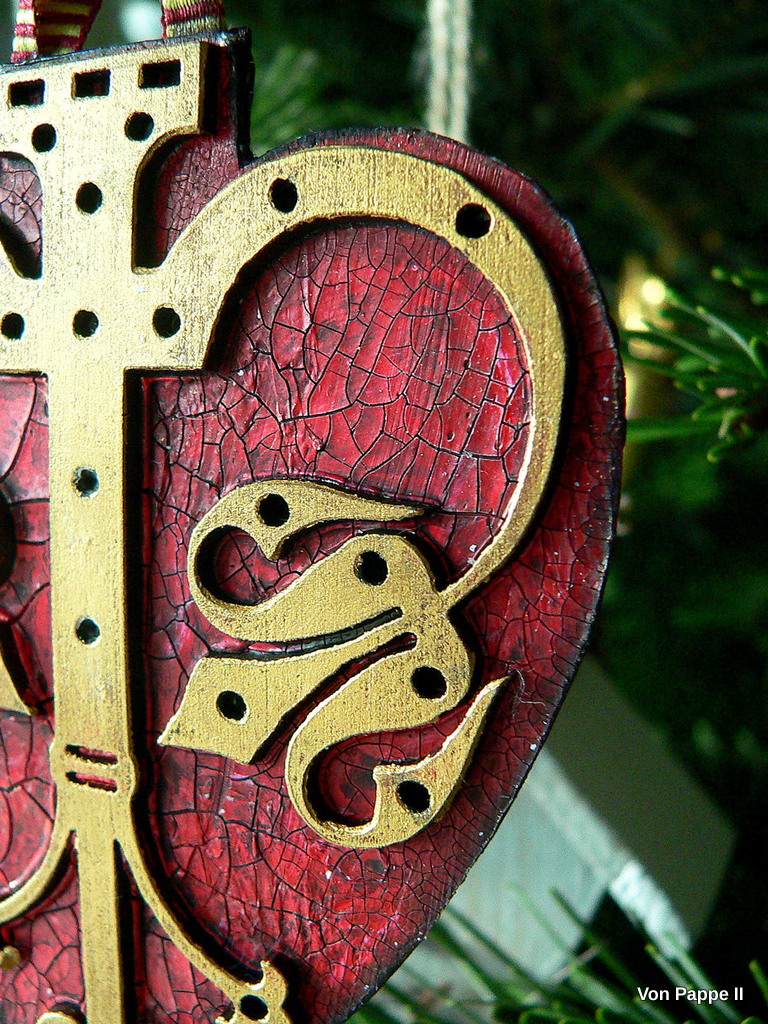
Heart Shaped Steampunk Ornament - by Claudia

Hi, servus and happy new year, dear Calico Craft Parts lovers and friends!

Over here in Austria we put up our Christmas trees on the 24th so we can exchange gifts under the tree that evening. We then have our decorated trees up for some more days or even weeks - mostly we put ours away on January 6th (but I remember my mum keeping it up sometimes until the tree had completely dried and one day just fell over ;)

I have several hand crafted pieces hung on my tree that I especially love - some made by my dear friend Kerstin (also really cool steampunk themed ones), some made by me during the last decades (like the ones I did in the middle of that incredibly hot summer of 2003 when I was pregnant and fled our flat to spend the day in my husband's bureau where they had an air con ;)
This year I also managed to create a new ornament to hang on our Xmas tree - using some of Calico Craft Parts' beautiful Hinges & Hardware Wood Shapes from their Ironmongery & Architectural Elements collection...


I often find I have a more relaxed and more creative approach to some joyful Xmas crafting right AFTER Xmas...so I made this crackled heart ornament between Xmas and New Year's Eve. So it kind of got "test-hung" on the Xmas tree once it was finished ;)


Calico Craft Parts used:
Ornate Fleur de Lis Decorative Hinge MDF Wood Shape (two pieces, large size)


My first idea when I first saw this particular hinge shape was that it would make for a beautiful heart shaped ornament on a mixed media piece or something like that. The idea to use it as a decorative piece to hang on our Christmas tree followed shortly after that...and I am thinking it would also make for a lovely addition to put on wrapped Xmas presents for especially loved ones...

The how-to is quickly explained:


For my two heart shaped bases I used steady cardboard from packaging left overs.


I placed one of the hinges on the cardboard and drew a heart shape around it with a pencil.


Then I cut that shape out, flipped it over and used it as a template to draw my second heart for the other side of my "hinge heart ornament". Flipping the first shape over makes sure both hearts will be a perfect fit when being glued together - even if the hand-drawn heart isn't exactly symmetrical!


I used DecoArt Americana Lamp Black acrylic paint to paint the fronts of the two heart shapes and heat dried them.


Then I took a palette knife and evenly spread a thin layer (maybe half a millimetre) of DecoArt media white Crackle Paint on top of the dried black paint. While the Crackle Paint was still wet I put the two hinges in place and put two heavy paint bottles on top as weights to make sure it all stayed flat while the crackle paint was drying.


The Crackle Paint not only created beautiful crackle but also worked as a glue to hold the hinge shapes in place.


Using a fine detail brush I painted the crackled areas with DecoArt media Pyrole Red fluid acrylic paint.


Once that had dried, I darkened the hearts' edges using black archival stamping ink and a piece of blending foam.


That was followed by a coat of diluted DecoArt media Carbon Black Antiquing Cream to tone down the bright red.


I used cotton buds to remove some of the Antiquing Cream on top of the red paint, so it mainly remained in the crevices to highlight these.

Afterwards I applied Gold Rush DecoArt Metallic Lustre to the hinges using my fingertip. I also used some soft cloth to buff the dried Metallic Lustre to a sheen afterwards.


Once both sides were done, I prepared a short piece of festive ribbon to glue between the two hearts as a hanging loop. Everything was put together using DecoArt matte Decou-Page that I generously applied on all sides of the ribbon's ends (the very ends were folded once and glued in place like that to form a proper loop)...


...and cloths pins to add a little pressure while the Decou-Page dried.


To finish off my ornament I took a very fine detail brush and added Lamp Black acrylic paint to all the hinges' holes to cover up the white from the Crackle Paint.


Voilá!


Some detail shots: 


Maybe I am not the only one who enjoys some Xmas crafting during the Christmas holidays...but then after Christmas is also before Christmas, isn't it?

And as the ornament can also be used in any kind of mixed media project, I dare share this project and tutorial with you right now.  I hope you like it!


Hugs and happy crafting!
Claudia
xxx