Showing posts with label Art Deco - Baroque & Nouveau. Show all posts

Monday, 25 March 2024

Easter Egg - Home Decor


 Hello everyone!


I have designed an Easter egg (210 x 150 mm)

 that can be used as a mural on a window or on a wall.

It could also work as a standing Easter decoration

 in a spring landscape if you built a small stand for it.


 I selected a basic wooden frame (which is not yet available here, but there are egg plaques here), 

and added a felt egg as a background. I decorated the top half with the Art deco part. 

I separated the vine corner and placed it behind the hare family, 

which was beautifully engraved and required minimal colouring.


some details


used MDF shapes Calico Craft Parts


Hare Family

Art Deco & Nouveau Style Ornament Shapes - Style 3

Deco Vine MDF Wood Corner Embellishment - Style 48


Happy Easter Greetings!

Kerstin

Friday, 16 July 2021

Riding on a Bat! By Kat


I have always been interested in fairies, pixies, witches and fairy folk and had many books on the subject as a child. Some were hand me downs from older family members, some I bought with my pocket money from car boot fairs and jumble sales. One of the many images I used to love, and still do is the little fairy riding on a bat by Ida Rentoul Outhwaite. As a child my house was right by a river and on warm sunny evenings we often used to get bats swooping gracefully in our garden as they chased insects. I used to lie on the grass watching them imagining I was that fairy going for a ride! 

So using Calico Craft Parts mdf shapes here is my version of the same fairy and even though she is now older, like myself, she is still enjoying riding on a bat! 

Firstly I painted all my mdf shapes with white matt paint, I find this gives it a good base before adding coloured paints. Once dry I used water colour paints. To add some sparkle to my fairy's dress I added some gold acrylic paint. 

I then painted a simple river scene onto the circular mixed media board. I was planning on using a larger moon at first but then to my delight found one of Calico Craft Parts mini circles was a perfect size to use! So I painted this with matt white paint. 

Once the paint had dried I arranging my bullrushes until I was happy with their position. I then glued them into place. 

I then did the same with my moon, bats and fairy, positioning and gluing them into place. To add colour to the moon and bats I used some distressed crayons. 


To finish off the whole scene I added a little cardboard wording quote. 
The string ribbon is a length of gardening hemp. 

Well I hope you enjoyed another 'Kat Make'. Please contact me if you have any questions and of course if you like it let me know. It's always nice to hear from you. 
Until next time,
Kat 😊

MDF shapes used. 

Round MDF Shape

Flying Bat Colony

Art Nouveau Figurine

Mini Circle Shapes

Bulrush Grass Shape

Friday, 4 June 2021

The Kraken Shrine: by guest designer Lori Woods

Hello everyone! I'm Lori and I'm thrilled to be the guest designer for Calico Craft Parts this month. 

As soon as I saw the Nautical Shrine kit I knew it would be perfect for a piece dedicated to my favourite sea creature, the kraken! Once I had assembled the shrine, I used textures pastes and stencils on the outside to create some areas of interest and then I painted it with cream, browns and red to give a weathered and aged look. To finish decorating the outside I added elements from the Mini Nautical motifs set, an Art Deco Ornament shape and a Compass shape, gave these a splash of colour and then dry brushed white gesso over everything to highlight all the different textures and details.


For the inside of the shrine I painted a very rough sea and sky in two different colours of blue, then added a crackle glaze over the top to give it an antiqued look. I coloured the Galleon Boat shape with paints and glued this into the shrine, using some pieces of card to raise it off the background and create a more dimensional look. Then, the tentacles! I rolled some lengths of air dry clay into tentacle shapes and once they'd dried, coloured them with some metallic paints to give that glistening wet look. I mixed a blob of gel medium with some blue paint to create the water effect on the bottom of the shrine and used this to secure the tentacles in place. A little white paint dabbed on top of the gel to simulate the look of waves and voila, my shrine to the kraken was done!

Supplies used:

 Nautical Shrine kit 1

Art Nouveau & Deco ornament 7

Mini Nautical motifs 6

Galleon Boat 6

Compass shape

Monday, 22 June 2020

A Tribute to Bee No. 2647! - by Claudia

Hi, servus and thanks so much for stopping by!

I've just read the fabulous and touching book by Maja Lunde - "The History of Bees" - and that inspired me to create a tag that shines a light on our busy bees without whom mankind could not exist. It's working bee No. 2647 and if you  - like me - have read one (or all) of Professor Dave Goulson's highly entertaining and informative, loveable books about bees, bumble bees and other insects, you maybe share my (and Professor Goulson's) love for all kinds of bees too. ;)


I've used a lot of gold and shiny bling to stress the importance of my bee - and of all her busy colleagues all around the world!


Calico Craft Parts used: 

- MDF Tag Shape - Classic
- just the frame of the Shaped ATC Wood Blank with Flourish Cut Out Frame
- Sheet of Mini MDF Bees & Beehives
- Art Deco & Nouveau Floral Ornament - Style 46
- Sheet of Mini MDF Hardware Woodshapes
- Sheet of Mini MDF Hinges Woodshapes
- Sheet of Mini MDF Label Holders Woodshapes


This is how I combined all the pieces on the tag. To the left there's the left over background panel from the ATC Wood Blank (that I will use on another project at some other point).


I used matte DecoArt Decou-Page to glue everything in place and let that dry.


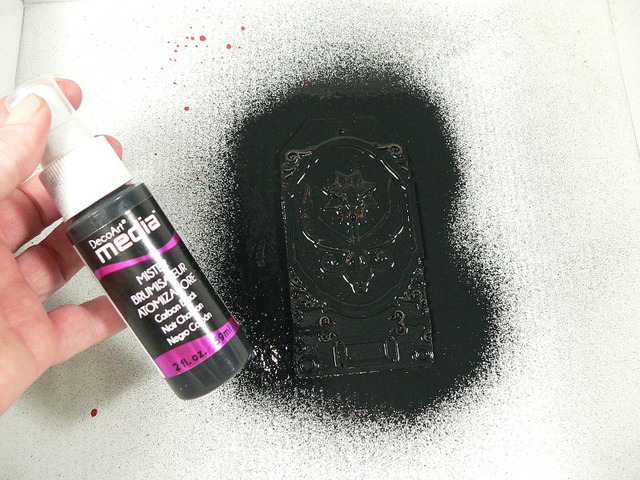
Afterwards I sprayed the tag with Carbon Black DecoArt media Mister and heat dried that (as I am quite an impatient person when it comes to drying times).


With the very tip of a small palette knife I spread DecoArt media white Crackle Paint on top of the ATC frame and label holder and as it was only a thin layer that crackled quite quickly. Once the crackling has started you can also go in with the heat tool.


Titanium White DecoArt media Antiquing Cream was diluted and spread on top of the bee and the floral ornament with a soft brush - this made the laser engraved texture and patterns more visible.


Diluted media fluid acrylic paint Raw Umber was painted on top of the crackled frames.


Time to add some bling! I randomly spread traces of DecoArt media fluid acrylic Metallic Gold here and there. Some of it was going to be painted over during the process - but for now I wanted to see how it looked in the different spots.


More diluted Titanium White Antiquing Cream was added all around the ATC frame section, but not on top of the hinges and the other glued on bits.


Primary Yellow DecoArt Americana acrylic paint was sprinkled onto the tag and also used to paint the bee - my tag definitely needed some bright pollen, right?


The dull black from the background inside the ATC frame was much improved by adding a layer of Turquoise DecoArt media fluid acrylic Interference paint.


To make the bee pop from the blossom it sits on, I painted the petals with Bahama Blue acrylic paint.
A layer of Gold Interference paint was also added on top of the white areas for additional depth and bling.


Voilà! Ready to buzzzzzzz!!!!


And this is a picture I took to show the cool effect from the media Interference Paints - if you look at the tag from a special angle there is subtle gold and turquoise metallic bling everywhere.


Some close ups: 


...and once more the finished tag: 


I hope you like it - and Bee No. 2647 (and all the others) too!


Hugs and happy crafting!
Claudia
xxx


Wednesday, 22 April 2020

"Stay Home" altered plaque - by Lesley

Hey everyone. Lesley here with some altered art for you.

I've been pondering for a while now whether to do a piece about what we're all going through at the moment, and this is what I came up with.


I started out with an oval media board which I covered with old sheet music. I used various spray inks and paints over the top and texture paste through a stencil. I finished off with a date stamp.


The next layer was a trefoil border mixed media board which had more ink and paint slung at it. 


I then used art deco foliage shape. I cut off the top bits and then enamel embossed it all.
The doll is an old cake topper! She was given a concrete look with textured paint. I used wire to attach her to the foliage shape.


I gave her a mask. Old fabric, rusted up of course!
And finally, I added a blank word element which I added the words "stay home" to.


Thanks so much for reading. Please take care and stay safe. 
L.xx

Ingredients used

Thursday, 12 March 2020

Secrets by Lesley

Howdy everyone.

This week I've been playing around with a few of the new pieces that have arrived in the shop!


I started off with a plain MDF board which I covered with an old book page .


The three sticks are kebab sticks!


I layered the craft parts onto the sticks. And included a picture of a young boy behind the clock.


I use lots of different coloured embossing powders over the top. Love the effect it has given.


Thanks for reading
L.x


Ingredients used

Art Deco and Nouveau style 65
Art Deco and Nouveau style 51
Art Deco and Nouveau style 8
Rustic Roman numeral clock face
Rounded Rectangle shape, MDF Media Board

Sunday, 28 July 2019

Wild Geese - Charcoal Storage by Julie Ann

I hope you've been enjoying some beautiful summer days and managing to keep cool! I recently discovered the pleasures of sketching in charcoal, so I decided to create storage for my charcoal sticks and evoke a memory of geese flying on a glorious summer evening at the same time - courtesy of Calico Craft Parts.


I used an ATC/Tag display box. These are so easy and quick to assemble - and - like so many Calico Craft Parts - really adaptable to other uses. To begin with, I painted the sides and inside of the box with heavy black Gesso.


Only one coat is necessary for a great, smooth finish.


I used a grey water-colour pencil to sketch a stylised portrait from a photo of my daughter. This was to form the back of the 'case'.


For the sides I used the same method of creating stylised faces, going on to block them in with diluted, Acrylic inks. I toyed with the idea of adding a crown, but I opted for a simpler, bare-headed approach eventually.


It was fun to create swirls with a white gel pen.


I really wanted to get those crowns on there, so I added them as side details. The simple effect of the gold, metallic paint with the black Gesso, worked really well, I thought.


The Art Deco/Nouveau style ornaments added a vintage touch.


The image on the back of the box was inspired by a summer memory. One evening just before sunset, my daughter and I were sitting on our patio chatting, when the beating of wings overhead drew our eyes upward. A flock of geese were soaring into the blue evening sky and as they flew the sun touched the oil on their feathers and turned it to a kind of rippling, molten gold.


It was one of those moments that are beautiful to share not least because they are almost impossible to describe exactly to anyone who wasn't there.


I used 3 of the flying sea-gulls painted gold as my wild geese. May your summer be filled with memorable moments. Happy Creating until we meet again.
Calico Craft Parts used in this Project
ATC/Tag Display Box (MDF)
Art Deco & Nouveau Style Ornament
Crowns sheet of mini wood MDF crowns
Garden Birds sheet of mini wood MDF Garden Birds
Acorns and Oak Leaves mini wood MDF shapes
Sheet of Mini MDF Seagulls Wood Bird Shapes