Showing posts with label Beach & Seaside. Show all posts

Wednesday, 21 June 2023

Hello Summer - Homedecor


   Hello everyone!


I was inspires to create a wooden writing to beginning of summer. 
Love the weathered wooden style it fits perfectly to the feeling of salt water,
 healthy sea air and the fascinating underwater world.
 
You can find a lot of suitable theme shapes in the section
Aquatic & Marine Shapes at Calico Craft Parts,
 
my favourites are coral and seaweed shapes.


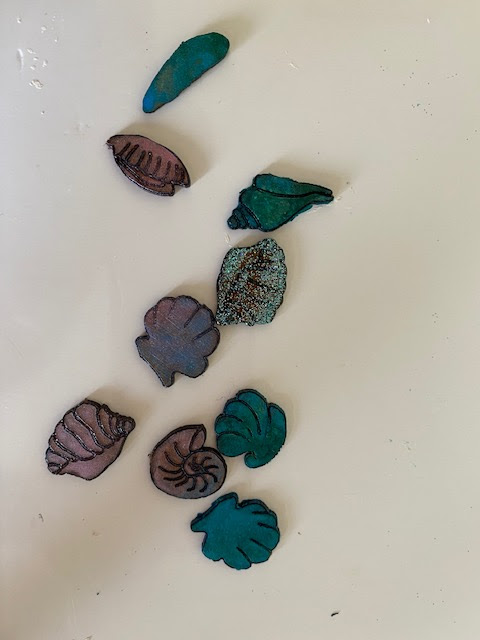
 - chose a coral in big size and divided it into individual pieces

 - shapes were primed with white gesso, sprinkled with micropearls,

 then coloured with brown spray paint

-after drying, finished with dry brush technique


some details


used MDF shapes


 Thanks for your visit!
 
 I hope you find inspiration!


Kerstin

Saturday, 6 August 2022

Altered Book - Pirates Adventure by Kerstin


Welcome creative friends!


I love it to create  books in Altered Art, and to tell stories with it.

It's always fascinating to work in combination with 2D and 3D effects.


I worked with MDF shapes, outcast's from silicone moulds

and cutting dies.


I'm a big fan of all the Pirates of Carribean adventures,

they inspire me again and again.

Galleon Boat  

 reminds me of Black Pearl rising from the sea.


 some details


used MDF shapes from Calico Craft Parts


Coral - MDF Wood Shape Style 15

Galleon Boat MDF Wood Shape - Style 10

 Art Deco & Nouveau Style Ornament Shape - Style 65

Ship in a Bottle MDF Wood Shape - Style 1

Coral - MDF Wood Shape Style 10


I hope I could inspire you to try some projects out off the page, 

because there is a lot of possibilties what you can do with amazing MDF shapes!


Happy crafting!!

Kerstin

Saturday, 23 July 2022

Maritim Frame - Summer Home Decor with Kerstin


Welcome creative friends!


Summertime and vintage feelings
 
I was inspired to create an upcycling project and a maritim picture frame 
was born.
It's a combination of MDF shapes, old fabric leftovers
and nature elements.


 How I began


 used  an old wooden circle panel as base
attached 4 pieces of jute ribbon to make it look like a lifebelt
added 4 beach inspired MDF shapes,
 which were partially divided and cut to size
should be an old weathered character
so I only used a dry brush technique with white gesso


some details


used MDF shapes from Calico Craft Parts


Wild Grass MDF Wood Shape - Style 4

 To The Beach Signpost

Rustic Beach Fence Panel

Deck Chair


I hope you find inspiration!


Thanks for stopping by...until next time


Kerstin

Saturday, 11 June 2022

Beach Idyll - Homedecor with Kerstin


Welcome creative friends!


It's summer time, best time for sea, sun and beach.


I was inspired to create a new home decor piece in mixed media style and

 combined a beer mat and a big seashell as base

for a small standing deco object.

I  added also a suitable saying and a little photo

for a more personal character. 


some details


used MDF shapes from Calico Craft Parts


Square MDF Beer Mat 9.6cm


Scallop Seashell - MDF Wood Shape Style 1


Lighthouse MDF Wood Shape Style 7


Wild Grass MDF Wood Shape - Style 4


Leaning Palm Tree


Sheet of Mini MDF Wood Birds - Seagulls


I hope you find inspiration!


Thanks for stopping by...until next time

with another Sea inspired project


Kerstin


Friday, 4 June 2021

The Kraken Shrine: by guest designer Lori Woods

Hello everyone! I'm Lori and I'm thrilled to be the guest designer for Calico Craft Parts this month. 

As soon as I saw the Nautical Shrine kit I knew it would be perfect for a piece dedicated to my favourite sea creature, the kraken! Once I had assembled the shrine, I used textures pastes and stencils on the outside to create some areas of interest and then I painted it with cream, browns and red to give a weathered and aged look. To finish decorating the outside I added elements from the Mini Nautical motifs set, an Art Deco Ornament shape and a Compass shape, gave these a splash of colour and then dry brushed white gesso over everything to highlight all the different textures and details.


For the inside of the shrine I painted a very rough sea and sky in two different colours of blue, then added a crackle glaze over the top to give it an antiqued look. I coloured the Galleon Boat shape with paints and glued this into the shrine, using some pieces of card to raise it off the background and create a more dimensional look. Then, the tentacles! I rolled some lengths of air dry clay into tentacle shapes and once they'd dried, coloured them with some metallic paints to give that glistening wet look. I mixed a blob of gel medium with some blue paint to create the water effect on the bottom of the shrine and used this to secure the tentacles in place. A little white paint dabbed on top of the gel to simulate the look of waves and voila, my shrine to the kraken was done!

Supplies used:

 Nautical Shrine kit 1

Art Nouveau & Deco ornament 7

Mini Nautical motifs 6

Galleon Boat 6

Compass shape

Friday, 7 May 2021

Marine plaque by Liling Payne


Hello Everyone

First of all, thanks to Louse Crosbie for the invitation to be a Guest Design Team member for May.  We were fellow DT members of another craft blog so it’s been a privilege to learn from all the talented crafters out there.

This has been my first foray into mixed media and a bit of a learning curve, but thanks to You Tube and Pinterest, I was able to find inspiration to help me choose what I wanted to make from the amazing range of products and themes that Calico Craft Parts sells.

I love oceons, sea life and the colours of the seas and oceons so I decided to choose ocean themed  products:


Helen, the owner, included an extra plaque with my order so I decided to use that as the base for today’s project. 

So first of all I decided to prepare the oval plaque and the craft parts with white gesso. 


I gathered a selection of ink pads and paints I thought would suit the project focusing mainly on aquatic themed colours.

I stamped the seahorse with some of the inks starting with where I thought the shadows would be so darker shades on the head and tail. I sprinkled water to activate the distress inks so it gave a nice mottled look to the sea horse. I then used the darker brown distress ink to draw some markings on the element then I used some bronze coloured modelling paste to highlight some areas and give a metallic sheen, then I added some sparkle with a glitter based products. This also helped give the shell a nice glossy effect (which, sadly does not show up in the photos). I also covered the base in various shades of green and blue mica spray, then added texture with some mesh fabric I had as well as muslin. I then played around with the different gesso, pastes and sprays until I got the look I wanted on the base, however it did end up very blue and green so that’s why I did some of the embellishments in paler colours and glimmer/glacier paste. I also laid some bubble wrap over the base to give me some more texture which I thought I could then use embellishment drops or glossy accents to highlight the bubbles.


Once all my elements were painted, covered, embellished, I laid them out on my board to decide on placement. To try knock some the blue back, I found a piece of burlap which I left natural to give me some dimension and then lightened the base below the burlap and added more gesso for texture before deciding how to place all my pieces. I played around with layout, took photos each time until I found the layout I wanted.

So here is how I decided to place everything which I then glued down.

I think I’ll probably use this as a wall hanging as the plaque had holes in the top which have been covered by the gesso and pastes, but to showcase it for the blog, I found some ocean themed papers in my stash which I felt co-ordinated well.

So I hope you like my first ever mixed media project.  Thank you to Louise and Calico Craft Parts for giving me the opportunity to try the products and design something as a complete beginner and novice and hopefully this will inspire other beginners to mixed media to just jump in and find your theme then be creative.

Happy Crafting 

Liling

xoxo

Supply list:

Seaweed style 12

Coral style 1

seaweed style 7

starfish 

starfish

sheet of mini shells

oval plaque


Thursday, 22 April 2021

Wish We Were Here/ by Liz Marsden

 Hi guys, I'm here again for

Calico Craft Parts with my second GDT spot for this month,

This time I couldn't resist this awesome MDF boat, it comes in a few sizes with or with out a shelf too,


As you can see I chose with out, after taking the pieces out, I glued them together, when set I then painted it inside and out with some white Gesso, leave aside  to dry,


Meanwhile take the section of the left over MDF and draw around the shape onto a piece of card,  here I drew around the outer edge, but I should have drawn around the inner, so do that, he he


You should have a shape like this, then fussy cut it out,


Next score some lines along the length of the boat shape, here I went every 1cm,
but you could do less or more if you wish, this balanced nicely though,


Fold them on the crease lines so the edges are pronounced,


Take an ink pad and holding it lightly go down the length of the scored lines so the ink catches onto the card here and there,


Then go over the same way with another colour of Ink pad, this time I used an oxide ink pad and it did  spread a little easier, to finish it off I lightly swiped here and there with this ink too,
Hopefully you get a worn wood look to the card,
(I got the idea for this off Tracy off the intenet who has fabulous tutorials and ideas), 


Now for the next fun bit, here I used the Calico craft parts mini Seagulls and Mini Nautical style 2 wood shapes, these I applied white gesso as before then when dry I went over with some Texture paste, love this stuff, it gives feather effect to the birds and a rusted effect to the anchors,


For the Anchors when dry I then went over with some wax in Old Silver, you can see another mini piece from the sets which I gave the wax treatment too to,
Going back to the boat I painted the whole boat with a light greyish blue to keep in with the colour theme,


So fun part 3!!

I glued the piece of card I had created to look like worn wood to the base of my boat, 
I decided to make my boat part of a scene, this could have been created as a stand alone scene which would look just as fabulous or as I decided to do in a exploding box so it can be given as a gift,


I made the base of my scene, with watercolour card stock, which I painted with yellows and beiges for the sand, and a couple of blues and greens for the sea, when dry I glued this in place on my box,

Next I built up around it, by gluing one of the Anchors in front of the boat, a log effect piece I have in my stash to one side onto which I added the finished seagull which I painted over with a little yellow acrylic paint for it's beak and white for the feathers, some shells and other bits, then I added some mini Art Stones to finish it off,


Now for the rest of the box, I downloaded some digi print papers and glued them in place, these kept to the seaside theme,


On the back piece I glued some more of the seagulls, looking like the're flying around the coast line looking for fish, (not a chip in sight) Lol


I created a tag out of  the papers and simply added the oars and a shipswheel on the bottom, I kept this just coloured in the white gesso so the natural wood bits showed through, again for a weathered look, they would look fab coloured in bright colours too if that's more your thing!!


Here you can see the Binnoculars I had coloured with the wax in the previous picture, I painted the beach hut in light colours again going for a weathered look, and added one of the adorable little Anchors to the top!!

I love this compass styled one, which I painted with colour then went over with white to soften it, it went brilliant with the background images,


So of course a box has to have a lid!! so I used the same papers for this as inside just using the wood look ones,


Creating another tiny scene of the top, Again using one of the fantastic Anchors, another piece of my wood embellishment, shells and mini art stones, and another of the Calico Craft Parts compass but this time I left that in its natural colour to give a little pop to the neautral colours of the others,

Well I hope this has inspired you , do check out all the fabulous products Calico Craft Parts sell,

Now for some exciting news!!
I have been asked to be a full time member of the design team for
Calico Craft Parts,
 so watch this space for more projects from me, Lol

Calico Craft Parts used:


Check out the fabulous projects on the Calico Craft Parts Blog

Happy Crafting!!