Showing posts with label Astrid. Show all posts

Monday, 21 March 2016

The card to fit the person.... by Astrid.

Hello Calico friends and thanks for your visit.  Today I have a card to share that is quite different from my usual style...
The card is meant for a friend's birthday, she loves clean and simple lines, so I knew I had to stay away from anything too vintage or shabby chic. Anyway, this is how it all started:
I took an ATC woodblank, coated it with black gesso and then used some of my mica sprays to add luminous colour effects.
I stamped some twigs with Decoart Titanium White acrylic paint for some more interest, and painted the frame that comes with this ATC with gold acrylic paint.
The butterfly that forms to focal image that was taken from the Butterfly Bramble - Flora & Fauna Flourish Style 3. I carefully snipped it with my scissors, and will use the rest of the parts for another project. It was given a coat of white gesso and then treated with the same sprays and finally coated with some Decoart Crackle Glaze.

Now all I needed to do was mat and layer it on some black, white and Kraft card and finish it with a word sticker.
I love how the Craft Parts are so versatile and can be used in so many different ways. Here's hoping this is clean and simple enough...... Meanwhile thanks for your visit and do check out all the latest additions!

Monday, 7 March 2016

Spring is in the air, wall plaque by Astrid

Hello Calico fans thanks for dropping in. I have a little wall hanger to share with you today:


Let me start today with listing the craft parts I used for this and then I will share a short step by step:

Butterfly Bramble style 3
Bird on Flowering Vine style 7
Baroque Flourish style 19 (part of only)
Ancestry Font word

I started by covering the grey board with some scrapbook paper in light spring like colours, I distressed the edges a bit and added some subtle background stamping.

Next I painted the ATC in similar, but slightly darker colours using chalk ink and then added some stencilling using Distress inks and a stencil. I also added a tiny scrap of a paper serviette to both the plaque and the ATC for a little more interest.

This was followed by covering parts of both with Decoart Media Crackle Glaze and then adding some Antiquing Creams to bring out the cracks. I forgot to take a picture of that stage, but below you can see a close up how it all came together:

For this project I wanted the cracks to be quite subtle, so as not to detract too much from the beautiful craft parts.

I left the Craft Parts themselves fairly plain too, the only treatment they got was with Decoart Dazzling Metallics in Luminous Gold, just to add a bit of shimmer to the main parts, in this case the bird and flowers.

One of the things that I love about the craft parts is that they come in so many different sizes.. When using larger sizes I love to alter them with paints and crackle mediums etc, but when using smaller sizes, like on this occasion, I think they are better left almost untreated to bring out their delicacy.


Because they are so delicate, they can occasionally break, but I have never found that a problem, as it is easy to use them in parts (like I did here with the corner part) or carefully glue them together again. In fact sometimes I break them on purpose if it suits a particular project I have in mind.


Well that's it for today, - thanks for your visit and fingers crossed that Spring will soon be in full swing here in the Northern Hemisphere. I for one could really do with some warmth and sunshine!
xxx

Monday, 22 February 2016

Longing for summer.... by Astrid

Hello all, Astrid here with a project for you today.

I know, winter is still in full swing (at least in the parts where I live), but I cannot help but long for Summer.....

This started out as an experimental piece, playing with backgrounds and texture and might have become part of a journal, until I decided to use it for showcasing some of the amazing craft parts.
Here is how it started out:
Using various sprays over a background of texture and crackle paste with some gesso thrown into the mix.
The texture was achieved by pouncing into the wet paste with a scrunched up bit of aluminium foil.
My main embellishment was this lovely corner piece, it's the Lily MDF Wood Corner Embellishment - Style 38, size large,  you can find it HERE. First I just coloured it dark brown with some ink.
Next I adhered the piece to my background and with some Decoart Media Acrylic paints and a small brush I coloured the flowers inside the openings.
When the paint had dried I filled the openings with Glossy Accents and let it dry for several hours, the flowers (they look much nicer in real life than in the photo) now looked like glass.
The main focal point became a stamped and layered sunflower, I stamped it several times, fussy cut the individual flowers, coloured them with Distress Inks and then layered them up together.

Next I took a Curled Vine Fancy Flourish MDF Wood Shape - Style 3, coloured it in matching colours to my background, broke it apart in places and arranged them around my sun flower.

A bit of stencilling in one corner, to fill in a rather empty space

A sentiment and some background stamping

And with that my project was complete...
Well, hope you like my it and thank you for your visit. The shop is full with all sorts of new Spring and Summer craft parts, - do check them out!

Monday, 8 February 2016

Bittersweet love.... by Astrid

Well, it's nearly Valentine's day, so I thought I'd share another project featuring some of the marvelous Valentine inspired craft parts. This project was really quick and easy to do, perfect when time is running short.


I created an envelope out of black card and gave it a decorative flap with the help of some dies. There are numerous tutorials out there on how to do something like that, so I won't go into the details here.


I covered the base with decorative papers aged with the help of some inks and then decorated with various Craft Parts. These are the ones I used:


As you can see, I positioned the large heart from the Valentine set with the Art Deco ornament in the center and added a little flower on top. I then used two of the corner embellishments to balance it out. I love how the different craft parts echo each other in shape and can kind of harmoniously work together like this.


All I did to alter the wood shapes a bit was colour them with dark brown ink (I used Adirondack Espresso) and then high lighted them a bit with Decoart Metallic Lustre in Champagne


The feather and other elements were all coloured in the same way. I added a few details to the feather with a black pen.


The envelope closes with a little magnet.


The back was left plain, just lined with paper with a bit of back ground stamping.
Next I made a card to fit inside the envelope, using some of the other Valentines elements from the same sheet.
I chose the title bittersweet love, as this particular heart reminds me of barbed wire, and don't we all know that love at times can have this other bitter sweet side...... That's also the reason I kept the colours quite dark, a change from the usual red and pink.


The little heart has the words I Love You engraved inside, because, yes, true love can overcome those tricky prickly patches, and as the saying goes, - Love can conquer all.....

Well, I'll leave you with that philosophical musing, all that remains is to wish you all a very happy Valentine's Day!!
Thank you for visiting like always
xxx

Monday, 25 January 2016

Love, love, love by Astrid

Hello Calico friends, long time no see..... I've been away and so this is my very first post in the new year and it's nearly February....

Anyway, that being so, I thought I would share my first Valentines project with you:


Have you seen some of the new Valentines Craft parts? You can find them right on the home page at the moment.

I used the Mini Valentines Wood Shapes set 3, some amazing new corners
Baroque Floral MDF Wood Corner Embellishment - Style 35, and the word Love from the Create you own Word craft parts in the Coventry Garden Font, but that is a story by itself that I will tell you in a moment.

I started with one of the Shaped Profile Grey Board mixed media boards and started by adding some texture with the help of a couple of stencils and texture paste. I then gave it all a good coat of gesso.

Next I selected my chosen craft parts and arranged them on the board. I also used a metal embellishment from my stash to complete my composition.

Next everything was covered in a further layer of gesso.

And then followed my favourite bit, adding colour with the help of various paints and sprays from my stash.. However, before showing you some detail about that, as you can see, there is quite a gap on the left, and I felt it really needed a sentiment. Now I had a complete phrase "Love is in the Air" cut from the Coventry font, but...... I had not been careful when ordering, and it was huge and far to big for my project. I'm telling you that, because I know I am not the first one who has made that mistake, so beware and be careful, take out that ruler before ordering!!

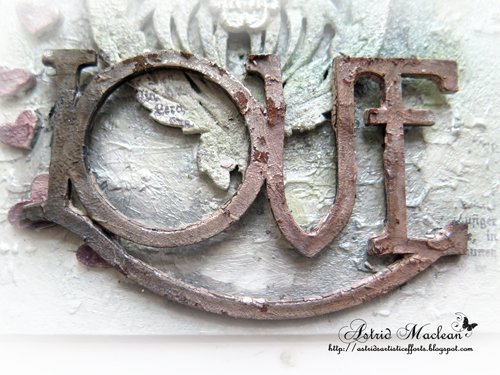
Anyway, all I have space for was the word Love, but as it turns out, the good thing was that the shape of the word mimics the shape of the arch on the grey board, thus balancing the design quite well I think.

Here you can see what it looked like after I altered it, to give it a worn rusty look.

This was achieved by adding some Decoart Crackle paint and when dry colouring with various sprays and paints. I then added some Antiquing cream in Burnt Umber, and then when I buffed it and rubbed it off, also peeling some of the crackle paint away again. In order to stop more crackle peeling off, you then need to seal it.


Here is the centre part, while adding colour I had also added some glitter that was then covered over again to take away the sheen but just leave some texture. As that unfortunately obliterated the text on the heart (cut into the actual craft part), I then added a wood sticker to give it more of a focal point..
Below are a few further details still:


Shadows around the craft parts, to create more depth to the colouring.

In my world no project is complete without at least a bit of background stamping.

I love how the metal embellishment and Craft Parts seamlessly work together once altered in the same way with gesso and paints.

And here a bit a closer look at the final project once more....

Thank you for visiting