Showing posts with label Pipework Maze. Show all posts

Thursday, 30 January 2020

The Handy-man House - by Lesley

I'm currently doing a bit of DIY in my house...….this led me to make a little rusty handyman house...


As usual, the pieces were primed, and then I dry brushed on dark colours.


I used bits from the pipework sheet to decorate the sides and back.


And used the tiny pieces for the roof. These were covered with copper texture paste.


I filled the house with rusty bits and bobs from my stash.


Thanks for reading.
L. x

Ingredients used
Framed MDF tall house kit
MDF pipework maze

Saturday, 17 November 2018

Inside View - Nemo's Memories by Kerstin

Hello crafty friends!

Maybe you can still remember my last book shadow box
 'Octopus En Vogue' with the awesome 
  Today I would like to show you the interior design. 
The background was created using a decoupage paper with old maps, which 
I think is very suitable for Captain Nemo, a very famous fictional character by Jules Verne, and his adventures.
I wanted to create a gritty and dripping atmosphere.
 
So I used a lot of Nautical & Seaside wood shapes from Calico Craft Parts
in combination with some of their steampunk shapes.


 Calico Craft Parts used:


on my detail photos you can find all these wonderful pieces staged beautifully


with Metallic Lustre 'Gold Rush' from DecoArt


two old lanterns made with a silicone mould and 
black acrylic, painted with Antiquing cream 'Patina Green
and highlighted with  Metallic Lustre 'Gold Rush'


only on some places with embossing powder


with crackle Glaze and Antiquing cream 'Patina Green) from DecoArt


from Sheet of Mini Nautical Motifs Style 4


I hope you feel even more inspired  now to create your own
 Steampunk piece or a project in industrial grunge style?!
I really enjoyed working on mine!!! 
Many thanks for stopping by!


Wednesday, 29 August 2018

George the Pterodactyl - by Lesley


Hey there everyone. A couple of years back I introduced you to Norman, he's HERE if you want to say hello.

Norman has appeared on the blog quite a few times over the past couple of years in various shapes and forms. This week I would like to introduce you to his friend, George the Pterodactyl. 


George started off as a little lump of wood that I found in my basement. His head was taken off a Halloween decoration which accidentally came home with me from work last year. :)

Using some clay I modelled his head and neck onto the wood and then secured a brass water type fitting thing-y around his neck and let it all go off. With the remaining clay, I used it to attach some wings onto the back of George.


Once it was all dry, I set about painting him. I used a graphite grey, a blood red and a touch of purple and dry brushed him until he was covered.
Using the pipework maze add-on sheet I decorated his body with the tiny bends and connectors. These were then heat embossed with a mixed media embossing powder.


I finished by adding a few touching's of silver wax and then added some veins to his head in black ink. 


I'm thinking that George needs to have a home, or a perch, so watch this space to find out  what happens to him.


Thanks for reading,
 L. x

Ingredients used:


Monday, 9 July 2018

Pipework Maze Desk Organiser - by Claudia


lol...when I uploaded this image to prepare this post, the following phrase hit my mind: "We are the Borg. Your biological and technological distinctiveness will be added to our own. Resistance is futile." (Yes. you're guessing right - I have been a huge fan of Startrek - The Next Generation and Captain Jean Luc Piccard and the Borg back in the 90s...oh dear! Was this really that long ago?!!!)

Well, I should have added a LOT more of the pipework maze parts and used darker colours to really make it a Borg style project, but still...this could be the preliminary model of a Borg desk organiser...(I hope I will remember this idea!!! ...and to order at least three sheets of each of the Steampipe Maze Sheets and Add Ons to do something really Borg-ish).


Calico Craft Parts used: 

- Artist Trading Block Cube Kit - Square Aperture (large)
- Pipework Maze MDF Craft Parts (small)
- Pipework Maze Add On Sheet - Valves and Taps (small)
- Pipework Maze Add On Sheet - Pipes (small)


The cool thing about the ATB cube and these sheets is that the large Artist Trading Block Cube and the small Pipework maze parts go together just perfectly! Also the valves and taps help cover up spots where there are little gaps - so you gain a bit more flexibility when building your pipework maze across the whole cube.


I used matte DecoArt Decou-Page to assemble my cube and to glue the pipes in place. Before I started gluing on the pieces I played around with the pipes for quite a long time. Then I started with the pipes around the opening edge of the cube and moved on to the sides and around the cube from there. 


You will need a lot of the smallest angle pieces from the Pipework Maze Craft Parts sheet. Don't make this rocket science - you can always "cheat" by using a tap or valve piece to cover a spot where the parts do not meet properly. Be playful and have fun!


Here's a detail shot showing how I connected the cube's sides...it even works if one of the pipes protrudes a little (but not farther than the MDF's thickness). Simply glue the pipe that continues the maze behind this "overlap".


Some pictures of the process...working my way round the whole cube...


Once all parts were glued in place and the Decou-Page had dried, I painted the outside with DecoArt Bronze Dazzling Metallics paint. I used a soft brush and made sure I worked the paint into all the bends and edges by stippling around and under the pipes, taps and valves.


Then I used DecoArt Americana black acrylic paint to dry brush the whole piece on the outside (for a more worn look and to make the edges of the pipes more visible) and to also paint the inside of the cube. 


The edges were darkened as well. 


Voilá! 
Resistance is futile! 


I hope you like my pipework organiser! 

Thanks for stopping by and as always: 
hugs and happy crafting and happy holidays!

Claudia 
xxx

Monday, 26 June 2017

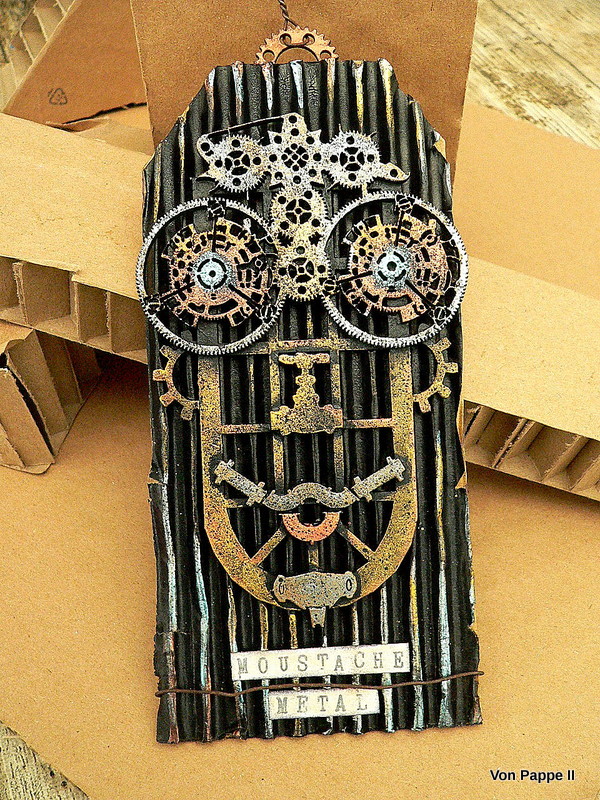
"Moustache Metal" - by Claudia

"We all know Heavy Metal but what on earth is Moustache Metal ?" I hear you ask...


...well, it is without any doubt the kind of metal that steampunk moustaches are made of!


In my case the whole face is made of "metal" to be precise (but I like the moustache most), so let me introduce you to Mr.....erm....honestly I haven't come up with a satisfying name yet...maybe you have an idea for the perfect name of my Metal Moustache Mister on this tag.


Calico Craft Parts used:

- Window MDF Wood Shape - Style 19 - large
- Steampunk Mechanical Clockworks Motif Style 12 - medium
- Pipework Maze MDF Craft Parts
- Sheet of Mini MDF Wood Cogs - Style 11


I love corrugated card and as my wonderful boss, Helen, always uses it to safely wrap my Calico Craft Parts I always have some at hand. And when you use black paint and metal paints or pastes on it it almost looks like corrugated metal (yay! I love that effect!).

So I started with gluing a piece of corrugated card to a flat piece of heavy card for more sturdiness. Then I browsed my stash of Calico Steampunk Parts to form the face. The beautiful Clockworks part that looks like mechanical eyes behind a pair of goggles and with mechanical hair (or a hat) on top was what sparked my idea for a steampunk face in the first place. I also had some left overs from the great Pipework Maze sheet that made a perfect nose, mouth and moustache. And to form the cheekbone I used a small cog and cut it into halves.

I just needed something as the base shape of the whole face....and found one of Helen's awesome window shapes. That was IT!


I played around a little until I found the perfect spots for all the parts and then glued them in place using matte DecoArt Decou-Page.


At that point I was still going for a rectangle format as you can see (but - as I often do - hadn't completely thought it through yet).

Once the glue was dry I fetched my spray paint box (an old large shoe box) and gave everything a thorough coat of Carbon Black DecoArt media Mister acrylic paint (which is a lot faster and more effective if you aim for even coverage in spots where a brush may not reach - just make sure you spray the paint on from different angles).


The paint dries really quick. So I was able to continue after only a few minutes of drying time. I gathered (almost all of) my DecoArt Metallic Lustre pots.


I used my fingertips to add the Metallic Lustres and also used several tones on one piece (for example a lighter tone to the left of the nose to create the illusion of depth or a bit of shading around the eyes). I also added the same tones of Metallic Lustres to the corrugated card to fuse the face with the background.


At that point I found that my guy still looked too shiny, even and "new"...


... so I added some speckles of Carbon Black Mister for a bit of a worn look:


Much better!  But then I got stuck with deciding on how to finish the piece off....the rectangle format didn't "speak to me". So I put my project to the side for a while (which sometimes is the best thing to do when you get stuck, right?) and when I returned I knew I wanted to change my panel into a steampunk tag.


I created a little loop from a small cog that I covered with Copper Kettle Metallic Lustre before I glued it behind the tag.


"Moustache Metal" (I am an alliterations junkie....who would have guessed ;) ) was stamped onto a strip of white card, cut out and covered with a wash (!) of heavily diluted Champagne Ice Metallic Lustre (so the letters would still be visible but at certain angles were almost hidden behind the metal layer on top)


 Some twirled rusty wire was added to the loop on top...

...et voilá! 


I don't know why he looks so surprised, but he definitely must have spotted something very astounding or exciting (maybe you?)...

There are a lot more fantastic steampunk parts to find at the Calico Craft Parts store to build your own steampunk people with! And it was such fun! I hope you will have a lot of fun too and can't wait to see yours!

Hugs and happy crafting!
Claudia
xxx


Wednesday, 10 May 2017

Perched on Her Throne by Lesley

Howdy people. Lesley here with an assemblage piece for you.


Following on form my last post where i used the pipework maze craft parts.......i decided to try and use some more pieces from the sheet on this weeks piece.

I started out by gluing together an ATC cube and primed it with gesso.
Next i splodged on some patina colour pastes onto five of the sides. (Quite a lot of colour usage for me! ha ha!)


I really wanted to use the arch pieces form the pipework set, so i secured them to the top of cube using aves clay, so that they stood up. And then a few of the mini ones on the other side. .


Once the clay had gone off........i painted them with a metallic brass paint.


Using some more of the pipework, i added them to the corners of the cube, again painted with the brass colour.


The dolls head was painted white and then dry brushed with a bit old silver and brass paint.


For her head, i used a large cog, and another piece form the pipe set. And then a rusty cow bell for her hat.


To finish off, i added some diamantes and a heart pendant from my stash.


I think she looks like she is perched on her throne! Minus her body of course!


Thanks for reading.
L.x

Ingredients used
Pipework Maze
MDF Cog shape, style 7
ATB Cube kit, plain