Thursday 29 July 2021

From Me To You by Liz

  Hi Guys, I want to show you a MDF Trug from Calico Craft Parts that  I've put together which I think would make a lovely gift for anyone special,


I put it together then gave it all a coat of white gesso, when dry I went over with two layers of acrylic paint,

I took a stamp from my stash and randomly stamped a little text here and there on all four sides of the Trug,


I then took a Rose flower head stencil I have in my stash and with some transparent medium stencilled the Rose heads here and there too,


When all the media was dry I added this lovely MDF Ashleaf and twig keeping it in it's natural colour as a focal point for the front,

MDF - Trug 

MDF - Ashleaf and twig 

Happy Crafting!!

Hugs Liz xx

Saturday 24 July 2021

Sea Adventures - Altered Bottle by Kerstin


Welcome everyone!


I was inspired to create a glass bottle in altered art. 

  I simply love to work 

with moulds and modelling clay

and an Under the Sea theme is always one of my favourites. 


  An upcyling idea, I used a liquor bottle as base

 and modeled with silicone moulds and theme suitable MDF shapes.


some close up's


Illustrated step by step guide


some outcast's made with silicone moulds and airdrying clay

glued as frame with assembly adhesives

supplemented with MDF shapes

and gauze


ship lantern was pressed into the still wet modelling clay with a piece of wire, 

it can move freely,

a perfect rocking element in heavy seas :-)

after the drying process everything was painted over with black gesso,

only for the middle part I used grey chalky paint


coloured with green gold metallic wax and white acrylic paint

+ Art stones in various sizes


highlighted with golden metallic wax


used Calico Craft Parts


Ship's Lantern

 Spider Web

Coin Seaweed - MDF Wood Shape Style 5

Galleon Boat MDF Wood Shape - Style 10

Sheet of Mini MDF Nautical Motifs Style 1


Thanks for your visit!

Happy crafting!

Kerstin

Sunday 18 July 2021

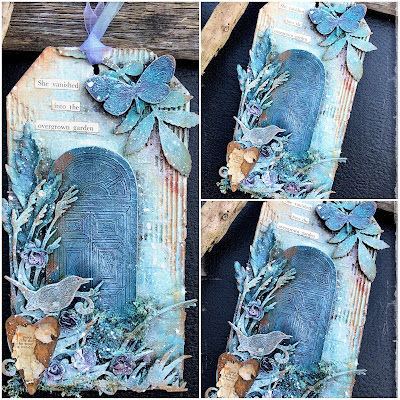
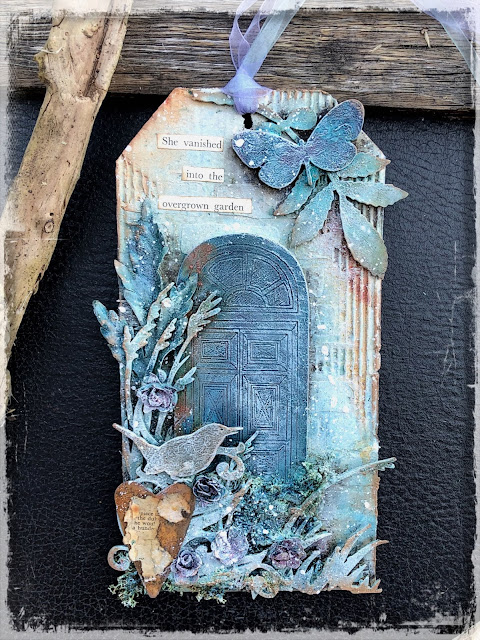
Wild garden tag. By Zuzu


Hi there.

Today I’m sharing a jumbo tag featuring one of the lovely door shapes as well as grass, a flourish, leaves, a butterfly, and a lovely little wren.

I’ve used a piece of the packaging the craft parts were posted in to make my tag. 

By tearing away some of the top layer and exposing the corrugated card underneath you can achieve some lovely texture.

I simply built up my layers, panted it all over with white gesso then applied paints with a lot of water. When it was dry I dry brushed it with more white gesso. Just enough gesso to catch the tops and highlight everything. 


Supply list 

Panelled door with arched window.

Wild Grass

Butterfly

Leaves

Flourish

Wren

Friday 16 July 2021

Riding on a Bat! By Kat


I have always been interested in fairies, pixies, witches and fairy folk and had many books on the subject as a child. Some were hand me downs from older family members, some I bought with my pocket money from car boot fairs and jumble sales. One of the many images I used to love, and still do is the little fairy riding on a bat by Ida Rentoul Outhwaite. As a child my house was right by a river and on warm sunny evenings we often used to get bats swooping gracefully in our garden as they chased insects. I used to lie on the grass watching them imagining I was that fairy going for a ride! 

So using Calico Craft Parts mdf shapes here is my version of the same fairy and even though she is now older, like myself, she is still enjoying riding on a bat! 

Firstly I painted all my mdf shapes with white matt paint, I find this gives it a good base before adding coloured paints. Once dry I used water colour paints. To add some sparkle to my fairy's dress I added some gold acrylic paint. 

I then painted a simple river scene onto the circular mixed media board. I was planning on using a larger moon at first but then to my delight found one of Calico Craft Parts mini circles was a perfect size to use! So I painted this with matt white paint. 

Once the paint had dried I arranging my bullrushes until I was happy with their position. I then glued them into place. 

I then did the same with my moon, bats and fairy, positioning and gluing them into place. To add colour to the moon and bats I used some distressed crayons. 


To finish off the whole scene I added a little cardboard wording quote. 
The string ribbon is a length of gardening hemp. 

Well I hope you enjoyed another 'Kat Make'. Please contact me if you have any questions and of course if you like it let me know. It's always nice to hear from you. 
Until next time,
Kat 😊

MDF shapes used. 

Round MDF Shape

Flying Bat Colony

Art Nouveau Figurine

Mini Circle Shapes

Bulrush Grass Shape

Thursday 15 July 2021

Christmas in July by Liz

  I can't believe I'm doing Christmas in July, I mean what! who me!! but I honestly couldn't resist putting this gorgeous mdf Sleigh together and decorating it,


After putting the sleigh together, (there is a pdf tutorial you can download to help), I painted it with white Gesso all over, then using two colours of antiquing paint I went first over with the darkest blue colour, then using a dry light amount on my brush went over the top with a lighter bluey green, this gives a fantastic weathered look,


When dry I went over the intracate sections with some sliver wax from my stash, adding it with my finger,


Here's where I decorated the inside section from my stash using bits and bobs Christmas related, I love to do a silver, blue themed Christmas as against the traditional red and green, but of course you can decorate it in whatever colours you wish,


I built up my layers to give added interest,


Finally I added some fake snow to the parts of the sleigh where I thought snow may settle,

I hope you have a go too,

Sleigh - Mdf kit - style 2

Happy Crafting,

Hugs Liz

Monday 5 July 2021

Window to the past by Zuzu


Hi there.

I’m sharing a little plaque today. I liked the look of all the doors and windows in the shop and when the postman brought them I was keen to use on on something… anything… 

The substrate I’ve used is actually a piece of grey-board that the shop used to keep the craft parts from getting broken in the post. So it’s like a little free plaque.

And the photo is of my mum as a baby. I have two of these photos. one in the original sepia sort of colours and this one with the colour added (this is just a copy of the original). It is one of the few old family photos I have that has been colourised like this. Very interesting now that we take colour photos for granted. Wonder how much it cost my grandparents to have that done.

When I use craft part embellishments I often break off bits that fit the size and shape I need at the time so I am often left with little piles of left over broken flourishes and leaves etc. This little plaque was the perfect size to use some of those up. It’s going to be hard to give you a supply list for those little bits but I will do my best. 

But it is worth noting that when you are selecting your flourishes, it’s a good idea to think about which ones you could break up into more than one piece to use in different ways. 


Supply list

Arched window

Songbird trio (I used part of it in a previous project so mine is a songbird duo.)

Mini hardware sheet

Swirly flourish (bits of it)

Mini sheet of butterflies (style 6)  

Mini sheet of hearts 


Friday 2 July 2021

Madame Maud Fortune Teller by Kat Hazelton.

 "Roll up, roll up, get your palm read, gaze into the crystal ball or have a tarot reading! She sees all, knows all, please come in and have your future told!" 


This fun project was inspired by a book I own called The Fortune Teller and Dreamer's Dictionary by Madame Le Marchand. In this wonderful book it shows you all sorts of different ways to tell fortunes from tarot cards to reading tea leaves. However, it is the wonderful front cover that I particularly love. Instead of traditional imagery on the cover it has a fortune telling witch sitting on a chair gazing into a crystal ball! This gave me a fantastic idea and using a wonderful witch sitting on a chair from Calico Craft Parts, I made Madame Maud's Fabulous Fortune telling tent! 

Firstly to make my Madame Maud a tent I used a piece of cardboard to create the back of the tent, you could use a flat piece of mdf. This was firstly painted with white gesso and once dry I used distressed crayons to create the traditional Circus/Fairground red and yellow stripes. I also added some dark brown crayon round the bottom to make it look mud splattered. To add some extra Circus details I researched online for posters. I resized the images to make them smaller, then printed and glued them onto my tent wall. I then made a start on painting some accessories and making the tent curtains. 


To make the curtains I used stiff grey board, the type you often get in packaging. I often recycle old packaging to use in crafting especially cardboard. With a pen I drew a rough curtain shape. To make sure I could see Madame Maud I used her as a positioning model.

I painted Maud using acrylic paints. Instead of painting her in traditional witch clothes I painted her in brighter colours with the addition of glittery 'bling' to make her look more Fortune Teller in appearance! 

To give the curtains folds I used sculpting paste and a cocktail stick. I applied a thin layer of sculpting past onto the curtain area and using the cocktail stick as a tool I addes fold lines.
Once dry I painted the curtains with red acrylic paint.


Once the paint was dry I glued on some small mdf circles on the back to help to give the scene a raised 3D effect. I also did the same for Madame Maud. 

I also added a string of real mini battery operated lights! I wrapped these around the backboard and taped them into place on the back. 


Once Maud and the curtains were glued in place I added lots of other details including a beautiful candelabra, sign, crystal ball and curtain pelmet, made in the same way as the curtains. The crystal ball was a pretty marble gifted to me by my friend Debbie. Thank you Debbie it makes a perfect crystal ball! 


Lights on! 
Madame Maud is now set up and ready for business! 


Will you have your future told? 

Well I hope you all enjoyed another 'Kat Make' if you have any questions please do message me and of course if you like it please do let me know. Always nice to hear from you. 


Thursday 1 July 2021

Spring Blooms By Liz

 Hi all, today I thought I'd show you an idea for a journal using some of the fabulous MDF pieces from 

Calico Craft Parts,

(Full process video at the foot of this post.)


I created the front and back of my journal using the MDF Rectangles, these are 10cm x 20cm
 (100mm x 200mm)
which I painted on the outer edges with white Gesso, I also painted a light covering on the flower pieces,


I then painted the Rectangle pieces with some green paint,


I have made a video tutorial on how I created this journal which is below, but first I will show you some close ups of the finished journal after adding a few more MDF pieces, after painting the MDF pieces with the Gesso, I used a few colours of a watercolour brush pen to colour them, this allows the base design to show through still,


I love the way you can make the Butterflies look so different depending on the colours you use,


And the cute Bees,


Products used:


The Video link


Happy Crafting!!
Liz x