Saturday, 19 January 2019

Clockwork themed book box by Zuzu


I must first apologise for how short on text my recent blog posts have been. I’m finding it impossible on my iPad as once I add the photos, I can’t scroll to see or edit them. So I add some short vital info, then add the photos and just hope they are there because I can’t scroll to check.
If any of you blog using an iPad I’d very much appreciate any advice you can give.
Anyhoo... back to this weeks project.
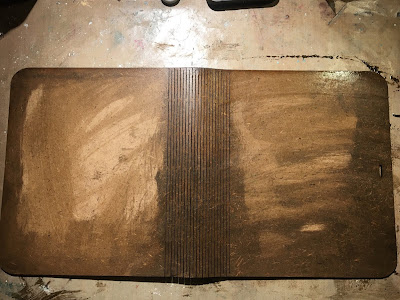
It’s a book box. Well so far it’s the cover of a bookbox.
I’ve covered it with scrapbook papers, added some lovely steampunk embellishments and used paint and rust mediums etc to give it a worn interesting look, (at least, that was the plan).


Well there you have it. A badly edited post with poor layout lol. I would have happily done a step by step on the paint distressing but google blog is making it impossible. 
If you have any questions, please just pop an email over to me or ask on Facebook. 

Z x 


Thursday, 17 January 2019

Boat Shrine by Lesley

‘Tis my first Calico make for 2019, And I decided to make a little shrine. But using the little wooden boat. I love the shape of these boats.


I started by assembling it, and then painted the outside using textured paints in dark and light grey.
I used cream and a purple on the inside.


The key was painted green and I used a purple metallic wax on it. And then hung it from the arch of the boat.


The roses are another favourite of mine. These were snipped off from the branches and painted red and glued to the top.


I kept the other piece whole for the front.


I look forward to working with the other size boats. :)


Thanks for reading
L. X

Ingredients used

MDF Boat and Oars Kit
MDF Heart Key
Rose Bramble, style 2

Monday, 14 January 2019

Encourage your Creative Soul, Calico Banner - Julie Ann Lee

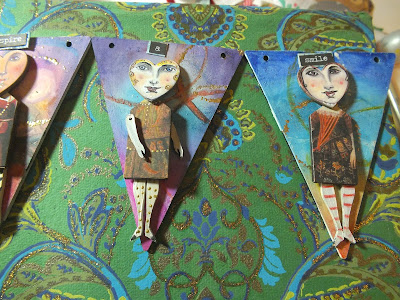
Hello Everyone and Welcome to my first Calico post of 2019. I hope that this will be a year of creative discoveries for you. I decided that I would start this new year with a bit of creative encouragement in the form of some Calico Craft Parts bunting. I used 5 of the MDF triangle bunting shapes, but there are also birch ply bunting shapes available.


The banner reads 'Encourage your Creative Soul Each Day' and I hope that, hanging above my fireplace, these little muses will remind me to keep a flame of creativity glowing on the darkest winter days.


I wanted to create warm, fun backgrounds on my bunting so I unearthed my oil pastels and had a great time blending warm colours and melting them with a heat tool. Warning! Don't touch the surface until it's cooled down - I almost burned my finger in my eagerness to blend while the pastels were still warm!


You will notice that I gave the bunting a coat of Gesso first to provide a nice foundation for the oil pastels. I used the purple lid to draw around. Eventually I sprayed the bunting with a fixative so that those rich, warm colours would remain stable.


Next step was to create a focal point for my bunting. I collaged these bodies from Renaissance art onto the larger tags on a sheet of Calico Mini MDF Tags with pointed tops.


With the addition of mini hearts for heads the little characters start to introduce themselves...


and they really come alive when you give them arms and legs from one of the small Calico doll kits.


I played for some time, decorating and assembling the legs and bodies...


and experimenting with different word stickers to create a positive message. Gold Ultra Thick Embossing Powder provided another layer of warmth. I dipped my circle lid into an embossing ink pad, pressed it onto the bunting and then sprinkled over the gold granules and melted them with a heat tool before coming to a final decision as to where to place my muses and what words to use.


Who are my Muses? This is Gaea, reminding me to look to the Earth and the Natural world for inspiration.


  Charis will remind me to treat myself and others with kindness.


Psyche reminds me to look into my heart and soul for inspiration and to make self discoveries.


Athena might look shy and diffident but underneath she has courage and boldness: she just needs a little encouragement to leave her comfort zone and shine!


Finally Vesta, goddess of hearth and home reminds me that there is inspiration to be found in our everyday lives.

Thank You so much for dropping by today. I hope you will be inspired to create yourself or a friend an encouraging banner of 2019. Have a happy and creative time until we meet in a fortnight.

Calico Craft Parts used in this Project
Sheet of Mini MDF Tags - Pointed Tops
MDF Triangle Bunting Shape
MDF Heart Mini Plaques
Standard Jointed Art Doll Kit (small)
Leaf from Songbird Trio in Spring Branch

Saturday, 12 January 2019

Happy Mind - Homedeco by Kerstin

Welcome friends!

Today another winter inspiration project for a cosy home decoration. 

I was thinking of our dog - he loves the winter time and especially when it's snowing. 
Filou freaks out with the first signs of snow and when we are walking in the woods,
 he is full of enthusiasm and wants to go on and on.
No matter if it storms or snows, his nose is in the snow and he is always looking for a new trail to folllow.


I used a thick wooden board from a 'One Euro Shop' as a basis.
Together with some awesome wood shapes from Calico Craft Parts 
and some other self-made
winter-y elements it has become a unique home decoration piece.
And even better; here in my warm home, I can enjoy the snowy winter landscape
 comfortably with a cup of hot cocoa or coffee 
and without having icicles on my nose and wet shoes


I removed some parts of the snowman's faces
 and made them more transparent and filigree.


the big 'JOY' wooden letters were a perfect addition
 and background for this winter-y scene


The winter trees were only covered with some diluted white acrylic paint 
and some 'Snow - Tex'
(DecoArt). Together with some handmade winter firs
 and snowflakes (from silicone moulds) it's now a wonderful romantic winter scene.


I left the dog in the original colour shade and added only a little bit of white paint
 in a dry brush technique. That is meant to illustrate the stormy wind.

 Many thanks for your visit!
Have a good time!
Kerstin
 

Thursday, 10 January 2019

Favourite Projects of 2018 : Jennie

Hello and a very happy New Year to you all.

It has been lovely over the last month viewing everyone's favourite projects from last year. I am a bit late doing this but it is now my turn to share my favourite four with you. How hard it was to choose just four!

I am a great lover of Calico Craft Parts alterable items and kits and matching these with lovely individual  pieces - both large and small.  My mind often goes down a different route and this was the case with the boat kit. I thought it would make a lovely Romantic Arbour and had great fun putting this project together back in April.


Some of the Mini Craft Sheets are just begging to be used in a project and I had so much fun creating this beach scene back in September - This Way to the Beach.  It is lovely to be able to add so much detail.


I managed to achieve a lovely whitewashed look and this piece sits alongside other beach finds in our bathroom.


I am a great admirer of the lovely shrines created by my fellow design team members and decided to try one myself. As it was late November the period of Advent came to mind - a time to reflect a little each day, getting away from the madness of being in the local panto and getting ready for Christmas. This Advent Peace Shrine really did help to create a little peaceful corner each day.


I probably create more ATCs than anything else through the year, not just with Calico Craft Parts but also for other challenges and just because I love making them. This was a collaborative ATC with my little grand-daughter (aged 4) who was visiting in July and had a wonderful time going through all the drawers and cupboards in the craft room. She particularly loved the Calico Craft Parts drawer and so I asked her to gather together some bits and pieces that I could make into a project. I love what she chose and the resulting "A Little Girl's Dream" ATC - she does too, it now sits on her bedside table.

As always thank you for joining me today and I'll be back in two weeks time with my first project of this year.

Jennie x

Monday, 7 January 2019

Decorate Your Home with Calico Craft Parts House Lights - by Claudia

Servus, hi and welcome to my first project for 2019 as a still happy and proud member of the lovely Calico Craft Parts design team!

Winter over here in Vienna (and I not just mean the season in general but the time when everything outside is covered in snow and really earns to be called by that name) mostly starts mid-January (and while I am writing up this post the first tiny snowflakes have begun to fall) - so I love to decorate my home during that darker and colder time of the year with home decoration that adds a bit of lighting to my home and makes it more cosy.

The new gorgeous Town and Countryhouse Kits from Calico Craft Parts are just perfect for this! All you have to do is paint them in a colour you like and add some LED light strings to them.


I have made one and put it on top of our new little (electrical) fireplace in front of my freshly red painted wall. I just love how the red on the house beautifully echoes the red wall! And of course it adds a very cosy and romantic touch to that corner opposite my favourite resting place on our (new) couch ;)

Here's a picture that shows a bit more of my "ensemble".


Actually it took about half an hour to make my little house light. I used the small sized Georgian Style Townhouse kit and an electric 10 LED string light.  


First I drilled two holes for two LED bulbs into the house front (making sure the drill size I chose would match the width of my bulbs) and then another one at the very bottom in the middle of the back panel of the house kit for the electric cable to go in. If you use a battery powered LED light string you can skip that last step and just insert the battery case into the house after you have switched it on as the house has no base panel it sits on. 


I examined if the bulbs fit before I continued with putting together the whole house (just in case I had picked the wrong drill size).


Yep - a perfect match!
So I continued with gluing the little extra pieces for the façade in place (using matte DecoArt Decou-Page and an old detail brush).


Once the glue had dried I put the whole house together with more Decou-Page.

I used a mug to stabilise the side panels of the house until finally the fourth side and the roof were added (which made everything stay at a right angle and in place). To not move the house too much while putting everything together, I put it on a sheet of paper, so I could simply carefully turn the house without having to touch it (so it wouldn't collapse) by just moving the paper instead of the house itself.


As the Decou-Page dries really quickly I could start painting my house only ten minutes later. I used cheap red acrylic crafters paint and a soft brush and made sure to not cover up the door's laser engraved patterns (which works best if you rather dry brush these areas than painting over them with loads of paint on your brush).


I filed a slot for the cable to go in and enforced the opening with a cut to size piece of acetate that I glued in place with superglue.


Finally I added the LED string and inserted the two bulbs into the drilled holes. I added a tiny bit of Decou-Page to these two to prevent them from falling out.


Et voilà! It's as easy as that! And as there are nine different house kits to choose from you can even create a little light house village to light your home with! And these would make for lovely self made Christmas presents as well! ;)


Depending on the angle you look at the house light you will see some of the lights from inside peek out - if you want to avoid that effect, you could glue some tissue paper to the windows' backs before you assemble the house. But the photograph makes the bulbs on the inside look a lot more eye-catching than they really are.


I love my little red house with the lights on! I hope you do too! 


Hugs and happy crafting!
Claudia
xxx