Monday, 2 October 2017

Turn your Handcrafted Houses into Haunted Manors with Calico Craft Parts Mini Wood Shapes! - by Claudia


Well, of course there's still hope for those who "enter" this post...lol.
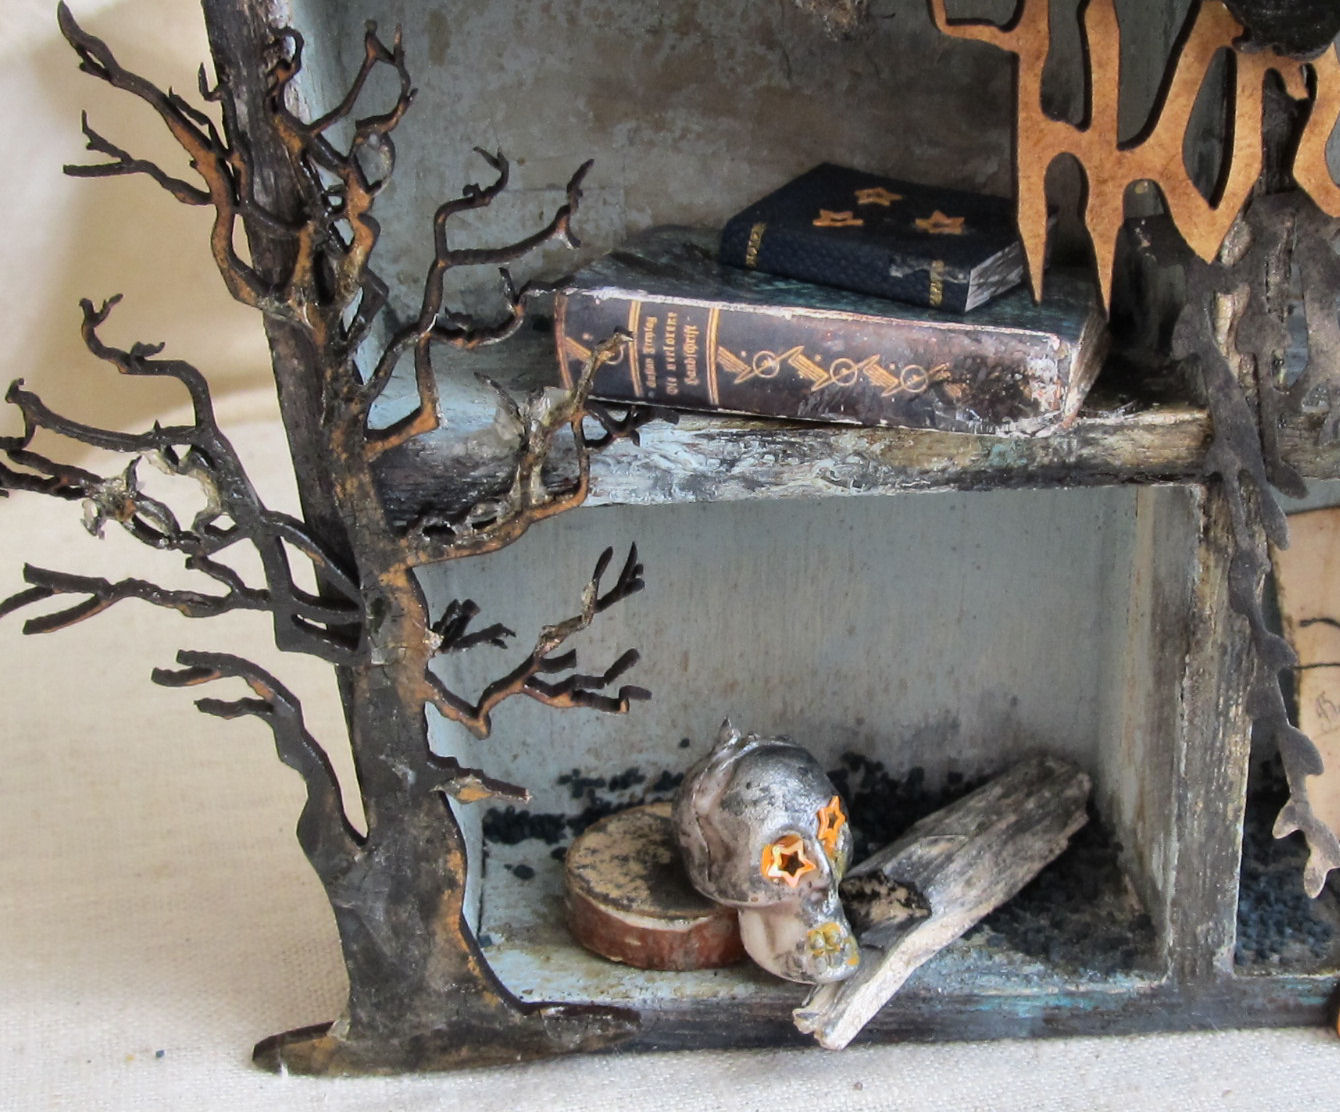
Hi, servus and welcome to "my" Monday over here at the Calico Craft Parts blog! I am so happy you're stopping by and today I would like to share with you my first Halloween make for this year. I have finally taken the time to create a little Haunted Mansion and when I found Calico Craft Parts' latest Halloween Mini Wood Shapes I knew these were the perfect size to decorate my finished house and thus turn it into a haunted one - not just an old looking one ;)

There are billions of posts out there who show (much better than I could) how to create these gorgeous little houses - so this post is all about turning them into spooky mansions by adding some ghosts, bats, crows, a spooky tree and a little graveyard - and not to forget about a pumpkin or two ;)


So here's my finished Haunted Manor and these are the Calico Craft Parts I used for decorating:


- Ivy Leaf Garland MDF Wood Shape - Style 2


I played around and picked my favourite Mini Wood Shapes from the sheets...


...to build a little graveyard behind a spooky tree...


...I picked some bats and ravens to have them flying around the house...


... a little pumpkin to sit beside the doorstep...


...and of course I needed some ghosts (or who else would be able to do the "haunting job"?)...


...and last - but not least - I wanted some ravens to sit in the garden and not be impressed by any of the spooky sounds or sights...


The Mini MDF Wood Shapes were painted using DecoArt media acrylic paints, Neon paint, Antiquing Creams and Americana acrylic paints....I mixed and added layers, wiped back, added more, dabbed off,....until I was content with the look. The MDF gladly takes a lot of heavy mixed media trying, wiping off and re-trying....lol.


To paint the Word Element I mixed a bit of Americana Neons orange paint with white media Antiquing Cream and applied it as a wash on top of my Paynes Grey base coat I had already painted most of the Calico Craft Parts with.  


To finish the sign off, I finally went in with pure orange Americana Neons paint and let it seep into the letters. Then I wiped off the excess with a soft cloth. This way the paint in the letters remained and made them more visible. 


I used an old sturdy book cover as a base for my house to sit on and added some glued on die cut tiles as well as a generous coat of texture paste where there should be grass later. I let that dry thoroughly...


...before I sprayed everything with Carbon Black DecoArt media Mister...


Once that had dried I used DecoArt media black Modeling Paste and a palette knife to glue the tree, the crosses, grave stones, fence and ravens in place. I let that dry overnight. 


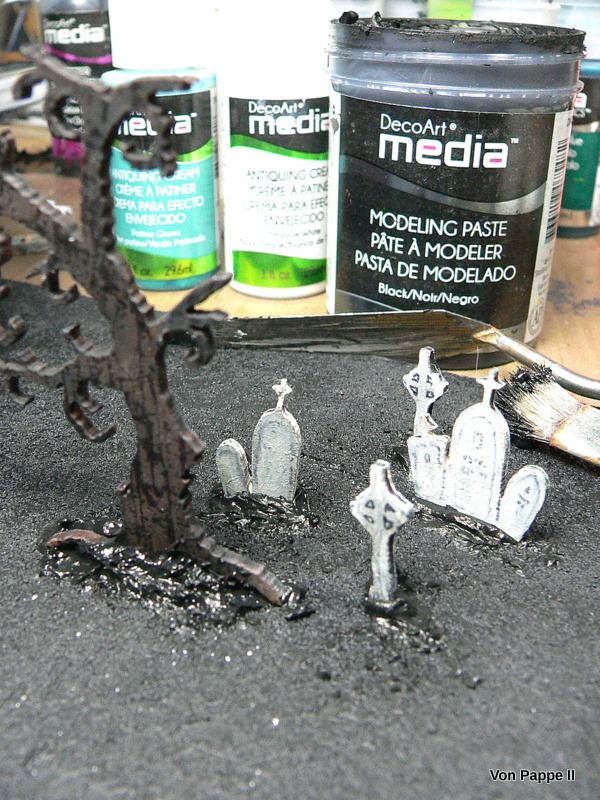
Then I dry brushed the grass with different shades of greens.


The path from the garden gate to the doorstep was highlighted using white and patina green DecoArt media Antiquing Cream that I wiped off the tiles with a soft damp cloth once the Antiquing Cream had dried. 


The painted Ivy garland and spider were glued to the house using matte Decou-Page. 


The ghosts were glued directly to the house as well, while the bats and raven were added using thin black wire...


Again I used the black Modeling Paste to fix the wire that I had first bent into tiny loops at one end to the backs of the bat and raven wood shapes...


Once the Modeling Paste had dried I bent most of the other ends into U-shape and inserted these into the chimneys. One bat was fixed to the house by inserting the pointy wire end below one of the roof tiles strips. 


Moss from the home decor shop was added to form some hedges and bushes. The Word Element "sign" was hanged to the fence using short pieces of wire. Et voilá!


I love how Calico Craft Parts' Halloween Mini Wood Shapes make the house look the two storey high building it really is! They're just the pefect size! And the two little ghost fellas are just too cute, aren't they? 


Thank you for stopping by and happy Halloween crafting! 
Claudia
xxx


Saturday, 30 September 2017

Once upon a time - GD Kerstin

Welcome!

Kerstin is back with a new mixed media fantasy project.
 It's an artist trading block and my inspiration was a very romantic fairytale.
 Can you guess which story I mean???
A little bit difficult, isn't it? 

...Lost in the forest, Belle's father Maurice seeks refuge in the Beast's castle, but the Beast imprisons him for stealing a rose. Belle ventures out in search for him and finds him locked in the castle dungeon. The Beast agrees to let her take Maurice's place.... 


How I did it:


before and after


Colour technique wooden shape 

  1. firstly a thin layer of diluted grey and black acrylic paint
  2. clear DecoArt Crackle Glaze  on some places
  3.   DecoArt White and Raw Umber Antiquing Cream diluted with water for creating drip lines with a brush
  4. sprayed with water to make them run and spread


 some close up's 


side views


+++++++++++++++++++++++

Witching Hour
 and another inspiration for you

I live near the  'Harz' mountains. Their highest peak is the 'Brocken' and it has always played a role in legends and has been connected with witches and devils.  I love these fantasy stories about spooky forests with misty figures and phenomenons, where the fog creates eerie visual  effects.
Halloween time is near and so I had a lot of fun to create a little witches house with the amazing wooden shapes from Calico Craft Parts.


Calico Craft Parts wood shapes used:


this is how it looked before I started with decoration and painting

mainly painted with DecoArt Chalky finish Paint Vintage   and Glimmermist 'Woven Burlap'
plus a little bit diluted black paint


some close up's


I'm  always fascinated from this natural wooden shape look and I think it isn't always necessary to paint them, or?!
I only used orange and black acrylic colors, 
the classical Halloween shades with a little bit shimmer, to paint some wooden shapes


oh what is that??? a phenomenal magic effect ;-)


an old weathered roof


a long post with a lot of inspiration for you, I hope :-)

I really had a lot of fun to work with the amazing Calico parts and I am sure 
(in preparation for the time for creating Christmas gifts) it will certainly not be my last order.

Thanks so much for your invitation as your guest designer this month,
it was a pleasure for me!!!!

Happy crafting!
Kerstin


Wednesday, 27 September 2017

Treat or Treat Goodies by Lesley

Hey people. Well........its nearly the month of October, which can only mean one thing, HALLOWEEN! Yay!! Possibly my most favest time of the year.

I have a little mixed lot of doodahs today for you. I emptied out all my Halloween craft parts and basically just had a play around with them. Really simple ideas.


The cake toppers are a simple idea. Just painted them black and then embossing powder on the top. And a stick glued to the back.


I used one of the oval shapes for the tag and painted it black. A skull stencil and then the mini craft shapes glued on.


The teeny box is my fave. How diddy is it! This was glued to together and again painted black. I used a cobwebs stencil from my stash for the sides and top. And found these fab skull beads which I used for the legs. A calico spider was glued on top to finish it off.


I bet you can guess what i'm off to do? Yep.......eat those cakes! :)

Thanks for reading.
L.xx

Ingredients used.
Birch plywood box kit, small
Mini MDF Halloween motifs, style 2
Bat MDF wood shape, style 2
Skeleton hand
Skull and crossbones
Witches hat, style 2
Spider, style 3
Oval birch plywood plaque

Sunday, 24 September 2017

Adventure Awaits by Julie Ann

Hello, it's great to be back at the Calico Craft Parts Blog as Autumn works its magic. This is a special time for me, not only because of the seasonal gold, reds and oranges, but also both our children were born in the Autumn! This year, instead of a birthday card for my daughter, Matilda, I chose one of the Calico Artists' Trading Cards - and a story!


When Matilda was a tot her obsessions were cats and stories! Even though she knew the contents of the well loved books inside out, she would still cuddle up and wait with anticipation for the adventure to unfold: if those adventures involved cats that added to her delight! Edward Lear's 'The Owl and the Pussycat' was a great favourite!


 Matilda has a real adventure to look forward this birthday - a trip to Venice, a gift from her partner, Elliot. In the ATC I have created for her, The Pussycat dreams of the adventures that lie ahead for her and her new friend, Owl in their beautiful Pea Green Boat.


Calico ATCs are the perfect substrate to work on - the possibilities are endless. I began my project with vintage map paper, which I aged with spatters of water-colour, and a scrap of lace trim stiffened with some heavy gel medium...


The Pussycat's gown was originally worn by Mary Queen of Scots! How Miss Pussy got her paws on it I'm not quite sure, but I love the bold red with the autumnal brown. The fun of collage is that you can create a wardrobe for your own characters in no time at all and their character begins to emerge!


There are a whole range of Calico ATC frames to choose from and they add another dimension to the adventures too. Here I used some design paper with a linen weave pattern coloured with water-colour and some tea-bag fragments to add texture around the edges. The Pea Green Boat was coloured with acrylics, diluted with acrylic glazing fluid and touches of water-colour pencil.


How regal the Pussycat became as I gathered calico parts and little broken jewellery pieces to add. The Owl, the love of her life, became a troubadour, singing to his feline lady of adventures in undiscovered lands. From the day she first heard his beautiful music throughout all their adventures together, the Pussycat wore a tiny miniature of him around her neck, along with her jewelled carved cross. Thank You so much for stopping by today. I hope this Autumn will be a golden time for you. If you're planning craft projects now the days are shortening, do pop over to the Calico Shop where you will find so much to inspire you!
Calico Craft Parts in this Project
Plain ATC Wood Blank with Boat on Waves frame
Word Elements Travel and Explorer
Fleur de Lis Cross style 2
Hearts mini Greyboard shapes

Wednesday, 20 September 2017

Ahoy There Me Hearties : by Jennie

Hello! and welcome fellow pirates (and crafters!) ..... 


I have always been fascinated by ships in bottles and we have quite a few here at the house collected over the years. When I saw this little wine bottle I thought I would try to create a ship "on a bottle" instead as that is probably the nearest I am ever going to get to making one!


If like me you like altering bottles, it is worth looking at some of the "mini" bottles of wine in the supermarket. This was a small bottle of Mateus Rose - I can't say that the wine was very great but I did like the shape of the bottle!

The fact that it has a nice flat rounded shape meant I could add embellishments without them standing too proud.


After being coated with the brown acrylic paint I then used a palette knife to add DecoArt Crackle Paste over the body of the bottle. I wanted a thicker finish than usual and using the palette knife achieves this.


I stamped some nautical images on tissue paper and added these over the crackle to add a few highlights - the crackle was nice but a bit bland!


And then the glorious pirate galleon! I did my usual dabbing of white paint over the sails - I always love how the burnt brown seeps through. The hull and masts got daubed with brown acrylic paint and I added a little gold here and there to highlight parts of the boat.

I absolutely love the wonderful new word elements and although it doesn't look as though I have done anything to it it has been coloured with a little brown ink and a light dash of gold paint over the top.


I finished off with some shells collected from beaches here and on the west coast of Scotland and some jute twine around the neck.

I really enjoyed creating this little bottle - it was a lovely size to work with and didn't feel too daunting in terms of decoration. Now I am off to the supermarket to see what others I can find! see you in the wine aisle!

As always thank you for joining me today.

Jennie x

Calico Craft parts used: