Well, of course there's still hope for those who "enter" this post...lol.
Hi, servus and welcome to "my" Monday over here at the Calico Craft Parts blog! I am so happy you're stopping by and today I would like to share with you my first Halloween make for this year. I have finally taken the time to create a little Haunted Mansion and when I found Calico Craft Parts' latest Halloween Mini Wood Shapes I knew these were the perfect size to decorate my finished house and thus turn it into a haunted one - not just an old looking one ;)
There are billions of posts out there who show (much better than I could) how to create these gorgeous little houses - so this post is all about turning them into spooky mansions by adding some ghosts, bats, crows, a spooky tree and a little graveyard - and not to forget about a pumpkin or two ;)
So here's my finished Haunted Manor and these are the Calico Craft Parts I used for decorating:
I played around and picked my favourite Mini Wood Shapes from the sheets...
...to build a little graveyard behind a spooky tree...
...I picked some bats and ravens to have them flying around the house...
... a little pumpkin to sit beside the doorstep...
...and of course I needed some ghosts (or who else would be able to do the "haunting job"?)...
...and last - but not least - I wanted some ravens to sit in the garden and not be impressed by any of the spooky sounds or sights...
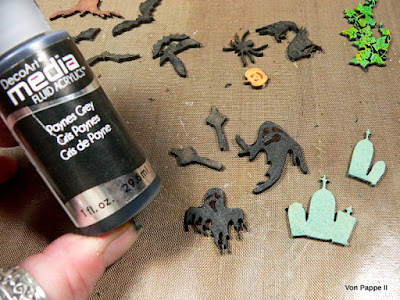
The Mini MDF Wood Shapes were painted using DecoArt media acrylic paints, Neon paint, Antiquing Creams and Americana acrylic paints....I mixed and added layers, wiped back, added more, dabbed off,....until I was content with the look. The MDF gladly takes a lot of heavy mixed media trying, wiping off and re-trying....lol.
To paint the Word Element I mixed a bit of Americana Neons orange paint with white media Antiquing Cream and applied it as a wash on top of my Paynes Grey base coat I had already painted most of the Calico Craft Parts with.
To finish the sign off, I finally went in with pure orange Americana Neons paint and let it seep into the letters. Then I wiped off the excess with a soft cloth. This way the paint in the letters remained and made them more visible.
I used an old sturdy book cover as a base for my house to sit on and added some glued on die cut tiles as well as a generous coat of texture paste where there should be grass later. I let that dry thoroughly...
...before I sprayed everything with Carbon Black DecoArt media Mister...
Once that had dried I used DecoArt media black Modeling Paste and a palette knife to glue the tree, the crosses, grave stones, fence and ravens in place. I let that dry overnight.
Then I dry brushed the grass with different shades of greens.
The path from the garden gate to the doorstep was highlighted using white and patina green DecoArt media Antiquing Cream that I wiped off the tiles with a soft damp cloth once the Antiquing Cream had dried.
The painted Ivy garland and spider were glued to the house using matte Decou-Page.
The ghosts were glued directly to the house as well, while the bats and raven were added using thin black wire...
Again I used the black Modeling Paste to fix the wire that I had first bent into tiny loops at one end to the backs of the bat and raven wood shapes...
Once the Modeling Paste had dried I bent most of the other ends into U-shape and inserted these into the chimneys. One bat was fixed to the house by inserting the pointy wire end below one of the roof tiles strips.
Moss from the home decor shop was added to form some hedges and bushes. The Word Element "sign" was hanged to the fence using short pieces of wire. Et voilá!
I love how Calico Craft Parts' Halloween Mini Wood Shapes make the house look the two storey high building it really is! They're just the pefect size! And the two little ghost fellas are just too cute, aren't they?
Thank you for stopping by and happy Halloween crafting!
Claudia
xxx


Amazing Claudia ! thank for the tuto.
ReplyDeleteSimply FASCINATING!!!
ReplyDeleteWhat a treasure!!
<3 Thank you, Brigitte and Susi, for the lovely comments! XXX
ReplyDeleteOh I love this!
ReplyDeleteJust spooky enough to be delightful Claudia!!! What a work of art - an heirloom treasure. Just WONDERFUL in every way. And so perfectly done too. The ghost up the highest made me giggle a bit - his mouth is so cute!! You should be soooooo sooooo proud of this SPLENDIDLY SPOOKTACULAR creation. Xj.
ReplyDeleteAmazing work, Claudia! The detail and atmosphere is just fantastic! xxx
ReplyDeleteThank you so much for the kind words, bkazoo, Joi and Julie Ann! You made my day! xxx
ReplyDeletethis is definitely fabulous!!
ReplyDeleteJaw droppingly stunning x
ReplyDelete:) Thank you so much, Lisa and Jennie! Hugs! xxx
ReplyDeleteWow, wow and Wow Claudia!!!!
ReplyDeleteWhat a fabulous Halloween project and decor, I absolutely ADORE this on... marvelous (and wonderfully spooky!!! :D)
Thank you for the great tutorial, too. xxx
Thank YOU for the lovely comment, Coco! Hugs! XXXX
DeleteWicked! 🎃🎃🎃🎃
ReplyDeleteI love your haunted mansion. Halloween is all year long for me! Lol.
ReplyDeleteLove the house. Making a haunted house and looking for ideas. How did you make the trees with the moss?
ReplyDeleteI used Irish Moss and inserted a short piece of a tooth pick covered with glue at the very bottom, wrapped the moss around and let it dry. If the moss tends to unwrap, you can also use some green thread to keep it in place around the tooth pick.
Delete