Friday 31 August 2018

Steam powered music box by Zuzu

I've had a go at decorating one of the beautiful little round box kits. Every time I see it in the shop it reminds me of 'The magic roundabout' or the 'Camberwick Green' music box,


No surprise that I gave mine a vintage steampunk sort of a look. I used large vintage thread reels to elevate it and give it a raised centrepiece.

I love the raw colour of the craft parts so I utilised that by cutting out suitable papers roughly to size and gluing them on to the side parts.


Then I sanded the edges before inking with a vintage sepia colour.


Then I assembled it according to the pdf instructions on the shop webpage.


Once its all together you are instructed to put the dowling through the little hinges and catch.

Now this is the point that, if you're anything like me, you read the word dowling and think "OH!!! THATS what those were." while refering to some little bits of wood you found on your desk and either threw them out or put them "somewhere safe" then forgot where...

Not to worry. you can use a coctail stick or a match or something. I shaved down a scrap off of the left over section from the kit.

When I had the box assembled I simply glued lots of interesting bits on the top, making sure to only glue to the lid section so that it would still open.
I've used one of the steampunk mini sheets as well as random single cogs and a steam train a bit like Stephenson's Rocket.


To complete the look, I popped it into one of the large glass domes you can buy in Ikea and labelled it using one of the word elements from the Apothecary sheet.


Simple to make but a lot of fun... see you in two weeks.
Z x

Wednesday 29 August 2018

George the Pterodactyl - by Lesley


Hey there everyone. A couple of years back I introduced you to Norman, he's HERE if you want to say hello.

Norman has appeared on the blog quite a few times over the past couple of years in various shapes and forms. This week I would like to introduce you to his friend, George the Pterodactyl. 


George started off as a little lump of wood that I found in my basement. His head was taken off a Halloween decoration which accidentally came home with me from work last year. :)

Using some clay I modelled his head and neck onto the wood and then secured a brass water type fitting thing-y around his neck and let it all go off. With the remaining clay, I used it to attach some wings onto the back of George.


Once it was all dry, I set about painting him. I used a graphite grey, a blood red and a touch of purple and dry brushed him until he was covered.
Using the pipework maze add-on sheet I decorated his body with the tiny bends and connectors. These were then heat embossed with a mixed media embossing powder.


I finished by adding a few touching's of silver wax and then added some veins to his head in black ink. 


I'm thinking that George needs to have a home, or a perch, so watch this space to find out  what happens to him.


Thanks for reading,
 L. x

Ingredients used:


Sunday 26 August 2018

Autumn Washi Tape Cube by Julie Ann

Hello Everyone! This week I'm back at Calico Craft Parts with a storage cube to stack up beside my other storage pieces I created a while back.


As we are drawing to the end of summer, this little storage cube has Autumn inspired colours and craft parts.


I decided to use one of the square aperture Artist Trading cubes to keep Washi tapes that I'm using currently close at hand on my desk. My favourite part of the whole process is gathering scraps of paper and art work that will coordinate and be appropriate to my theme. I really liked the effect of this tissue applied with fluid matte medium over my collage.


No scrap is too small to be kept for layering onto future projects.


Washi Tape and scraps of sentiments from previous projects along with more paper scraps all help to build up layers. Calico Craft Parts are then perfect to top off the project. Here I combined 2 different leafy parts, painting them in Autumn shades.


There are so many beautiful Calico leaf shapes - these are the Sugar Maple leaf and twig.


Here I combined the Sugar Maple leaf and twig with the Mini Sugar Maple. It's really fun to mix and match the craft parts. They take all kinds of paints and media, while still looking terrific just as they are!


Early Autumn always seems a meeting point to me, when we reflect on the past glories of the Summer, look about us at the array of Autumn colour and anticipate the dramatic silhouettes of winter trees against red and gold sunsets.


The cube is just for a small selection of tapes. The spool inside the aperture forms the perfect anchor for 3 coordinating tapes.


The cube is finished off with Washi Tape edging and Scrabble tiles covered in map paper and playing card designs. To add contrast I stamped across the top of the cube, embossing with a white embossing powder.


Now as the shorter days approach and it's time to get crafting for Christmas, I shall have a ready supply of tape on my desk to add to my projects.
Calico Craft Parts used in this project
Square Aperture Artist Trading Block (medium sized)
Sugar Maple Leaf and Twig
Mini Sugar Maple Leaf and Twig
Skeleton Tree, Style 8
Blackberry Bramble MDF shape

Saturday 25 August 2018

Welcome by Kerstin

Hi crafty friends!

The time is right for a new inspirations with some absolutly awesome new wooden shapes from Calico Craft Parts. Today in the focus: the genius anchor.

 In memory of a wonderful summer vacation last year, where we had rented a holiday apartment by the sea, this Shadow box was created. I also liked the flat so much because it had an individual touch and welcomed the holiday-makers with home-made things. 
I used a shadow box similiar to this one Birch Plywood Box Frame Kit Size: S , old book pages, and stamps (stars and saying). The frame was done with white crackle paint from DecoArt and afterwards coated with Antiquing Cream Patina Green and Carbon Black.
I wanted a background in grunge style, therefore I also used Distress Ink 'Walnut Stain'.


 some details


 The anchor was primed with Texture Sand Paste (DecoArt) and then painted with some acrylic Fluids, because it was meant to get a very old and used look. In order to make the telescope better visible again, I finally used a black fineliner.


 the WELCOME word was embossed with white Embossing powder,
I love this look, because it looks like sea sand


for an effective 3D look I used a Silicone glue, so the anchor could stand diagonally 
and utilize the spatial depth of the Shadow box


Two posibilities, you will have it in your hands to decide, 
with or without painting?
that's the question :-)! 
Many thanks for your visit and attention!
Happy crafting!
Kerstin

Wednesday 22 August 2018

Faith is Like a Lily (Christina Rossetti) by Jennie

Hello and welcome!

Today I am sharing a quick project which was really fun and relaxing to create. 


I have had this gorgeous lily in my stash for quite some time and didn't think my painting would do it justice. But I decided to give it a go as at the moment I have a number of beautiful lilies flowering in the garden and wanted to be able to remind myself of their beauty later in the year.

Christina Rossetti's words were in my head while I was painting:

Faith is Like A Lily,
Lifted High and White.

from the poem Hope is Like A Harebell


The flowers were painted with gesso, a watery coat first, then building up a little more at a time so as not to lose the gorgeous engraving. I didn't mind the brown of the base showing through here and there as it all adds to the ethereal feel!

The leaves were painted in a similar way with a sage green chalk paint, keeping everything as light as possible.


For my background I chose a Calico Craft Parts Beer Mat which was painted in the sage green chalk paint and again got light coats of watery gesso, building up each layer slowly to give a distressed finish. Finally a little over stamping with a text stamp here and there so as not to overwhelm the lily.


A soft and gentle little coaster which would make a lovely front for a card or mini book. I actually rather like to have seasonal coasters propped up here and there on my kitchen dresser to remind me of summer days.

As always thank you for joining me today and happy crafting!

Jennie x


Calico Craft Parts used:


Monday 20 August 2018

Diver's Deep Sea Surprise - by Claudia

Hi, servus and welcome back to another "Claudia Monday" over here on the Calico Craft Parts Blog!
I have much enjoyed my holidays at the lake but am also happy to be back in my studio (even though I still need to sit in front of a fan due to the extreme temperatures)...aaand I have already learned my first lesson after the summer break: do NOT reorganise your craft space shortly before you leave on holidays for several weeks. You won't find anything after you have returned. lol


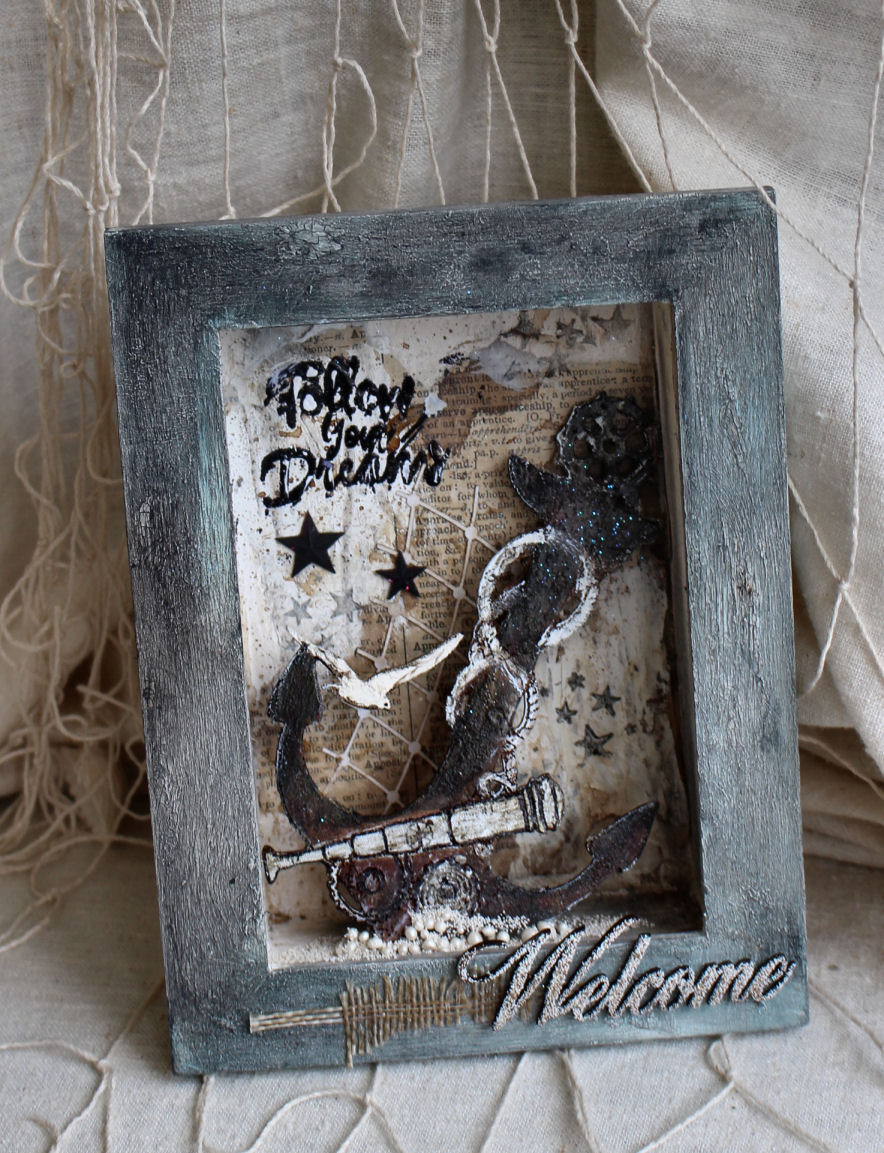
So I had to put on my diving helmet to go searching for a lot of stuff I thought had been put in much better places than before. Nah! Just kidding....this is a detail shot of today's project of course. ;)
The idea for this project suddenly evolved when I looked at some of the stuff on my crammed desk that was waiting to be stored away and suddenly my mind started combining bits 'n pieces from the different piles...and as often happens when I find an awesome surprise craft part in my design team package, I changed my mind and put the already chosen pieces from my stash box to the side, because I just HAD to use this fab piece as my focal point and I had to use it NOW!

Honestly  my last order for future Calico Craft Parts design team projects mainly consisted of a collection of my beloved mixed media greyboard blanks (ATC blanks, smaller tiles and mixed media boards in various sizes), but lovely Helen also included some extra surprise goodies (like she always does) and one of them was a really cool (and I mean REALLY cool!) Deep Sea Octopus Diver with a divers helmet which I immediately fell in love with!


The other bits I picked from my desk were ...


...the newly bought Tim Holtz die and 3D embossing folder to create planks with, some gift wrap paper and paper embellishments with some beautiful script print on them. Oh, and some pieces of (fake) drift wood from the sales section of a home decor shop (which I forgot to add to this picture).

And this is what I have made from them:


Calico Craft Parts used:

- Deep Sea Diver Octopus - MDF Wood Shape
- Rounded Rectangle Greyboard Mixed Media Board - Style 18
- Coral - MDF Wood Shape - Style 3
- Coral - MDF Wood Shape - Style 6


Of course I had to play with my new dies and embossing folders!!! The Tim Holtz "Planks" die and the "Lumber" 3D embossing folder were must-haves of course.

I first die cut the planks and then ran them through my Big Shot using the embossing folder. The result was absolutely stunning! I followed Tim's advice to mist the cardstock with water from both sides before embossing them and to run them through three times  (Tim says: "3D means 3 times").


Then I painted the plank I was going to use with DecoArt media Titan Buff fluid acrylic on both sides.


Once that was dry I dry brushed the front side with several layers of different mixes of Titan Buff and Prussian Blue Hue fluid acrylics.


Next I added a wash of DecoArt media Raw Umber Antiquing Cream to my plank.


I added two more layers of the Antiquing Cream, then heat dried the plank and blended the edges with dark brown archival stamping ink (using a cosmetic sponge with a tip).


I used matte DecoArt Decou-Page to glue the greyboard mixed media board to the backside of the gift wrap paper.


Once dry I sanded off the excess.


The octopus got primed with a layer of white DecoArt media Gesso that I applied using the dry brushing technique to not lose any beautiful detail.


Once that had dried, I started with washes of DecoArt media Prussian Blue Hue and Quinacridone Gold, adding them loosely for a first layer to start from.


Then I used a fine detail brush to add some shading and detail with more paint. I only used Titan Buff, Prussian Blue Hue, Quinacridone Gold and mixes of the three tones to add shades and highlight details. The final touches were added with a white gel pen.


To make all the pieces match in colour, I added washes of Prussian Blue Hue to the plank and the background panel.


Then it was time to add some interest to the background! I glued on some script circles, added some doodling with a white gel pen and a black watersoluble pencil and a wet brush...


.
..and before I applied a layer of thinned Titanium White DecoArt media Antiquing Cream, I sealed the background with some matte spray sealant! 


The paper had crumpled a bit, but that added to the driftwood look beautifully - a happy accident! Yay!


So these were my components once all the parts were done - the painted octopus diver, the background, two painted Calico Craft Parts corals (with a quick coat of Quinacridone Gold on one and a mix of Titan Buff and Quinacridone Gold on the other), a piece of fake driftwood that would make a perfect stand for the panel, my self made paper plank and a stamped and cut out quote.


I used matte Decou-Page and sticky foam pads to assemble the pieces.


Et voilá! 


I hope you like it as much as I do! Here come some detail shots as well: 


Thanks for stopping by today - and for reading this far! I hope you have enjoyed your visit! 

Hugs and happy crafting!
Claudia
xxx


go shopping: