Hello!
Did you know you can make fancy schmancy Christmas ornaments from ATB cube kits? You can!!!
(apologies for the first pic.... getting these to stay perfectly still whilst you take pics isn't easy)
All I did to the cube was to cover it in music paper, then glue on some snowflakes! The trickiest (ish) part is sorting out the hanging parts!
First, you need to grab a bit of wire and make a loop..
push the wire through a bead ....
then bend it back on itself and trim...
I glued three circles together..
Then glued the bead to the top. Simples!
For the bottom hanging part, I then added extra beads, and finished with a star...
This then can get glued to the underside of your ornament..
A second bead/wire/circle combo then needs to be created, and glued to the top so you can hang it up!
The snowflakes were given a bit of gilding with foil flakes...
I hope you like it.... so many uses for a cube lol!!
Trish xx
CCP parts used:
Small cube
Snowflakes
Circles (plus the middle 'waste' from this cogs sheet)
Stars
Thursday, 19 November 2015
Monday, 16 November 2015
Take flight with Craft Parts by Astrid
One of the things I love about Craft Parts is that they can be used in so many different ways. If you are a regular here (and trust me you should be), - you will have been spoiled with all the stunning Christmas pieces lately. Do scroll back, you will not be disappointed.
Anyway, I decided for this project to do something non Christmassy, but it did turn out wintry, so here goes:
A journal page using some of my left over Steampunk Craftparts.
I have a few process photos, so here goes:
I created a background with the help of some gesso, sprays, washi tape, background stamping and some Decoart Crackle Paint.
I just love how a little crackle here and there just adds so much more interest to any project really, specially when combined with paints and sprays.
I picked a selection of Craft parts, the steam punk elements I mentioned already and also a little crown and some wings from the mini wood shapes, you can find all of them HERE
First I coated them with clear gesso. When that had dried I went over them with Decoart Crackle glaze and finally when the cracks had appeared I dabbed on some white paint and Metallic Lusters. I am sorry the real effect just does not show up on the photos, as the days are so dark here at the moment, it's almost impossible to get any decent picks...
I added a vintage gentleman and some glittery snowflakes, the Take Flight sentiment all just to fill in some of the gaps.
Below are a few close up photos still:
A few micro beads where added to the steam punk clock. This piece actually looks brilliant just as it is, and sadly with all of my altering I lost some of the gorgeous detail. You can check out the original here.
Anyway, I decided for this project to do something non Christmassy, but it did turn out wintry, so here goes:
A journal page using some of my left over Steampunk Craftparts.
I have a few process photos, so here goes:
I created a background with the help of some gesso, sprays, washi tape, background stamping and some Decoart Crackle Paint.
I just love how a little crackle here and there just adds so much more interest to any project really, specially when combined with paints and sprays.
I picked a selection of Craft parts, the steam punk elements I mentioned already and also a little crown and some wings from the mini wood shapes, you can find all of them HERE
First I coated them with clear gesso. When that had dried I went over them with Decoart Crackle glaze and finally when the cracks had appeared I dabbed on some white paint and Metallic Lusters. I am sorry the real effect just does not show up on the photos, as the days are so dark here at the moment, it's almost impossible to get any decent picks...
I added a vintage gentleman and some glittery snowflakes, the Take Flight sentiment all just to fill in some of the gaps.
Below are a few close up photos still:
A few micro beads where added to the steam punk clock. This piece actually looks brilliant just as it is, and sadly with all of my altering I lost some of the gorgeous detail. You can check out the original here.
Mechanical wood shapes style 3 are used as a corner piece
The crown and wings. Love how the wings nestle perfectly around the little crown.
And finally the good ol' gentleman, fussy cut from a cabinet card with some shadows added for dimension.
Well, that's it for today. Thank you for your visit and hopefully see you soon again.
Saturday, 14 November 2015
Woodland Winter Scene: By Zuzu
I decorated the front of a canvas for a DecoArt project and thought it might be nice to have a reversible canvas so I cold alternate which side was showing.
Because i love the calico Craft Parts in their natural wood form, I decided to try and make something that complimented that.
I stained the raw pine wood of the frame with some Decoart raw umber acrylic paint watered down so it blended in better with the Craft Parts. Then I covered the back of my canvas with thin wood veneer by cutting sections out of a sheet (you can get these sheets in hobby shops and on line). I also stained that with a watery wash of 'raw umber' and then a little touch of 'quinacridone gold' for a touch of warmth.
Next I painted the inside of the canvas "sky" with 'Primary Cyan' and dry brushed some 'titanium white' on it when it was dry. I also sprayed a little of the Decoart mister (white).
I added some Decoart 'snow-tex' in and around it as well as using it to put snow on my trees.
after then gluing my trees into place, in a 3D manner, I finished it all off with a sprinkling of Glamour dust glitter and a piece of bark from my friend's (Carol F) tree.
Although the photos don't show it, this snowy scene twinkles like frost in the light. I am actually quite pleased with it. it was so simple, as the craft parts do the work, but so effective.
Calico Craft Parts used:
Winter tree scene style 2
Winter tree scene style4
Winter tree scene style5
Thanks for visiting.
Z x
Because i love the calico Craft Parts in their natural wood form, I decided to try and make something that complimented that.
I stained the raw pine wood of the frame with some Decoart raw umber acrylic paint watered down so it blended in better with the Craft Parts. Then I covered the back of my canvas with thin wood veneer by cutting sections out of a sheet (you can get these sheets in hobby shops and on line). I also stained that with a watery wash of 'raw umber' and then a little touch of 'quinacridone gold' for a touch of warmth.
Next I painted the inside of the canvas "sky" with 'Primary Cyan' and dry brushed some 'titanium white' on it when it was dry. I also sprayed a little of the Decoart mister (white).
I added some Decoart 'snow-tex' in and around it as well as using it to put snow on my trees.
after then gluing my trees into place, in a 3D manner, I finished it all off with a sprinkling of Glamour dust glitter and a piece of bark from my friend's (Carol F) tree.
Although the photos don't show it, this snowy scene twinkles like frost in the light. I am actually quite pleased with it. it was so simple, as the craft parts do the work, but so effective.
Calico Craft Parts used:
Winter tree scene style 2
Winter tree scene style4
Winter tree scene style5
Thanks for visiting.
Z x
Thursday, 12 November 2015
The Different Faces of Christmas by Lesley
So, Halloween is done and dusted for another year, which can only mean one thing........the "C" word is on its way!
There are oodles of goodies in the shop, and one of my most favest are the little gingerbread men. They are far too cool! To begin with i wanted to do a Christmas piece, then when i sat down........i didn't! In the end i came up with something that is not Christmassy to look at but indeedy is all about Christmas!
And the second face of Christmas is the Tired face. This usually kicks in about 8 Christmas day evening. Hence the "pooped" wording!
And the final face of Christmas is the "gutted" face. This usually occurs on Boxing day morning when they realise that all presents have been opened and its another year until the next Christmas! ha ha!!
Now......i had one ATC left on my desk, so had to use it right?
This is my face currently!Its suddenly dawned on me that i haven't even thought of presents, let alone bought any.......hence the "sad" face!
And that is the faces of Christmas in my house!
I urge you to go over to the shop, and snaffle up some Christmas stuff. And if you use the gingerbread men, please post your pics on the Calico facebook page......would love to see what you do with them!
Thanks for reading.
L.xx
Ingredients used
Mini gingerbread men
Mini star wreath
Mini jagged plaques
Arched ATC with frame
Plain ATC with frame
There are oodles of goodies in the shop, and one of my most favest are the little gingerbread men. They are far too cool! To begin with i wanted to do a Christmas piece, then when i sat down........i didn't! In the end i came up with something that is not Christmassy to look at but indeedy is all about Christmas!
I created three ATC's using the gingerbread men to describe what my twinnies are like over Christmas!
The bases were all primed with white gesso, and i then dry brushed some red paint over and then when it was dry i added some tangerine coloured paint. Once this was dry, i added a touch of burnished gold paint. The same was done to the frames.
Using different stencils and white paint, i decorated the base of the ATC's, and added a few touches using a gold acrylic paint pen. The wee gingerbread fellas were painted with the same burnished gold paint and highlighted with a black pen.
So......the first face of Christmas for my twins is major excitement obviously! These little guys look like they are doing jumping jacks in excitement.........
And the final face of Christmas is the "gutted" face. This usually occurs on Boxing day morning when they realise that all presents have been opened and its another year until the next Christmas! ha ha!!
Now......i had one ATC left on my desk, so had to use it right?
This is my face currently!Its suddenly dawned on me that i haven't even thought of presents, let alone bought any.......hence the "sad" face!
I urge you to go over to the shop, and snaffle up some Christmas stuff. And if you use the gingerbread men, please post your pics on the Calico facebook page......would love to see what you do with them!
Thanks for reading.
L.xx
Ingredients used
Mini gingerbread men
Mini star wreath
Mini jagged plaques
Arched ATC with frame
Plain ATC with frame
Monday, 9 November 2015
Filigree Verdigris Baubles - by Alison
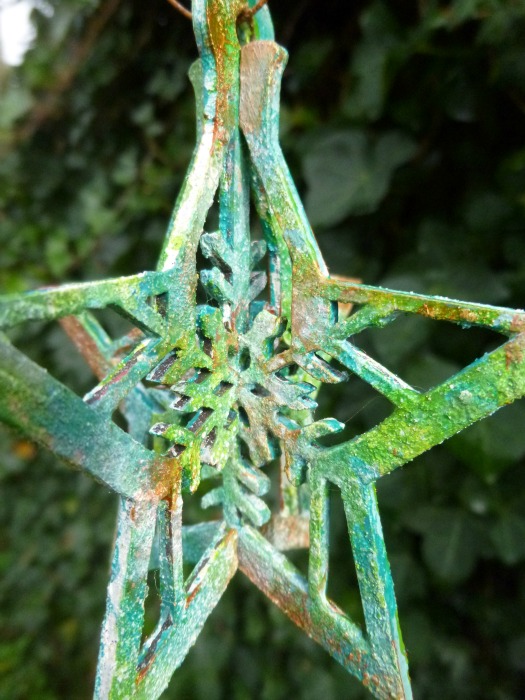
Hello all, Alison here with some weathered Christmas decorations. I've been playing with some of the new Christmas Calico Craft Parts - but I'm never one to go for new when I can create something a bit older! There's a wealth of new Christmas designs available, and today I've got some of the 3D Baubles and Decorations for you.
My camera decided to steal most of my process photos, so I can really only show you the finished results, but if you want a "before" you can see the baubles in their unaltered state by visiting the shop. Just click on any of the links in the post and you'll go straight there.
I had a lovely time altering the filigree pieces with DecoArt Media products. One word of warning - you need to make sure you keep the intersections relatively clear of paint and mediums. If you have too many layers, the pieces won't join together any longer. (And yes, that's the voice of mildly bitter experience talking!)
First off I applied some DecoArt Texture Sand Paste quite randomly to the Craft Parts - I didn't want all over texture, just some weathered areas. Below is the lovely Snowflake Bauble Style 4 (and mine are all in the Medium size).
Once that was dry, I gesso'd over the whole lot and then started applying Antiquing Creams and Media Fluid Acrylics.
With the Antiquing Creams you let them dry, then wipe back with a damp cloth. This leaves great depth of colour around the textured areas. There's Patina Green and English Red Oxide somewhere in the layers.
The paint colours include Cobalt Turquoise Hue, Cerulean Blue and Green Gold. Above is the Snowflake Bauble Style 3.
The coppery areas were done by mixing Quinacridone Gold with Metallic Gold - layered over the areas which had formerly had some of the English Red Oxide Antiquing Cream on.
In between layers, I spritzed with the White Shimmer Mister...
... and at the very end I gave the whole lot a wash of Translucent White, which helped to dull the brighter colours and remove some of the glamour of the Metallic Gold!
I did have to sand back in the places where the pieces needed to slot together, but once that was done I added some rusty wire (but of course) to hang them up by. In the photo below you can see Snowflake Bauble Style 2.
You'll see that I hung them in last year's Christmas tree for a couple of the photos - it's still standing out in the drive and has turned a beautifully burnished shade of rust... perfect!
I hope you like my Filigree Verdigris Baubles, and I hope you'll be inspired to check out the Christmas Craft Parts now available, with more arriving every day it seems, so keep checking the Latest Products page too.
Thanks so much for stopping by and I'll see you again soon. Have fun playing!
Alison x
Words and Pictures
My camera decided to steal most of my process photos, so I can really only show you the finished results, but if you want a "before" you can see the baubles in their unaltered state by visiting the shop. Just click on any of the links in the post and you'll go straight there.
I had a lovely time altering the filigree pieces with DecoArt Media products. One word of warning - you need to make sure you keep the intersections relatively clear of paint and mediums. If you have too many layers, the pieces won't join together any longer. (And yes, that's the voice of mildly bitter experience talking!)
First off I applied some DecoArt Texture Sand Paste quite randomly to the Craft Parts - I didn't want all over texture, just some weathered areas. Below is the lovely Snowflake Bauble Style 4 (and mine are all in the Medium size).
Once that was dry, I gesso'd over the whole lot and then started applying Antiquing Creams and Media Fluid Acrylics.
With the Antiquing Creams you let them dry, then wipe back with a damp cloth. This leaves great depth of colour around the textured areas. There's Patina Green and English Red Oxide somewhere in the layers.
The paint colours include Cobalt Turquoise Hue, Cerulean Blue and Green Gold. Above is the Snowflake Bauble Style 3.
The coppery areas were done by mixing Quinacridone Gold with Metallic Gold - layered over the areas which had formerly had some of the English Red Oxide Antiquing Cream on.
In between layers, I spritzed with the White Shimmer Mister...
... and at the very end I gave the whole lot a wash of Translucent White, which helped to dull the brighter colours and remove some of the glamour of the Metallic Gold!
I did have to sand back in the places where the pieces needed to slot together, but once that was done I added some rusty wire (but of course) to hang them up by. In the photo below you can see Snowflake Bauble Style 2.
You'll see that I hung them in last year's Christmas tree for a couple of the photos - it's still standing out in the drive and has turned a beautifully burnished shade of rust... perfect!
I hope you like my Filigree Verdigris Baubles, and I hope you'll be inspired to check out the Christmas Craft Parts now available, with more arriving every day it seems, so keep checking the Latest Products page too.
Thanks so much for stopping by and I'll see you again soon. Have fun playing!
Alison x
Words and Pictures
Saturday, 7 November 2015
Snowflake Angel by Karen Hayselden
How fabulous to be invited back over here to create a little something with the amazing 'Calico Craft Parts' - and my fav time of the year too eeeeek! I have posted you the best of both, a tute and loads of close-up piccys (12 in all lol) so either go grab a cuppa 'n' sit back or simply peep through the piccys quick stix!
So after a peruse around the web shop and spying all the lush stash, i simply couldn't resist the 'Mini Xmas Wood Shapes' PRESS HERE to go check out these mini beauties, they are totally irresistible!
After some deliberation (lol) I went for the mini snowflake sets (oh dear!) all 3 sets hahaha they are just too 'itty bitty' darn gorgeous, no bigger than a 20 pence piece!
And I popped a larger snowflake in my basket too mdf style 3 - small I wanted to pop this larger snowflake in the mix so you could get the idea of just how delicate and small the mini's are!
All along I had in mind to create a 'special' Christmas card using the snowflakes, a 3 strand wired wreath covered with the snowflakes and (some of the mini mdf stars), a little crinkle ribbon, a lot of crackle medium, white gesso and in barely there soft cool hues of aqua, midnight navy and greys with a little black to bring it all to life!
But!
i had the urge to use the amazing and oh soooo Christmastime colour red hahaha!
And ta-dah! Snowflake Angel was born.
Next I filled in my Angel shape, wings 1st as they sit behind the angel -1st I gesso'd the snowflakes, then I painted in the wings with a turquoise colour then adhered the snowflakes over the dried paint, I layered them too and added the odd wooden button here and there, once dry I painted with the turquoise paint. (the large snowflake I gesso'd, applied a coat of DecoArt Americana Chalky Finish Paint in the colour Everlasting, when dry apply the fabulous DecoArt Crackle Medium and once again when dry apply a coat of the Chalky Finish Paint, I chose a contrasting colour this time so the crackles look more pronounced when they magically appear - my colour choice was Heirloom, All I did then was add a few gold flakes, dry brush white paint on the outer edges and pop a little silver glitter glue on the edges - a lone gem sits on one of the snowflakes tips too - to help the snowflake coordinate with my fairy, I took a wet wipe and lightly rubbed (not all over) a little of the same coloured paint I used for the frocks top bodice and arms)
The frock is created using up old strips of patterned paper, lace and fabric, cut to size. The petticoat are doodle circles over painted again and again (letting each layer dry) add gold flakes for a saucy sparkle. The bodice and arms are painted in a gold paint mixed with a matte gel medium, apply this in a thick uneven layer as where the arms join the thick consistency of the paint and gel help conceal these joins and make everything look soooo much better.
I outlined her face and features with a very fine 'waterproof' black ink pen, colourised and added the halo.
The snowflakes on the wings needed more depth so I added a golden paint and then a copper paint to their centres and touched up the edges with a drop of white paint and again I repeat the proceed till i'm happy.
I added gold flakes to various places (around the edges, on the frock, halo, petticoat) and ohhhh boy does this give an extra Christmastime feel as did the 'Artifacts' beads, flakes and glitters I applied to the snowflake wings to make them sparkle and come alive. I doodled all around the Angel wings/frock with a black pen and pencil, pulling the pencil out into the surrounding white space. Dry brushed the frock with gesso then added doodles in the frock with black pen and made some of the doodles 'pop' by adding dots of coloured paint to emphasise 'em. I also added a few hi-lights and shadows to the frock with dry brush painting,
Colouring pencils are great to emphasise any areas in the 'white space' that need a little more 'lift' I took an old credit card, dipped the edge in black paint apply the lines around and over the top of the gold flakes on the edges (tones down the glare of the gold and helps it to merge in) The bottom corners have more of the black lines than anywhere else as this helps to ground and balance the scene - the feet of the Angel are doodled/scribbles around for this reason too although you could get away with an angel floating (lol)
So now I have a snowflake angel I can bring out each year to enjoy, she stopping out from now though this year for me to enjoy (my hubby who never passes any comment said 'can't you do pretty - you always do quirky- kooky!' - soooo made me laugh and soooo pleased me - job done in other words!!!
Mwah xoxo
Kassa x
Subscribe to:
Posts (Atom)