

My camera decided to steal most of my process photos, so I can really only show you the finished results, but if you want a "before" you can see the baubles in their unaltered state by visiting the shop. Just click on any of the links in the post and you'll go straight there.

I had a lovely time altering the filigree pieces with DecoArt Media products. One word of warning - you need to make sure you keep the intersections relatively clear of paint and mediums. If you have too many layers, the pieces won't join together any longer. (And yes, that's the voice of mildly bitter experience talking!)

First off I applied some DecoArt Texture Sand Paste quite randomly to the Craft Parts - I didn't want all over texture, just some weathered areas. Below is the lovely Snowflake Bauble Style 4 (and mine are all in the Medium size).

Once that was dry, I gesso'd over the whole lot and then started applying Antiquing Creams and Media Fluid Acrylics.

With the Antiquing Creams you let them dry, then wipe back with a damp cloth. This leaves great depth of colour around the textured areas. There's Patina Green and English Red Oxide somewhere in the layers.

The paint colours include Cobalt Turquoise Hue, Cerulean Blue and Green Gold. Above is the Snowflake Bauble Style 3.
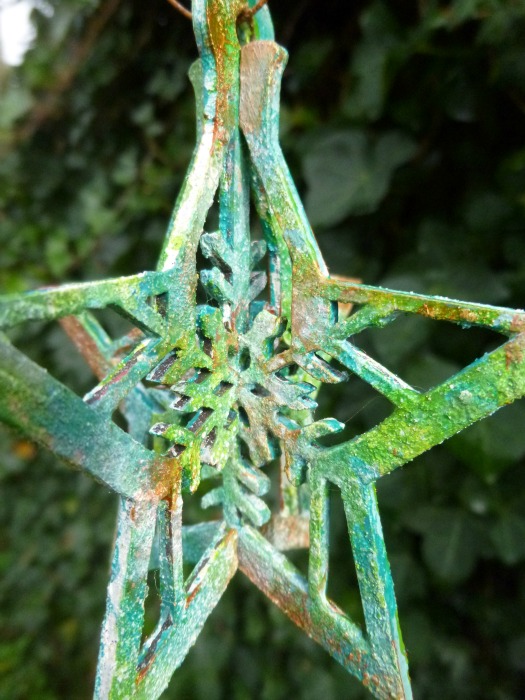
The coppery areas were done by mixing Quinacridone Gold with Metallic Gold - layered over the areas which had formerly had some of the English Red Oxide Antiquing Cream on.

In between layers, I spritzed with the White Shimmer Mister...

... and at the very end I gave the whole lot a wash of Translucent White, which helped to dull the brighter colours and remove some of the glamour of the Metallic Gold!

I did have to sand back in the places where the pieces needed to slot together, but once that was done I added some rusty wire (but of course) to hang them up by. In the photo below you can see Snowflake Bauble Style 2.

You'll see that I hung them in last year's Christmas tree for a couple of the photos - it's still standing out in the drive and has turned a beautifully burnished shade of rust... perfect!

I hope you like my Filigree Verdigris Baubles, and I hope you'll be inspired to check out the Christmas Craft Parts now available, with more arriving every day it seems, so keep checking the Latest Products page too.

Thanks so much for stopping by and I'll see you again soon. Have fun playing!
Alison x
Words and Pictures
These ornaments are exquisite! I love the patina/vintage effect, and am further entranced by the three-dimension aspect. Wow!! I am envisioning a holiday garland with these.... xxx Lynn
ReplyDeleteWow! They're fabulous! Lx
ReplyDeleteI obviously need to go back to the shop, as I had not yet spotted these.... They are fantastic in their natural state I am sure, but your yummy enhancements have really given them that special touch! Fabulous alteration and thank also for the warning re fitting them together!
ReplyDeleteThese are gorgeous!
ReplyDeleteAbsolutely gorgeous!! I had to laugh at the "mildly bitter experience" that's what happens when you are a media junkie! heehee
ReplyDeleteThanks so much for sharing Alison, I'm with you, making something-is much nicer!!
Jackie xo
Wow, your ornaments are great Alison! I love the colour and rustic tone of them, perfect vintage Christmas xx
ReplyDeleteThey are amazing Alison, they really looks like old rusted metal ornaments, your alteration is magic.
ReplyDeleteHug, Dorthe
these are so very pretty. i love the product and what yoy have done with them xx
ReplyDeleteOh wow Alison, you have used my favourites, Cobalt Turquoise Hue and Quin Gold - your baubles are gorgeous. The bauble in your tree from last year did make me smile! Anne xx
ReplyDeleteThese ornaments are so lovely. It's amazing what you do with paint !
ReplyDeleteCorrie x
These baubles are fabulous and the colour palette you used stands out against the dark green of the tree branches so nicely. Thanks for joining us at Anything But Cute.
ReplyDeleteHugs!
Cec
Wow! Really beautiful! I feel a spend coming on!!! Chrisx
ReplyDeleteWOW just WOW!
ReplyDeleteStunning results! Love all the beautiful textures and the way you layered the colours is a pure brilliance! Xx
ReplyDeleteGORGEOUS!!! Heading back to your blog to leave my comment. hugs :)
ReplyDeleteThese look wonderful & I know just what you mean about keeping the intersections clear!
ReplyDeleteSally
Positively stunning! You've really done these ornaments justice. Jenny x
ReplyDeleteThese are just beautiful - love all the colors you used - wonderful ornaments Alison! Julia xx
ReplyDeleteOne word: BEAUTIFUL! And I think I finally have all the DecoArt products you used! Now to get some of these baubles! These are so inspirational, Alison. And I'm happy to see you are getting some use out of last years tree for your photo shoot! A perfect backdrop for these patina'd ornaments!
ReplyDeleteWhat a beautiful effect and love the shapes, so delicate. Ruth x
ReplyDeleteThey are gorgeous!
ReplyDelete