Monday, 21 December 2015

Snowflake ATC - by Alison

Hello everyone, Alison here from Words and Pictures with a festive little ATC for you today.  I love the Calico Craft Parts ATC blanks, as you'll know if you follow along here, and this time I've used one of the decorative framed versions - so lovely to play with.


I started with a coat of DecoArt Media Fluid Acrylic in Titan Buff on the ATC Wood Blank with Snowflake Frame, and added a couple of spritzes of Media Mister in White Shimmer.  I then sanded back for a distressed look.


I painted the background with Raw Umber, and then used Distress Paints to create a soft blended look over the top.  The next layer was white-paint-stamped snowflakes, and then some clear-embossed music notation - which you only really get to see when you move it around.


I quite liked the frame as it was, but I decided I wanted some more texture, so I played around with some DecoArt Crackle Glaze, various Antiquing Creams and then some deliberate overheating with the heat gun.


I wanted texture and boy I got it!


The two little birds are actually remnants from another project which I've not revealed yet...


... but I couldn't throw away leftovers this pretty!


I hope you like my little Snowflake ATC, and I hope you're ready for the festive time ahead.


Here's wishing you all a peaceful and joyous Yuletide, and I'll see you here in 2016.

Alison xx
Words and Pictures

Thursday, 17 December 2015

Last minute decorations! By Trish

Hello!
I decided to add a little colourful sparkle to my tree... really simple and easy!


I covered the MDF bauble shapes with glitter embossing powder, then added acetate behind them. The acetate was coloured with alcohol inks to give the random, bright coloured look!
As it is acetate, the light can shine through! I took a pic with them on my tree...


I should say this is the tasteful tree, the main one is a riot of weird and wonderful kitsch...


 yes... that really is a Christmas guinea pig, and a pudding with googly eyes and a moustache :)

Have a fabulous Christmas and a wonderful New Year!
Trish xxx


Monday, 14 December 2015

Believe in the Magic of Christmas by Astrid

Hello all and welcome to the Calico blog! It's a busy time of year, so your visit is really appreciated!


As it's my last post  on the blog here, before the big day I created this little canvas to wish you all the most wonderful and magical Christmas.

I used the following Craft parts:

As you can see I used the reverse side of the canvas to create my little scene and I started by covering up the sides with some scrap paper to hide the staples and such.


Mitering the corners helps to make it a bit neater.


Next I added a thin layer of gesso over the edges and then I added Decoart Snow Tex to the bottom half and painted the top in Decoart Media Fluid Acrylics Paynes Grey.

Later I added some crackle antiquing cream and some more Snow Tex to the top half also and then covered the whole frame with matt medium and some bits of glitter. (Most of this got lost in the photos, sorry).

Now for the inside panel: I cut some smooth card to the right size to fit inside the frame and then created a kind of moon light landscape with the help of inks and stamps. 


Both the sledge and the tree scene were covered in Gesso, then painted in Paynes Grey and finally lightened to give the illusion of moon light hitting the edges.


The sledge is held in place with the help of a bit of strong card, glued to the back with a hot glue gun. It sits about half way towards the inside of the frame.


The tree sits right against the inside panel, I added some more Snow Tex around it to give the illusion of drifting snow.

Below some close ups still of the craft parts I used to embellish my piece. They were painted in glittery paints with loads of glitter added too, but like usual all of that got lost in the attempt to photograph them.


I love this particular font it's called Coventry Garden, but of course there are many different fonts available.


The holly sprigs and snowflakes on either side of the frame.

Well, all that's left to say is have the most wonderful Festive Season and stay creative!!!


Thursday, 10 December 2015

No tails.......but a top hat by Lesley

Oooooooh........not much longer until the fat bearded man pays us all a visit.....hope you have been good?
I've been playing around with a few bits and bobs making Christmas decs for the house. I'm not one for what i call 'normal' decorations, and prefer the more unusual ones. With that in mind......i made this.......


I began by giving the tree a watered down coat of gesso. Whilst the tree was in two parts and flat i heat embossed the hearts and stars, and then slotted the tree together. Do not paint the tree and try and put it together.......it ain't gonna happen!


Using red and white paint, i covered the entire tree. I then splodged on some light modelling paste with my fingers in random patches and sprinkled glitter over the top. 


It was looking far too sparkly for my liking after it had dried! So i took some gun metal grey paint and dry brushed it over everything. The sparkle is still there.......just not completely in your face!!


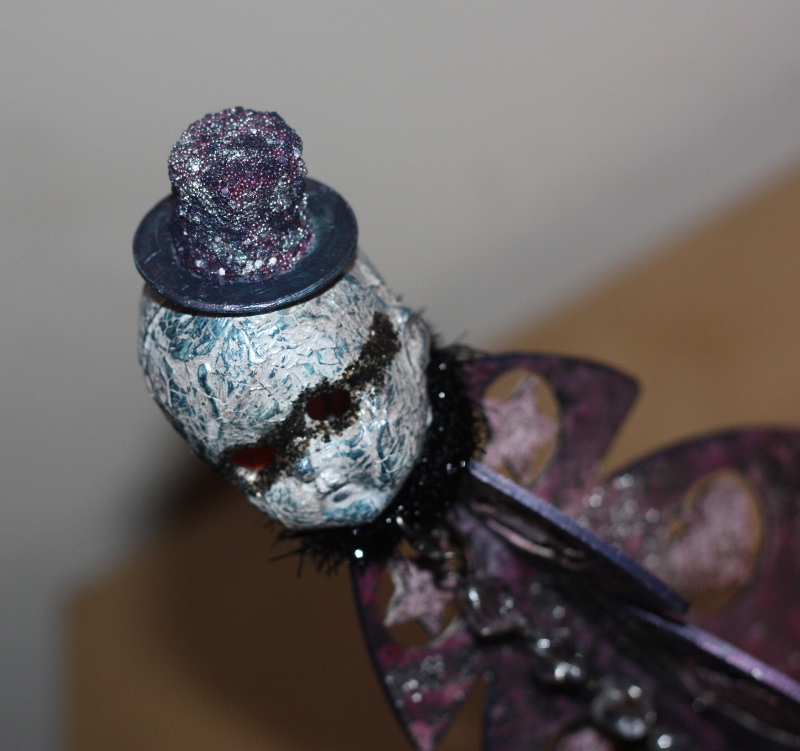
The dolls head was attached using some clay. She had a layer of crackle paint covering her head. Once dry, i rubbed in some purple wax cream into the cracks. Glitter was added to her eyes, and tinsel around her neck.


I've been itching to use this little top hat for a while! I painted it the gun metal grey colour and then added glue and little beads and glitter. And then glued it on at an angle. 


 I attached a long crystal dangly thingymebob to her tinsel to finish her off.


These trees are super sturdy and will take a lot of weight.
 I have used the largest of the sizes here........but i have a feeling that this madam will be having some children very soon!

Thanks for reading.

L.xx

Monday, 7 December 2015

Welcome Wreath Tag - by Alison

Hello all, Alison here from Words and Pictures.  For anyone who's a follower of mine today's post will come as something of a surprise!  My favourite Christmas colour palettes are either neutral or blue/brown but for once I've been indulging in the traditional red, green and gold.


It's all because of the fabulous Calico Craft Parts wreath which came as part of my order last month.  The moment I saw it I knew I needed to create a door for it to hang on, so I did.  This is the Seasonal Fruit Wreath Style 6, but there's a variety of designs to choose from.


I do like starting with a tag full of odds and ends that don't look like they'll amount to much.  For this one it's a couple of coffee stirrers, a pediment die-cut from Grunge Board, and some offcuts from die-cutting the window frame on my recent "window box".


I used a brick stencil around the edges, applying DecoArt Texture Sand Paste along with some regular texture paste and then adding layers of paint, ink and embossing powder until I was happy with the brickwork.


I worked out I needed a step at the bottom, and for that I used the window box from the window die, turned upside-down to make a nice elegant doorstep.  I painted all those elements white and also gave them a coat of DecoArt Triple Thick Gloss Glaze so that the door would have a nice look of gloss paint.


I did add some shading to the panels and other door elements - it just gives it a more lived-in look.


The wreath itself was a joy to paint.  I meant to take pictures at each stage, but I was enjoying myself so much blending the various colours of DecoArt Media Fluid Acrylics that I only managed the first one (a touch of Titan Buff for the pears).


Paints?  Well, lots of greens - Green Gold, Viridian, Sap Green - plus Diarylide Yellow, Yellow Iron Oxide, Pyrrole Red, Primary Magenta, Quinacridone Gold.  I think that's about it.


Once I was happy with the colours, I added a touch of the Triple Thick Gloss Glaze to most of the fruits - you get dimension plus a lovely glossy finish.


For the ribbon, I used the Media Fluid Acrylic in Metallic Gold to get a festive shimmer, though I warmed it up with a wash of Quinacridone Gold over the top.


And so that it would look like the same ribbon, I've used those same colours (as well as the Pyrrole Red plus Primary Magenta to do the stripes) on my banners for the words.  Ah yes, the words... they come from one of my favourite pieces of Christmas music, the Ceremony of Carols by Benjamin Britten.  Wolcum Yole is the first song after the Introit or entrance music.  This particular phrase, which is in Middle English (in use from around 1066 until about 1500), simply means "Welcome, Yule", welcoming the Christmas season, so it seemed perfect for a garlanded doorway, ready to welcome you in.


I used the Mini Alphabet Letters Copperplate Gothic to "write" the words, giving them the same paint and gloss treatment as the fruit on the wreath.


There's an Idea-ology door knob (I don't think these are intended as door knobs, but I find it hard to think of them as anything else, right from my very earliest crafting days!).


And since I'd covered up the hole in the tag with my pediment, I couldn't resist a bit of rusty wire to hang the whole thing up by.


I hope that's helping to get you in the festive mood.  If you're in a shopping mood, you can click on the product links in the text to make your way to the right bit of the Calico Craft Parts store... and watch out, there's a lot of tempting stuff there!


Thanks so much for stopping by, and I'll see you again soon.

Alison xx
Words and Pictures

Thursday, 3 December 2015

Angelic Art Doll: By Trish

Hello!
I couldn't resist combining two of my most favourite things... ATB cube kits and Art Dolls!
I give you.... the Angelic ATB Art Doll!


Her body is created from a medium and a small ATB cube kit. I've angled the bottom one slightly to give a less 'blocky' profile!
The blocks were covered in music print paper, then given a wash of white. A little stencilling with metallic silver paint was all the decoration needed...


Her wings were given the same whitewashed, stencilled look..


I created the heart from clay, then added wire and crystals....


More wire and crystals to create a halo, and also a decorative border to the bottom cube...


Her face is a fabulous Octopode image, coloured with watercolour pencils...


I hope you like her... she will be displayed somewhere where the light will catch her crystals, I reckon!
Have a fabulous Thursday!

Trish xx

CCP used:
Wings
ATB Cube Kits