Today I would like to share with you a project that is very dear to my heart as I made it to have a little keepsake to store some very old photographs of some of my ancestors' visit to the Großglockner glacier in. I can only imagine how adventurous and happy they must have felt and looking at these pictures always makes me feel kind of humble and also longing for some adventure too...
I had used copies of these pictures on a scrapbook page several years ago (it is this one HERE....well, actually rather a try to do some scrapbooking which I found isn't my thing) and on another project HERE and I have kept the scrapbook page but always thought I hadn't really succeeded in creating one but something different instead that I had no name for...until I stumbled over the box with the photographs recently and remembered that "page" and suddenly knew what it was that I had made back then and that I wanted to re-use it for a new project: a little keepsake book box embellished with my own "designer paper"!
Here's the image of the original "paper" I had made...

...and I remember I used copies of an old passport of my great-great-grandmother's, a portrait of my great-great-grandfather, some stamped images, brown Distress ink, white DecoArt Gesso and die cut cogs that I had coloured using DecoArt Metallic Lustres.
The perfect "designer paper" to use on my little book box keepsake! This way I could use the copies of the pictures I wanted to store inside on the outside!
Calico Craft Parts used:
- MDF Plain Cover Book Box Kit (small)
- part of an Ivy Leaf MDF Wood Corner Embellishment - Style 46 (small)
The size of my paper was perfect to cut three pieces from it that were to be used on the outer covers and on the inside of the front cover of the small book box.
I simply used the book box as a template to draw around, so I could cut along the drawn lines to create my three cut to size papers.
As I was going to cover up the slot for the closing mechanism of the book box I needed to cut it open again with my tiny detail scissors. I used a pokey tool to mark the exact spots.
Then I glued all three papers in place using matte DecoArt Decou-Page.
The result so far...
The edges of the glued on papers were blended with black archival stamping ink, using a piece of cut'n dry foam.
I had even enough paper left to glue it inside the glued on box frame! Yay!
The two layers of paper on the front cover's in- and outside added to the thickness of the cover, so the little closure piece couldn't be used anymore...
...so I decided to make my own closure from black wire. I simply cut off a piece of wire and used round nosed pliers to form the ends as shown in the picture below.
The wire is very soft, so it can be bent close once it has been "threaded" through the MDF closure hook.
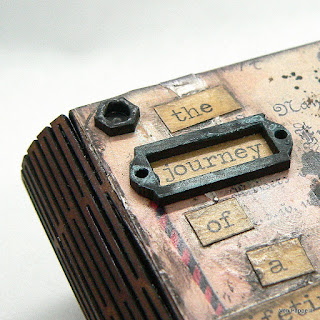
I also used some Calico Craft Parts from my "tiny parts box" to add a bit of dimension and depth to the front cover. A label and four washers and a left over snippet from an Ivy Leaf Wood Corner.
I glued these in place with matte Decou-Page and then painted them with DecoArt Matte Metallics Pewter and Dazzling Metallics Zinc using a detail brush.
I used my heat tool to cook up the still wet paint (usually a No-No of course) to create some additional worn texture.
Diluted DecoArt Carbon Black media Antiquing Cream was added on top of the painted bits and left to dry.
Afterwards I only partly wiped back the Antiquing Cream (using a damp cotton bud) to reveal a bit of metallic bling here and there.
Done!
As always some close ups:
and once more the finished book box:
If you have any scrapbook pages or other projects you have kept to re-cycle them on new projects making a book box keepsake from it might be worth a try.... ;)
I hope you like the one I've created and the tutorial too!
Hugs and happy crafting!
Claudia
xxx


Ein wunderbares Recyclingprojekt liebe Claudia, aber ich fand auch das Original echt großartig, eine spannende Zeitreise, die ich sehr genossen habe! Hugs, Kerstin xxx
ReplyDeleteAn amazing vintage box, wonderfully create and just perfect to keep your much treasured photos in xx
ReplyDelete