Hello Everyone and welcome on this last day of November - how the weeks and months seem to fly past!
We made a conscious decision recently to try and find storage in our house for the many bits and pieces that seem to get left around and I was looking for something to keep some of the little things that hover on the dressing table - earrings, a favourite brooch, necklace. All the things you wear quite regularly but don't seem to get put away.
I decided that the smallest of the lovely Calico Craft parts book/box kit would just fit the bill and so had great fun decorating it to (sort of) fit in with the colours in that area of the room.
The kit is very easy to assemble. I decided to put the box together first and then paint it as it wasn't too fiddly. I painted the insides all the same colour and scuffed it up a bit to make it look old!
Then the fronts got some crackle - I used DecoArt Crackle Paste with a palette knife as I thought this would be the easiest way of keeping that lovely spine. I was a bit haphazard about how I applied it as I wanted it to look distressed.
While the paints were out I painted some thick card with the same paint and then crackled a bit of it in order to cut out a leaf.
And then it was down to decorating the front - some of my usual suspects! and of course the lovely word element which got painted in the same chalk paint but then got sanded to look distressed.
I wanted to leave the inside with plenty of room to keep things. So a favourite photo on some torn book paper fitted the bill for the box.
And the opposite side a few more favourite elements and stamping.
Here are some more close ups:
I can't wait to play with one of these little boxes again and I already have a great idea which I will share next month. A little box like this would make a lovely present either for Christmas or a birthday and I am sure will be much loved by anyone receiving it.
Thank you for joining me today and I hope I have given you some ideas.
Over here in Austria children believe the presents are brought by Christ Child on the evening of the 24th December. When it's time for gift giving, the children have to leave the room with the decorated Christmas tree and wait outside until the Christ Child rings its bell which is the signal for them to enter and finally find their presents under the tree.
So I was very happy to find this lovely wood shape that shows Christ Child and its little angel helpers on a sleigh packed with presents and accompanied by forest animals. It's such a charming scene and I just had to use it to create a piece of Advent decoration for our home.
The project is a really quick and easy one. I started with "priming" my plywood plaque and the sleigh scene with DecoArt Chalky Finish paint "vintage".
Once the plywood plaque had dried I brushed on a thin coat of DecoArt Weathered Wood crackle medium.
While that was set aside to dry to the touch, I gave the star, word band and wings two coats of "lace" Chalky Finish paint.
Using dark brown stamping ink I stamped the "merry Christmas" quote onto the Word Element (I used a flipped over Word Element with a quote I wasn't going to use).
With my fingertip I rubbed on some DecoArt Gold Rush Metallic Lustre to the star, wings and edge of the stamped Word Element.
In the meantime the Weathered Wood had dried to the touch. So I gently brushed on a slightly diluted coat of "lace" Chalky Finish paint with a very soft wide brush. I let the paint dry naturally (which means I put it on the heating...one of the benefits of the colder seasons...drying times get reduced drastically ... ;)
Once everything had dried I rubbed on more Gold Rush Metallic Lustre around the edges of the plywood plaque and sleigh scene.
I used a brush to sprinkle diluted Gold Rush Metallic Lustre onto the plaque. And white DecoArt media Shimmer Mister was sprinkled onto the sleigh scene.
Before I glued the pieces onto the plywood plaque I gave the word band and sleigh scene each a coat of DecoArt "Ice Crystal" Glamour Dust for some Christmas bling.
Once that had dried all I had to do is fix the elements to the background panel with matte DecoArt Decou-Page. Done!
There are many other Reindeer and Sleigh Scene Wood Shapes to find at the Calico Craft Parts Shop! I am sure you will find one (or more) that you love!
I think we can now mention the "C" word........its nearly CHRISTMAS!!!!!!
And this week, i have little Christmas decs for you. So simple and easy to make as well.
I got these glass hanging jar type things last year, and made a few with my obligatory dolls heads in, and no, my twins did not let me hang them on our tree.
This year, i decided to add the sweet little houses from Calico, i just love these.
I started by gluing three together, leaving the roof's off.
Each house was then embossed with enamel powder.
I then glued the roof's on and added a coat of glaze glue and dipped them into micro beads and chunky glass glitter.
My idea was to then add numbers to them. Thought it was nice to personalise them with house numbers for folk. Only, i forgot to order the little numbers! So, at the moment, they are number free.
The houses were then glued to the inside of the lids. A sprinkling of glittery fake snow was added to the glass jar, and then screwed together.
Voila! Three little tree decorations!
Hello it's great to be at Calico Craft Parts and today I'd like to invite you to step inside a winter's world captured within a frame. For some time I've wanted to have a play with one of the Calico Craft Parts Birch Plywood Box Frame kits and I decided to just let my imagination lead me into this winter's tale. There is a list of all the Calico Craft Parts I used at the end of the blog.
As with all Calico Craft Parts, these box frame kits are really adaptable. They come with a glass panel, which you can slip in and out of the frame and you can change the arrangement if you wish. Because I wanted to create a winter scene the viewer could 'step into', I fixed my elements inside. I also preferred not to use the glass for the effect I wanted to achieve.
My imagination was sparked by these winter-themed napkins, which I tore and fixed with fluid matte medium to the back and sides of the box.
For a magical twilight mood, I blended thin layers of teal and light green acrylic mixed with an acrylic glaze.
I had been wanting to use one a little paper-clay head I'd created by making a mould from this German doll's head. You can see that at first I intended her to be a conventional Christmas angel, but I think she had other ideas!
She was much more of a Nature Spirit!
These beautiful window frames from Calico remind me of the glorious stained glass windows we saw on our recent trip to Belgium. I used Japanese paper and gem stones to try to create the effect of them glimmering in the winter evening.
I just used the outer frame rather than the two pieces with glass between and applied a crackle finish.
Winter worlds within worlds was my plan, so I created this little haven, watched over by a guardian angel fox. I had lots of fun creating ice and snow with ice-resin, gesso and acrylic paint dripped from a cocktail stick!
Putting the whole assemblage together was lots of fun and I reached for a few additional Calico details along the way! I wanted to keep the 'rustic' look of the plywood so I simply stamped in paint on the sides and then used a clear embossing powder to add a little dimension to the stamping, sponging the corners with white acrylic with a dusting of distress glitter.
Step through the frame and we're invited into a frost-bound world, but we don't have to be lonely or cold. The choir is singing carols and the sweet sound fills the chilly evening. Angel Fox invites us to join her by a cosy fire and listen to her stories before we step back into our own world.
I plan to display this little scene above my fireplace this Christmas, but the kit does come with the fittings for you to fix it to the wall. I hope you have been inspired to create your own boxes of winter delights to add a little Seasonal Magic this winter.
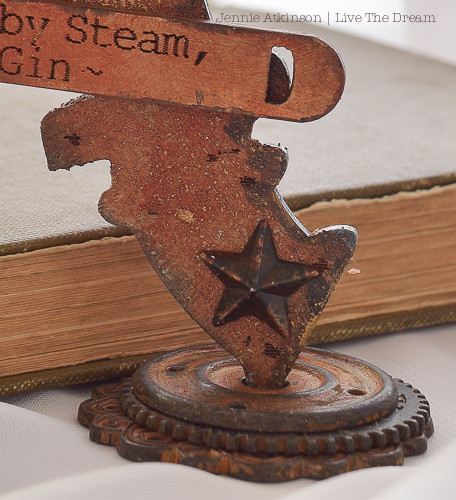
Something a little bit different from me today. I spent a lovely time going through all the Calico Craft Parts Steampunk/Mechanical and Ironmongery parts and decided to make a little project with one of the Steampunk letters. And of course it had to be A for Atkinson!
As Atkinson is very much a northern England name (although my father in law was very much a Cockney!) I thought this would fit quite nice with the steampunk theme.
The steampunk letter first got a coating of DecoArt Texture Sand Paste here and there and then a coat of a mix of DecoArt Paynes Grey mixed with a little Tinting Medium. I added some darker Paynes Grey here and there.
And then it was in with the DecoArt Quinacridone Gold splodging it here and there to get a rusty effect. I love how you can keep adding layers with a heavier hand to get a darker colour.
I love how it works with the Sand Texture Paste.
I hadn't intended to do much decoration, but thought this fabulous chap and his dog summed up an industrial age which I am sure the Atkinson's would have been involved in. I rusted a few mini cogs and added these under the photograph to give a bit of depth.
I thought this Word Element was particularly appropriate ! I rubbed more Quinacridone Gold with my finger on the Word Element and then added a little Paynes Grey around the edges to age it a bit. Before adding it to the background I did smear a little gold paint onto the sand textured areas to give it a bit of a glint.
Another close up of the rusting.
This turned out to be a very enjoyable project and I think it would work well instead of a birthday card for a male family member or friend. So .... another 25 letters to go!
Thank you for joining me today and happy crafting!
Yodeling is a very special form of traditional rural singing in Austria, Switzerland and southern Germany and as I am the Austrian chick on the DT I thought it was about time to create a piece that includes not only some yodeling but also a typical subject of Alpine landscape and folklore painting - a roaring stag in front of high mountain tops covered with snow and ice. Hollodero!
To explain how "dulijöh" is pronounced properly I can only give a kind of approach in phonetic spelling, as yodeling is a kind of singing where the singer changes rapidly between chest voice and head voice and there's no way to write that down exactly.
To "yodle" means to utter the syllable "jo" - or variations like jöh, jeh and others.
[doo - lee - yay] may come closest I guess. ;)
There are lots of other beautiful deer wood shapes to use for a similar project (or even create a little series of rural landscape wall boards). Click the link to browse Calico Craft Parts deer wood shapes collection.
I started with priming the oval shape greyboard with white DecoArt Acrylic Gesso. I used a wide bristle brush and made sure I created horizontal brush strokes only (as the lines' texture would look more natural with a landscape painting than vertical lines).
I used a landscape photograph as my model but changed proportions here and there so the mountain top and hills below would be in the right spots (and where's Bob Ross when you would need some help?!)
Well, I used a soft graphite pencil to sketch the landscape and mark the spot where the bellowing stag would be placed later.
I used mixes of DecoArt media fluid acrylics Titanium White, Cobalt Teal Hue, Cobalt Turquoise Hue and Cerulean Blue to paint the sky.
Then I went in with Quinacridone Gold, Burnt Umber, Green Gold, Sap Green and Viridian and painted the mountain and hills. I diluted the paints where needed to create lighter and darker areas from the same colour tone. At that point the texture from the brushed on Gesso started to add beautifully to the painting.
The trees to the left were painted with short quick vertical brush strokes and various greens. I always mix the colours I have on my palette to get additional tones for more depth. And the good thing is: as the mixes are always done with the already used tones, they all match perfectly and look quite natural.
To finish the background panel off, I painted a thin outline with Burnt Umber (which was also part of the mix that I used to paint the mountain rock).
The bellowing stag was painted using mixes of Titanium White, Quinacridone Gold and Burnt Umber. Carbon black was used to paint the nose and eye.
To make my stag more prominent I added a coat of DecoArt media Gloss Varnish.
I made sure the the colour of the grass to the stag's feet matched the grass on the painted hill!
The dulijöh plaque was primed with a mix of white Gesso and a hint of Burnt Umber. The red outline around the plaque and the dots around the background panel's edge were painted using DecoArt media Cadmium Red Hue.
I used a very fine detail brush to handwrite the dulijöh with diluted Carbon Black fluid acrylic.
Once the painted antlers were dry I added DecoArt media Liquid Glass to them for more dimension.
The finished plaque and stag were fixed to the background panel with stacked sticky foam pads.
Et voilá!
Some details:
Djo diri hollerei dulijöh!!!
So finally it's finished - yay!
I hope you like my little rural Austrian project! (As I can't yodel at all you're lucky there's no such thing as audible blog posts....giggle...but the Seven Dwarves can....)