Saturday 28 May 2022

Art Journal pages by Kerstin


Welcome creative friends!


Today some inspirations from my latest Art Journal,

 where I have presented recently the textile cover.

I played with stencils, stamps, paper cutouts

and used as 3d elements and eye candy 

MDF shapes from Calico Craft Parts.


used MDF shapes from Calico Craft Parts


Thistle Flower

 Rustic Post & Rail Fence Panel

Cabbage Butterfly & Flowers - Flora & Fauna Flourish Style 8


I hope you find inspiration!

Kerstin 


Wednesday 18 May 2022

Festival Time! Festival Heart by Kat Hazelton.


In Britain throughout the summer you will find a wide variety of festivals from big music concerts, country shows to smaller local fetes and fairs.  Fields become temporary homes to hundreds of tents, caravans and beautifully painted fairground attractions lit up with strings of pretty lights.  Big canvas tents are filled with stalls selling a wide range of treasures from vintage clothes, bric a brac, handmade crafts, yummy cakes and local farm produce. Often these tents and the surrounding areas of the fair are highly decorated with colourful bunting, balloons, cut flowers and pretty ornaments hanging from ribbons. Often reflecting positivity and love and created by local school children and craft groups. 

For this 'Kat Make' I have created a double sided Festival Heart. Perfect for hanging up at home or in the garden. 

If you are wanting to hang in garden please don't leave it out in heavy rain or cold conditions. 

To make a Festival Heart you will need. 


Acrylic paint. If you are wanting to hang outside then use waterproof/resistant paint and/or a waterproof coating. 
Paint brushes.
Glitters. 
Super glue. (especially if wanting to place outside)
Tacky or PVA. If wanting to leave outside please use a weather resistant glue.
Gem stones or sequins. 
Plastic or paper flowers. Remember use plastic if leaving outside. 
Ribbon or string for hanging.


Firstly I painted my heart shape with an undercoat of while matt paint. This helps to really bring out bright colours. I painted this side with bright neon pink, purple and blue.


I then painted my mushrooms in a matt black paint. Once dry I positioned and glued into place using super glue. I then glued on lots of fabulous glitter in various sizes. I then left this to fully dry. 


I then turned over my heart and repeated the same process. This time using a bright neon green and purple. 
Instead of glitter on these mushrooms I opted for gemstones which where attached with super glue. I then added swirls of glue which I glittered with bright green glitter to represent the beautiful summer grass lawns. 


To finish off I added some really cute little paper daisies and ribbon. It's now ready to hang in my garden. 


Well I hope you enjoyed another 'Kat make'. I hope they inspire you to have a go at creating your own.
If you have any questions please get in touch I am always happy to help if I can. 
Another 'Kat make' coming soon.
Until then happy making, 
Kat 😊


Saturday 14 May 2022

Art Journal Cover - Springtime Feelings by Kerstin


Welcome creative friends!


I created a textile collage with leftovers from various fabric and laces

as cover for an Art Journal.

I always love to use the MDF shapes as 3d elements 

in their original form. 

Love this special wood expression, often I also split them 

and create new impressions with it.


 sewed a small house with different fabrics together

 and decorated it with a mini door in grunge style


some close up's


used MDF shapes from Calico Craft Parts


Ancestry MDF Wood Font - Create A Word

Hello

Wildflowers, Grass & Bird

 Sheet of Mini MDF Door Wood Shapes


I hope you find inspiration!


Thanks for stopping by...until next time

with some pages from this Art Journal !


Kerstin


Wednesday 4 May 2022

The Wishing Well by Kat Hazelton.


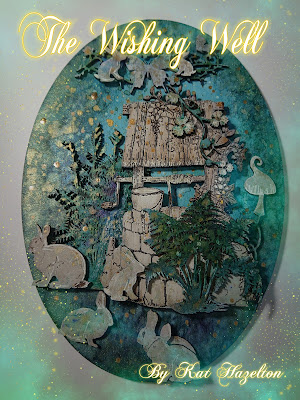
There is something wonderfully magical about a wishing well. 
My great grandfather had a wishing well in his back garden which he said had a magical troll living in it! Now I cannot say whether this was true or not having never seen the Troll in person! But who knows he was quite insistant and he seemed a sensible old man! 
Many Wishing Wells in the UK raise money for charities so if you see one pop in a coin or two and make a wish as even if your dreams do not come true someone else's might through your kindness. 

To make a wish visit a well and tell it your desires,
A coin from your pocket the well it does requires. 
If the coin lands heads up then good luck for you. 
If head faces down, your wishes won't come true! 

To make your own magical Wishing Well scene you will need. 


Assortment of inks I used blues, greens and purples. 
Assortment of paintbrushes, splattering brushes. 
White highlighter pen. 
Gold ink or gold pen for adding dots. 
Brown crayon. 
Acrylic paint in matt white. 
Super glue. 


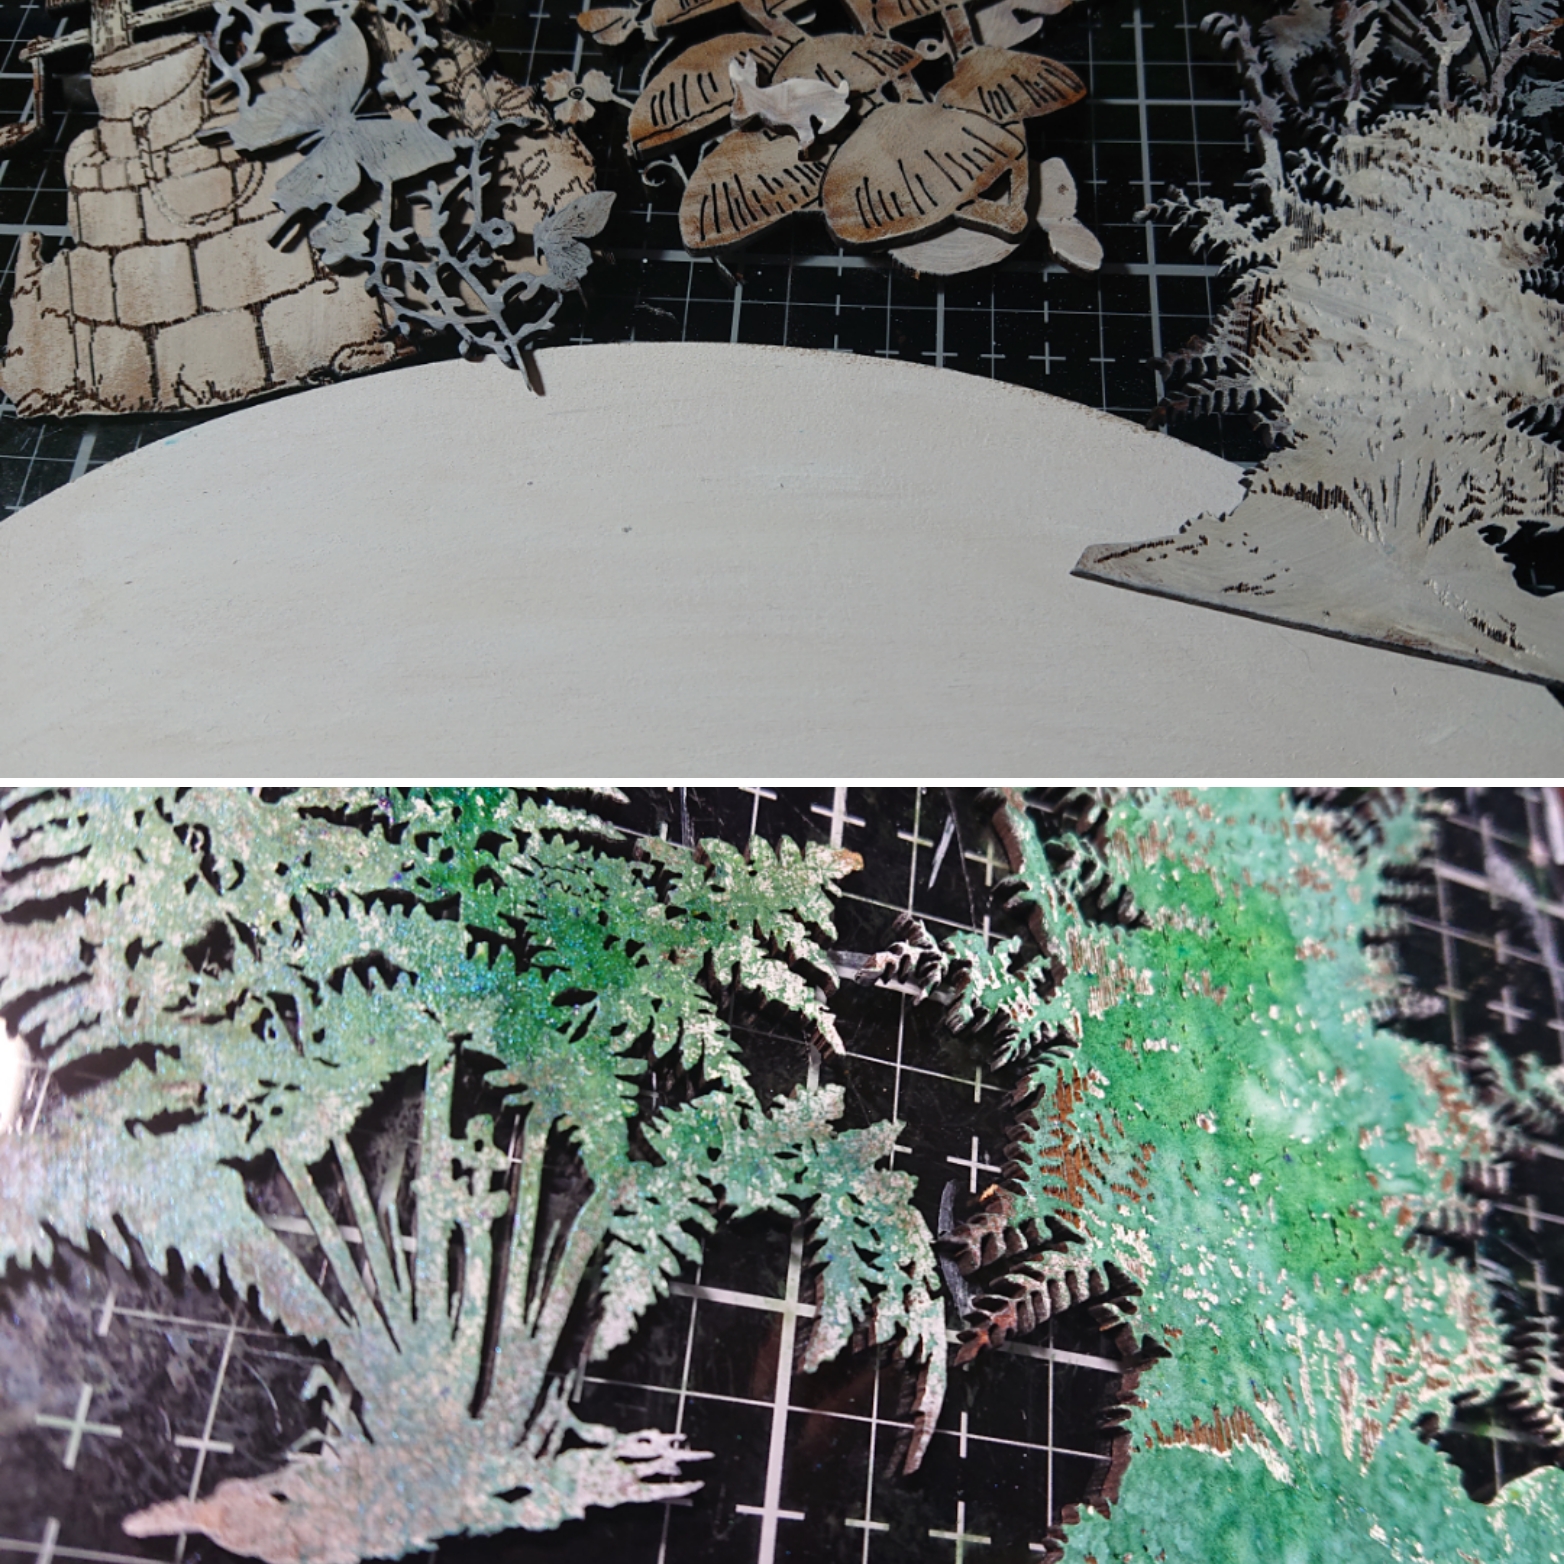
To start off I painted all my MDF and wood shapes with a matt white acrylic paint. This gives a really good undercoat to using inks. 

Once the paint was thoroughly dry I started painting the birchwood plaque with my inks. The joy of using ink on birch is they give very soft textural effects. I did a combination of spraying, splattering and gentle brush strokes with a dry paintbrush. I used a combination of greens, blues and purple inks. 

I then painted my ferns with the same mixture of greens, blues and purples. Being MDF these colours came out a little stronger in colour which gave a good contrast to the, softer etherial background. 


To add an extra magical sparkle I used gold ink which I watered down and splattered with an old paint brush. 


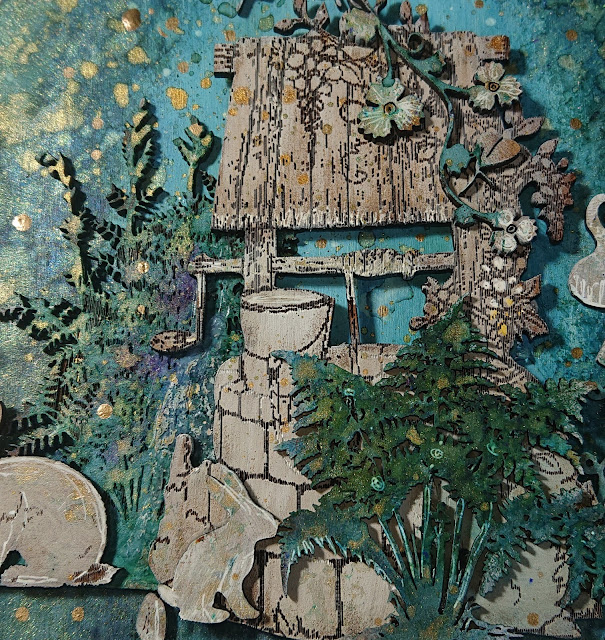
To give the Wishing Well a magical other worldly feel I decided not to paint over the ghostly acrylic white undercoat. I also did the same with the rabbits and toadstool. The little extra details were achieved using a white highlighter pen. I also added some definition and shading to the roof and the stonework with a brown crayon. 


I then assembled all my shapes and once I was happy with the layout I glued them into place with super glue. 
I then finished off the scene with little magical glowing gold orbs which I made using a gold pen. 

✨Now make a wish! ✨


Well I hope you enjoyed another 'Kat make'. I hope they inspire you to have a go at creating your own.
If you have any questions please get in touch I am always happy to help if I can. 
Another 'Kat make' coming soon.
Until then happy making, 
Kat 😊