Monday, 11 July 2016

She Sells Seashells.... by Claudia

Servus, welcome and good to see you back!

Claudia here today (as usual on Mondays) to bring to you another Calico Craft Parts tutorial.


I know, I know...it's a kind of marine theme again...but this time I rather thought of collections of seashells and other marine species in a museum (so it really is an off-shore project to be precise ;).

Imagine escaping the summer heat by entering the Natural History Museum to strive the gigantic and beautifully decorated halls with all the display cabinets filled with tableaus with stunning beetles, butterflies, semi-precious stones, seeds,...and a lot of other fascinating elements and specimen you haven't even heard of yet.

To me that being presented in file of all those little wonders has something very appealing and I tried to create a little tableau that is meant to capture a bit of this feel.


Calico Craft Parts used:

- Notched Rectangle Birch Ply Wood Plaque - 150 x 72 mm
- Sheet of Mini MDF Nautical Motifs - Style 6 
- Sheet of Mini MDF Label Holders Wood Shapes

I started with arranging my label holders and sea shell wood shapes on the ply wood plaque until I was content:


Then I painted the label holders with DecoArt "Iced Espresso" Metallic Lustre.


The ply wood plaque was given a coat of DecoArt Americana "relic" Chalky Finish paint...


...and toned down with a wash of DecoArt media Quinacridone Gold once the paint was dry.


The shells were first given a dry brushed coat of a mix of white DecoArt media Gesso and Raw Sienna fluid acrylic:


It is important that you rather dry brush than paint the Craft Parts because too much paint would sink into all the crevices and that way beautiful detail would get lost!

The first layer was followed by a layer of loosely brushed on Titanium White.


After that it was time for my favourite part: painting the shells in those typical lovely "shell" colours.

I only used four different colours and mixed these to get more shades. I took an image of my palette for you so you can see which colours were mixed and how (for a larger view simply click on the images): I added some of the Transparent Red Iron Oxide to the Raw Sienna for an orange tone. Raw Umber was used to paint the shades. Titanium White was mainly used for highlights and also mixed with traces of Transparent Red Iron Oxide to get the soft pink for the shell's inside.


I wasn't too precise with the details, but I used a book with shells images for reference. But I mainly followed my guts and mixed and painted away until I was content.

As my label holders turned out to be too shiny for my dusty museum tableau, I toned them down with DecoArt media Carbon Black Antiquing Cream (that I only partially removed after it had dried).


I cut some labels from white cardboard and toned them down with a very light wash of Raw Sienna.


Once they were dry I wrote the shells' names onto them using an extra fine tip black china ink marker. Then the labels were glued behind the label holders' backs and everything was ready to be mounted to the plaque (using DecoArt matte Decou-Page).

For a finishing touch the edges of the plaque were inked with black archival stamping ink using a piece of blending foam.


Et voilá! 


Some close ups of the painted shells (just in case you want to use them for guidance on painting your own):


Thanks for stopping by (and thank you all so much for the many wondeful comments on my last project! I was totally overwhelmed by the fantastic response! Mwah! XXX). I hope you like my little collection. But then: who does not love to collect and look at sea shells?!


Hugs and happy crafting,
Claudia 
xxx


Wednesday, 6 July 2016

Plant Pot Stakes by Lesley

Howdy people.

Leslie here with an uber quick little home decor piece. I had been thinking of these since doing the rusty garden ornament which you can see here......but didn't really have an exact plan in my head.
When Helen designed the diddy houses, i knew i could use them.

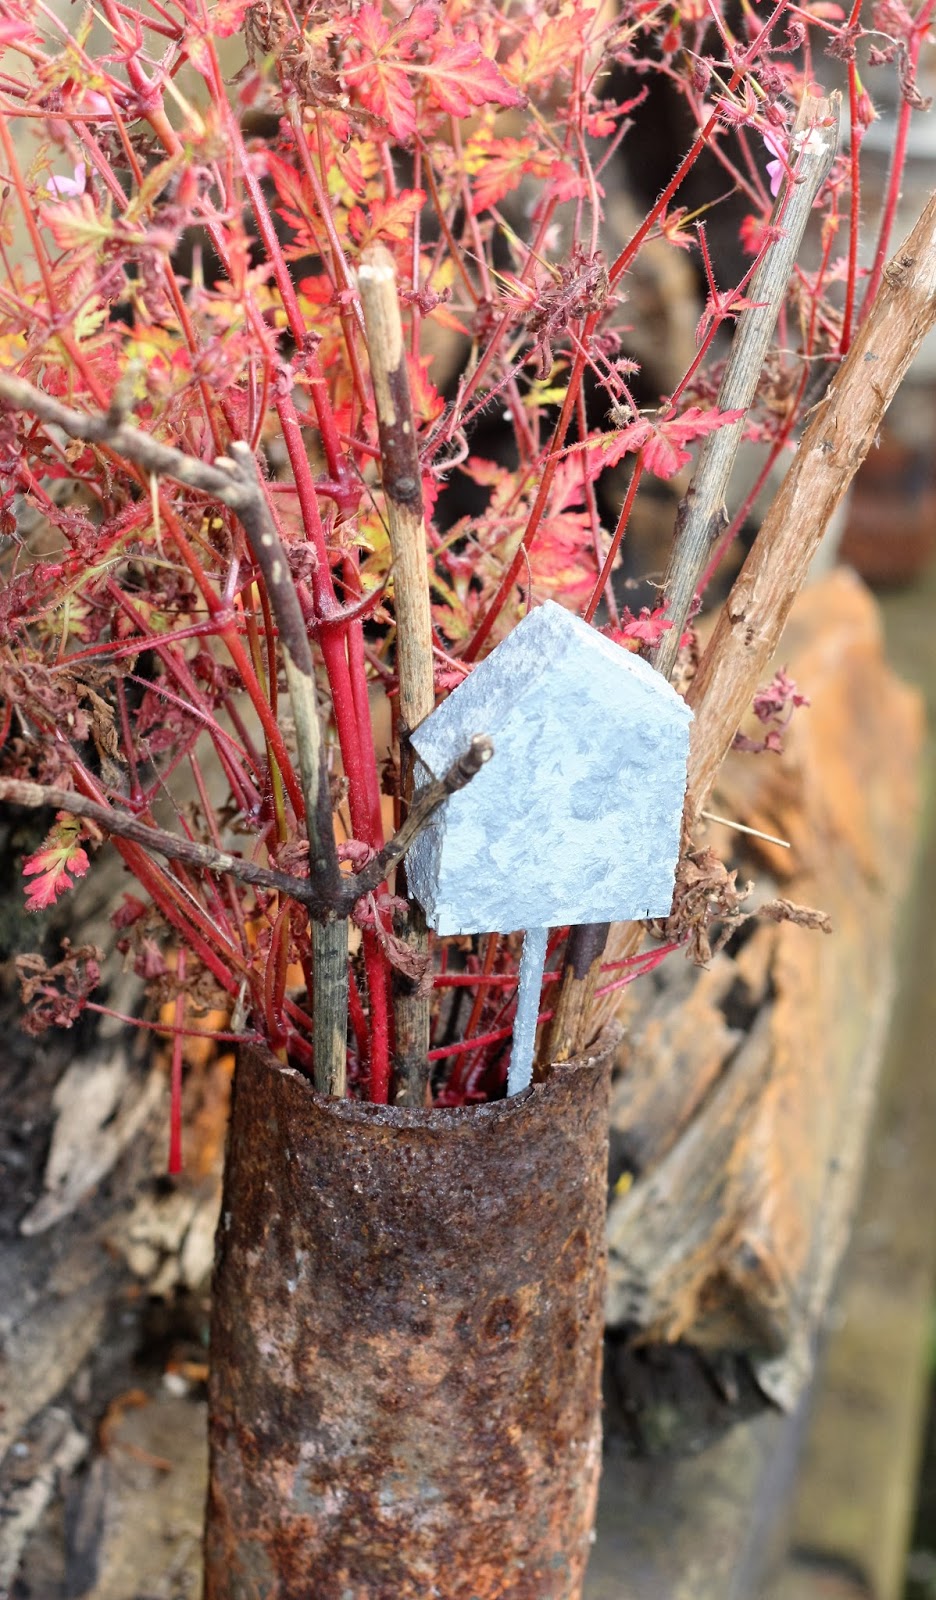
I am not a plant person at all........in fact I don't have any indoor plants at all! So I had to make an arrangement of sorts to house the plant stakes out of twigs, some foliage from the garden and a large chunk of rusty metal rescued from an old boat!


I used the same rust paste as the garden ornament, gluing the house together first.


The other was painted using a concrete paste. The sticks are wooden skewers that you use for kebabs.
Before gluing the houses together, i drilled a hole in the base for the sticks.


The idea was to use the mini wooden doors on the houses but this did not work out as planned! The paste is really quick thickly textured.............so the doors did not sit very flush the house, looked kinda naff! I will make some more of these, but will sit the doors into the paste whilst its still wet!
Finally i finished them off with a couple of coats of  matt medium.

I think these will look equally cool in bright colours, although i will always be a rust girl at heart!

Thanks for reading.
L.xx

Ingredients used
Block style MDF house
Block style MDF house with wonky roof

Sunday, 3 July 2016

Bread and Roses - Kitchen Shrine by Julie Ann

Hello, Julie Ann here. Our home is a bit like a building site at the moment with our kitchen re-fit entering its final stages and our new bathroom taking shape. I've been thinking about how each room in a home can be filled with stories and I've created a tiny kitchen shrine to put in place when everything is finally complete.


 Meet Elizabeth of Hungary in her mini shrine from Calico Craft Parts. Elizabeth who was married at the tender age of fourteen was a Hungarian princess. Humble and kind, she tended the sick and refused to wear her crown in church. On my shrine she has a crown taken from Mini Crown Shapes Style 3 that reflects the blue of the heavens. Elizabeth's legend associates her with bread and roses, so she seemed the perfect saint to watch over a kitchen.


Calico Craft Parts shrines are so easy to assemble. You simply press them out from the backing and use a strong craft glue along the edges. I applied a thin layer of Gesso to the pieces, before painting them with a blue and a white acrylic, blended with just a little glazing fluid to create the softness of clouds in a heavenly blue sky.


The MDF Crown Shrine kit comes with a beautiful arch. Before I started I knew I wanted to create the impression of a tiny, santos cage style doll. I used some rusting powder on part of Bird Cage Style 6 and added some tiny birds from the sheet of Mini MDF Garden Bird shapes, which is becoming one of my favourites. Elizabeth's face is my own art work over book text pasted to one of the mini oval shapes. I stamped a sun in Versamark and then heat embossed it with gold.


 Elizabeth's legend is that she was taking bread to the poor in secret when she encountered her husband out hunting with some other noblemen. He challenged her to reveal what she had hidden under her cloak to prove to his aristocratic friends that she was not hiding stolen riches. Her cloak fell open and the loaves were transformed into roses, showing that her charity was approved by God. Let's hope this was not a permanent transformation and that the poor were not deprived of their crusty loaves! I've fashioned some miniature loaves from air-dried clay, painted with acrylic paint and a glaze.


The crown above the arch gave me the opportunity to use some gold UTEE. I also stamped the archway and the sides of the shrine with script.


 I used moss to decorate her cage skirt and a little resin rose painted red, edged with gold gilder's paste. The Wings from Wings style1 are touched with white and blue acrylic and some gilder's paste and the hands are cut from my own art work.


A  bird turns back to glimpse the miracle taking place and cast a wistful glance in the direction of those little birds munching away at the bread before it turns into roses.


This label stamp seemed the ideal sentiment for Elizabeth and her miraculous roses.


Thank You so much for stopping by to look at my kitchen shrine. I had such fun making it and discovering Elizabeth's story. I'm now inspired to create a Calico Shrine to keep watch over each room in the house - it's more fun than contemplating all the plaster dust and confusion I'm going to have to deal with when the renovations are finally over! Have a creative and peaceful week everyone!

Calico Craft Parts Used
Crown MDF Shrine Kit - Style 4
Sheet of Mini MDF Crowns Style 3
Sheet of Mini MDF Wings Style 1
Bird Cage Style 6
Sheet of Mini Oval MDF Shapes
Sheet of Mini MDF Garden Birds

Saturday, 2 July 2016

To the Beach - Guest Designer - Nikki Acton


Hi everyone - it is my pleasure to be the guest designer here for July.

When I knew I was going to be creating a couple of projects using the fabulous Calico Craft Parts I was instantly attracted to the wonderful beach huts. I then saw that Trish had done something very similar but I decided to stick with my idea anyway - you can see Trish's version here.

Using the back of a canvas is one my favourite themes - creating a little shadow box effect and perfect for lots of mixed media techniques and embellishments.

I started by adding some texture to the canvas - using texture paste, string, little beads and cheesecloth. I also added some Deco Art sand texture paste. Once this was all completely dry I gave it all a coat of white gesso.

I then began to paint my background scene - the sea, sky and sand. Once the colours were dry I dry brushed white gesso over the surface - particularly the areas with texture to highlight and create contrasts. I also added lots of spatters with watered down gesso.

Now to the craft parts! I used the beach huts (small), the 'to the beach sign' and little ring buoy both from the mini nautical motifs sheet and some seagulls from the mini seagulls sheet. I really wanted the wood to still be visible so added my paint very lightly, mostly with dry brushing again.


The beach huts were coloured with a pale colour each and some white for contrast.

The sign and birds just had a little white paint dry brushed over the surfaces.

Finally I secured my craft parts onto the canvas - using foam pads for the beach huts to create some dimension.

Craft parts used today:

Thanks for stopping by, I will be back later in the month with another project. 
Nikki xxx


Thursday, 30 June 2016

Home Is Where The Heart Is - by Trish

Hello!

Have you seen all the FABULOUS houses in the Calico Craft Parts shop? Love love love them :) The mini houses are just totally adorable..... and led me to think a little outside the box for my project today!

Jewellery!


Another view....


It's not as hard as you might think to create either!

Firstly, glue all the bits together APART from the bottom!


When TOTALLY dry, drill a hole through the apex of the roof! This is easily done using an Archimedes drill. (really cheap from Ebay!)


The main 'stem' part of the drill remains in a vertical position, and you use your fingers to move the bit at the top (the bit that looks like it has rings around it) up and down. Drills holes through MDF like butter :)


See?!

To make the bail, twist the end of some wire into a large 'lump' (any shape that won't go through the hole!)


Then thread it through the hole....


Twist the top into a loop shape and trim off any excess wire...


Then you can glue on the bottom!


I then covered the whole thing with book pages...


All ready to decorate!

I kept it fairly simple, a clear glaze with added brown dye ink to age the house slightly, then a large red heart attached by wrapping wire around both it and the house..


The finishing touch was a cut out word: 'home'.

So.... Home Is Where The Heart Is. Geddit?!?!

There will be many more houses to follow.... so brace yourselves :)

Trish xxx

CCP used:
Block Style MDF House Kit Short : mini version