Monday, 18 September 2017

Summer Farewell - by Claudia

Servus and welcome to "my Monday" over here at Calico Craft Parts! In Austria summer is in its last throes and autumn is already in the air...so I decided to create a little summer farewell mixed media project that still captures summer's glory but also already has a bit of an autumnal feel to it.


This time I only used one single wood shape from the wide wide range of beautiful Calico Craft Parts as I think this one deserves to have the stage on its own:

the Wildflowers, Grass and Bird MDF Wood Shape from the absolutely fantastic collection of Wild Flower Wood Shapes.


I used the largest size as it gives enough surface to use some of my favourite DecoArt media on it like white Crackle Paint and Texture Sand Paste. ;)

I found a piece of white cardboard that fit the size of the wood shape perfectly! I used a palette knife to cover the whole surface of the card with DecoArt media white Modeling Paste.


While the paste was still wet I simply pressed the wildflower wood shape into it and put a heavy pot of acrylic paint on top so the card would not warp while it dried. I left my piece to dry naturally over night. 


The next day I sealed the wood shape with a thin coat of matte Decou-Page. 


While that was drying I applied some DecoArt media Texture Sand Paste around it randomly with a palette knife.

That was followed by some white DecoArt media Crackle Paint here and there on the sealed wood shape. I left everything to dry naturally. 


Then the messy fun began: I diluted some DecoArt Raw Umber Antiquing Cream with water and created drip lines that I sprayed with water to make them run and spread. This time I went in with my heat tool to dry the piece. 


I repeated this step with some Brilliant Turquoise Shimmer Mister. 


To make the wildflower wood shape more visible I sprayed the whole piece with water and added a mix of Carbon Black and Raw Umber Antiquing Creams around the craft part and also in the inner sections. I used a wet brush to spread the mix to make it fade out and blend with the background. 


Once the Antiquing Cream had dried I very carefully used a baby wipe to lift off some of it here and there. (don't rub too hard or you will end up taking off some of the Modeling Paste and Texture Sand Paste as well...which actually adds to the worn and textural look but I know this isn't to everyone's taste ;).


Using my fingertip I added some Gold Rush DecoArt Metallic Lustre to the textured areas  (from the scraped on Modeling Paste and Texture Sand Paste) and also partially to the wood shape and all around the edges of the cardboard. 


See how the Metallic Lustre makes all the yummy texture pop and shine? I looove that!


I finished off my piece with two little words that I cut from an old dictionary. 


Done!


some close ups:


and once more the whole finished project:


I hope you like my little Summer Farewell greeting! There are so many beautiful wildflower woodshapes to find at Calico Craft Parts - maybe you will find your favourite and try a similar project too sometime.

Thanks so much for stopping by and as always...

hugs and happy crafting!
Claudia
xxx


Saturday, 16 September 2017

Nautical Frame - GD by Kerstin

Welcome!

Kerstin from Scrapbook Dreams here and I'm so excited and happy to be invited to the Calico Craft Parts blog as a guest designer this month. I was very impressed when I finally saw the amazing pieces from Calico Craft Parts in original. They immediately reminded me of my time as a "woodworm" ;-)  yes, I loved working with wood -  mainly scroll saw projects. Calico's wooden shapes are so filigree and I could never have done this with a jigsaw! And their natural shades are wonderful too. 


As you may already know I have a soft spot for the sea with all its wonderful and mysterious creatures, and when I saw the wonderful aquatic and marine wood shapes at the Calico Craft Parts shop I was immediately inspired to create a new mixed media home decoration piece.


 Before and After


My base was an old simple plastic frame, but I fell in love with it
because it looks like a store window or a TV, right?!

How I did it:

Calico Craft Parts wood shapes used:


 I chose old book pages and black tissue paper in combination with white crackle paint and some brown shades from a Glimmer Mist spray. A very easy technique but I wanted a wonderfully neutral and more subtle background for the beautiful wooden shapes. I only used very few colours -  a patina green, black, white and a little bit neon green for a magical effect, because the Galleon boat reminded me of the 'Black Pearl'
(you know what I mean?)  Yes, I admit it : I'm a big fan of the Pirates of Carribean stories.
some close up's


I highlighted the crab and kelp with just some little pearls and used  transparent gel as glue


I used the untreated Ships Wheel as a base and added the Galleon Boat  for a 3D effect.

I love to combine the various sizes of the wood shapes to create layers!


sideview

At the end of the process I decided to make one of my favourite sayings the focal element, but that
may well be exchanged with a photo sometime.


Done!


I am not a person of many words, so I would like to say a heartfelt THANK YOU
for your invitation in the form of a small extra project on which I used
my absolute favourite among the Calico Craft Parts wood shapes:

in combination with the gorgeous


Thanks for your visit! 
I hope this was a bit of inspiration for you!
I will return at the end of the month with a 
new, spooktacular project and I hope you will then stop by again  :-)

Happy crafting!
Kerstin

Wednesday, 13 September 2017

Spring Wall Hanging by Lesley

Hey people. Hope you're all well!

This week, i have rustled up a little wall hanging, completely made from scraps off my desk before i tidied up!


The base of it is strips of driftwood, which i gave a coat of grey paint diluted with water.

I then took 4 long strips of wire, two for each side of the driftwood, and wove the wire inbetween the slats, until the driftwood was secure.


I used an ATC, which i primed with gesso, and then used a green and a grey water reactive paint on it.

The little cluster of birds is soooo sweet! Seemed a shame to cover it in paint and loose its detail, so i just added a light wash of white paint, and a little green metallic wax.


I layered it up onto a piece of muslin and a couple of pieces of netting.
I then added some green bendy twine in a circle around the birds, and glued it all down onto the driftwood.


To finish, i added some beads to the lengths of the wire.


Ingredients used.


Sunday, 10 September 2017

Autumn Flight - Printers Tray by Julie Ann

Hello Everyone. I can hardly believe we are entering the 'Season of Mists and Mellow Fruitfulness' already! It only seems a moment ago we were welcoming Spring! I do love the colours, sights, smells and sounds of Autumn so I decided that I wanted to capture a sense of this highly atmospheric season within one of the new, deeper Calico Printers Trays - and here it is.


The depth of these trays gives lots of scope for experimentation. I chose the 4cm depth, but I'm looking forward to creating with the 2cm and 3cm sizes soon too. For this project I chose not to use the shelves that come with the tray.


I aimed to create the hazy light at the close of an Autumn day. I began by first painting the background of the Printers Tray a neutral colour and then adhering torn scraps of tissue, napkins and stamped tea bag papers.


For a misty, twilight effect, I tied everything together with washes of blended acrylics diluted with an acrylic glaze.


A scrap of cheesecloth, some stamping and a beautiful Calico owl in flight along with some Fungi wood shapes helped give a definite autumnal mood.


For the reverse side of my tray, I chose a warm shade of terracotta acrylic with white embossed script. To create interest I decided to add a miniature Autumn house, which I created using one of the Block Style Wide House Kits and my own art work.


I like to block off the edges of the kits with masking tape so that the paint doesn't get into crevices and make the edges difficult to glue in place. When the kit is completed you can use a decorative tape to give a neat finish to the project.


Calico have so many beautiful Autumn embellishments, I had a great time painting them and adding them to the project to create seasonal detail.


I kept the roof open to display these painted twigs and to give the impression of the owl flying into the night sky, possibly having roosted in the roof of the little tumble-down house in the woods, where wild creatures find shelter as the days grow colder.


Perhaps in the white embossed script, there is a suggestion of snowy days to come...


...when the moon will make frosty leaves glitter and the owl will be grateful for the shelter the abandoned fairy cottage provides.


Autumn leaves are one of the loveliest aspects of the season and Calico have some beautifully detailed leafy embellishments just waiting to be given touches of flame. Golden sunsets setting the skies ablaze suggest Autumn to me as well, so I added splashes of melted gold UTEE to the sides of the Printers Tray.


I particularly love these acorns and oak leaves. I wanted to create the impression of leaves taking flight along with the owl!


Thank You so much for stopping by today. I hope as the days shorten you will enjoy a few more sunny days and some beautiful walks through carpets of crisp, autumn leaves. Have a creative time until we meet again.
Calico Craft Parts Used
MDF Printers Tray Kit Style 1
Block Style Wide House
Sprig of Oak Leaves and Acorn
Apple Tree Branch Motif
Flying Barn Owl Style 4
Wood Maple Leaf and Twig
Sugar Maple Leaf and Twig
Wood Beech Leaf and Twig
Wood Sweetgum Leaf
Sheet of Mini MDF Acorns and Oak Leaves
Wood Mushroom Fungi shape

Wednesday, 6 September 2017

Autumn Crackle : by Jennie

Hello everyone and welcome to my little celebration of Autumn!


I decided to work today with an ATC wood blank which I thought would be perfect for this little mushroom group which caught my eye.


The ATC got a coat of gesso and then some random "splodges" of DecoArt Crackle Paint. Texture paste through a stencil gave me a neat little sentiment too.

I then went in with a rusty/walnut stain spray adding lots of water to get a more softer look. As you all know I love these wood products from Calico Craft Parts as I can spray water heavily and nothing buckles!


I decided to give the mushrooms a crackle finish too. The crackle paint was overlaid over brown Acrylic paints which I extended to the stems as well blending the colours as best I could (I am not a great painter!)


I was very excited when these wonderful labels were introduced earlier in the summer just as I went on holiday, so I am only now getting to play with them. Adding a coat of gesso first meant I could add the watery sprays and dab it off here and there to get a rusty finish but leaving the quote more or less free of paint.


I really love how this little piece came together. We do get quite a few wild mushrooms growing up here in Shetland, some of which are definitely not good for you! They are huge things and are very black when cooked. I miss seeing the beautiful delicate mushrooms of the forest floor .....


..... which are indeed the most wonderful things ......

As always thank you for joining me today and happy crafting!

Jennie x


Calico Craft Parts used:


Monday, 4 September 2017

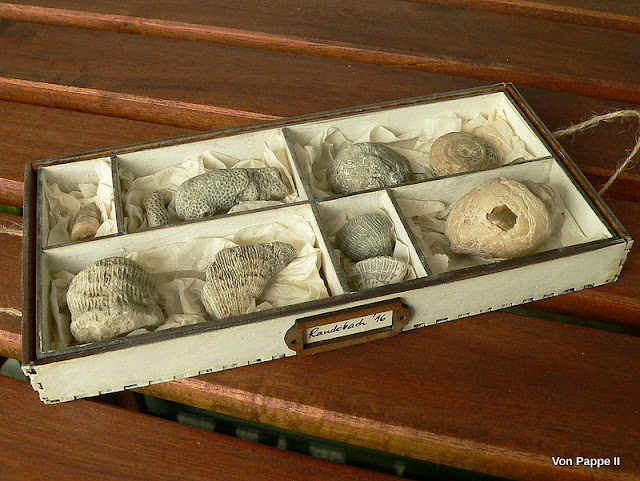
Specimen/Fossil Tray - by Claudia

Servus and welcome to today's inspirational Calico Craft Parts post, dear friends!
I am sure most of you have already seen our new fabulous Printers Tray Kits - I love them to bits as they come in many different insert styles and - if needed - there's also a stand available as well as beautiful frames to add that special final touch.

I for my part fell in love with them especially for their perfect size to (finally!) store my collected fossils in and have them at display beautifully too!


Ah, well, ....yes, there's a bit of a natural sciences geek in me too (when I was little I dreamt of becoming an archaeologist once...but looking back at that wish now I guess it was rather a geologist I wanted to be - being more interested in traces left behind by plants and animals than humans).


I just love to have my collected treasures finally stored like this (having that bit of museum feel to it ;). But of course you can use this kind of display or storage for other beloved bits 'n pieces as well! My fossil tray is really quick and easy to make - I promise!

Calico Craft Parts used:

- MDF Printers Tray Kit with Insert - Style 6 (I chose the 2cm depth, but they're also available with 3 or 4cm depth!)
- Sheet of Mini MDF Label Holders Wood Shapes


Other materials used:
- matte DecoArt Decou-Page
- Dremel or small drill
- DecoArt Americana Chalky Finish paint "lace"
- DecoArt media Antiquing Cream "Raw Umber"
- tissue wrap
- soft brush
- thin jute string
- baby wipes


This is how the printers tray kit and stand look like:


As you can see there's a bit of air left between the outer frame and the insert - perfect for my idea of making handles using thin jute string and fixing it with a single knot inside the tray's frame!


I first glued the outer frame together and set it aside to dry:


In the meantime I painted the inner sides of the insert with the Chalky Finish paint. Instead of trying to get neat and even coverage I added my  two layers of paint quite loosely, making sure I rather stippled on the paint than leaving even brushstrokes. This way I got a a more shabby and worn look. I also painted the frames' outside this way once the glue had completely dried.


I didn't care a lot about how much paint also got on the thin front sides of the frame and the insert during that process as I knew I was going to wipe it off with a baby wipe afterwards (which not only removed the paint but also toned the front sides down a bit).


I didn't even have to hurry much as the solvents in the baby wipes also remove already drying paint.


To tone down the inner bottom of the tray's frame I applied some Antiquing Cream with a soft brush.


Then I drilled the holes for my string handles using my Proxxon (which is pretty much the same as the Dremel tool) using a very thin drill (as I was going to use a very thin jute string so the knots would not be too big).


The jute string was a bit fiddly to insert so I simply wrapped some adhesive tape around its ends to form a sturdy and pointy end. These ends were cut off after I had tied knots into each end once the handles were in place.


A label holder was toned down with Antiquing Cream too and I wrote a small label (by hand) onto a cut to size piece of dictionary page paper.


Label and label holder were glued in place. Then I put the insert into the tray frame and filled the compartments with crinkled tissue wrap to put my fossils in. 


Et voilá!


My first piece for my "private museum storage" was done! I am really happy with how it turned out! And I can see so many variations - different colours instead of the shabby "lace" white. Maybe some Weathered Wood crackle on the outside....well, you know what I mean...the possibilities are endless...but in this case I wanted nothing to visually compete with my fossils. But I love how the tray and the fossils have become one beautiful visual unit! I hope you like my fossil tray too!


Thank you for stopping by and - as always - 

hugs and happy crafting!
Claudia
xxx