Showing posts sorted by date for query colour wash. Sort by relevance Show all posts

Thursday, 24 February 2022

Beware of fairies and mushrooms! Deathly Fairy Pendant by Kat Hazelton


The dangers of a fairy ring! Poem by Kat Hazelton. 

Nine times around the ring you step, when the moon is full. 

To travel to the magical realm this is the golden rule. 

But do be warned I need to impress. 

Don't step one more, nor step one less. 

For this is the fairy's way. 

Those will perish if they disobey!

There are hundreds of folk stories about fairies, mushrooms and fairy rings. Some are whimsical and fun depicting beautiful or childlike friendly fairy folk sitting on pretty toadstools or dancing holding hands around rings of mushrooms. But many more tales tell stories of mischievous sometimes malevolent creatures gathering in and around rings of mushrooms. Often these rings were places of magic and portals to other realms beyond our own. One tale says if you step into a fairy ring it will transport you into the fairy realm, never to return! Other tales say that if you step in and out of a fairy ring without permission on returning home you will find hundreds of years had passed! 

There is also various similar tales that say that to enter a fairy ring safely you have to run around the mushroom ring nine times under a full moon. But warning is given that if the runner did not pay attention and did a tenth that evil would befall that runner! Sometimes in the story the poor victims outcome was either madness or death! 

Personally because there are so many stories warning humans away from fairies, mushrooms and fairyrings it's best if you spot any on your travels to just admire them from a distance! It's not, in my view, worth the risk of upsetting the fairyfolk!  😉


To make this Deathly Fairy Pendant inspired by the stories of fairies, mushrooms, magical portholes and fairy rings you will need. 

https://www.calicocraftparts.co.uk/skeleton-mdf-wood-shape-style-3.html

https://www.calicocraftparts.co.uk/plain-round-bauble-frame-mdf-wood-shape.html

https://www.calicocraftparts.co.uk/mushrooms-fungi-mdf-wood-shapes-set-5.html

To add a touch of steampunk I used cogs from this mini mdf sheet. 

https://www.calicocraftparts.co.uk/sheet-of-mini-mdf-steampunk-motifs-style-4.html

Acrylic paints, metallic paints or mica powder, paint brush, water. 

Sculpting paste and sculpting tool. 

Insect or fairy wing rubber stamp, ink and water colour paper. 

Metal steampunk cogs, assorted Gothic charms and tiny beads. 

Glitter. 

Gloss Varnish. 

Glue, I used both tacky glue and superglue. 

Sharp scissors. 

Paper flowers. 

Wording either bought or writen with pen onto cardboard. It needs to be some sort of warning to keep humans away! 

String.


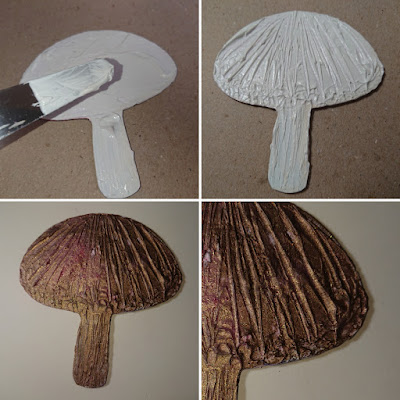
To add some details to the mdf mushroom I used sculpting paste, adding lines and grooves with a sculpting tool. Once I got the look I wanted I left the mushroom to thoroughly dry over night. I then painted it with a combination of brown and pink metallic paints. One dry I added an additional coating of brown mica powder which I watered down with water. The mica helped to add a shimmery effect. 


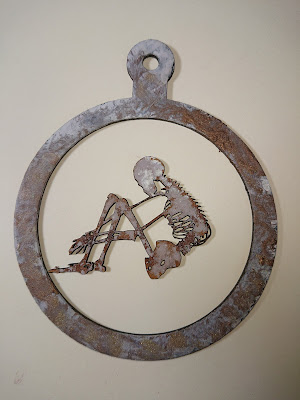
I then painted the MDF ring and 'Fairy' Skeleton with an wash of watered down white acrylic paint and brown mica. This gave both pieces a more grungy steampunk appearance. 

Using stamp and ink I created two wings. These were stamped onto smooth watercolour card. Once the ink was dry I cut them out, using sharp scissor, then painted them with acrylic paints. To finish them off I painted on a layer of gloss varnish sprinkled with assorted glitters to add a touch of magic. 

I positioned and glued on my mushroom and 'fairy' skeleton with the wings tucked behind the fairies back. 

I then glued on all my charms, flowers and wording. 

I also added some tiny beads to the wings. 

And finally finished off my pendant with a length of string. 


My pendant is now ready for hanging up.
I hope you enjoyed another 'Kat Make' 
If you have any questions please feel free to ask. I will be happy to help if I can. 
I shall be back again soon with another make. 
Until then 'enjoy crafting' 
Kat 😊 


Monday, 22 November 2021

Woodland shrine. By Louise Crosbie


I seem to be a little obsessed with layering up these trees every winter but they are just so perfect for it. Especially as they come in several sizes.

I wanted to do a night sky scene with Santa but at the same time, I still love the natural wood colour. So I’ve combined the night sky on the outside with a more natural woodland vibe on the inside. I gave my shrine little feet using teeny wee thread bobbins so I can stand it on my shelf .


I’ve not been heavy handed with the paints. I didn’t want the colours to be too saturated. I painted it on then dabbed it off with a baby wipe, leaving just a small amount of colour.
The outside part of the shrine was first painted with black gesso. I then added a colour wash of midnight blue before taking sandpaper and sanding back all the edges. I just wanted to see a little hint of the natural wood to help tie it in to the inside part of the shrine.
Then I was able to glue Santa and the front trees into place. 


 It’s quite 3D inside as the shrine kit has a little bit of depth to it. I put the smallest of my trees at the back then layered more in front of them (as ever, I broke the pieces up to suit my desired effect). I glued a little stick half way in to give me something to glue the tree with the deer on to.

When everything was painted and glued, I added the decoArt snowtex and glamour dust glitter to everything along with some white paint splatters to make it look like it is snowing. 

Monday, 2 August 2021

Dalek kit: by Guest designer Stephen Taylor.


Hello everyone. 

I was lucky enough to be given the opportunity to test drive one of the Dalek kits. The design team coordinator, Louise, had been sent it as part of her design team kit but she said she didn’t feel too confident doing such a large kit. As a model builder, I thought perhaps I could give it a try. 

And here it is…. 


Looking good with its slightly vintage paint job as a nod to one of my other passions, steampunk. 

I achieved this look by sealing the wood, painting with metallic paints, using metallic wax for highlights then giving it a colour wash with a watered down mix of black and raw umber acrylic paint to add shadow, depth and age.  

If you are a model builder yourself, I would say this kit was roughly a level 2 / 2.5. Not for a complete beginner but would certainly suit someone who’s only done one or two models in the past. 

You can find the Dalek kits HERE


Monday, 6 July 2020

House Journal - a Start - by Claudia

Servus, hi and thanks so much for stopping by!

Claudia here again to share some inspiration on how to use your Calico Craft Parts in your art journaling this time.

I had ordered five 200 x 160 mm sized House Shapes already months ago with the idea of creating a kind of sturdy concertina fold journal by hinging the single houses together with fabric ribbon or some garden fence pieces maybe, so the journal can be put up on a shelf and all the different houses, filled with different people and lives (and universes), can be visited and displayed.

Then I got interrupted by a different project, then distracted by another one (and another one), then I wasn't sure if I would be able to get the journal to look like I visioned it, then I found I had lost hold of the vision and idea,...well, I guess some of you know the story...

...but as I have been dealing with a lot of hormonal chaos during the last months I have now developed a kind of anxiety or stress disorder that forces me to practice self-care and listen to my actual needs closely...and that brought me back to the creative plans and things I really love - one of these being my forgotten house-journal-project!!!

At the moment I try to take pressure and high expectations out of the game wherever possible - and focus on the process instead of a specific result. Creatively spoken this means I am trying to get back to the techniques, media and topics I really enjoy (sometimes you just lose track a bit of that when you are mainly focusing on design team work) - and I allowed myself to just let the creative process take the lead.

So I decided to finally start my house-journal and fill the houses one by one - without a uniting theme, but rather with the concept of making them journal pages, where you simply indulge in creative play instead of trying to put a lot of meaning into everything on the pages. So here is page house No. 1 -
the result from a joyful session with my beloved book pages and other scraps, yummy texture and the media I feel most at home with:


I happily rummaged through my large scraps box and put together a little pile of scraps that spoke to me most (either because of their colour or because a specific pattern caught my eye) - even the black frame is a left over from some die cutting, but I thought it was a perfect fit for House No. 1. - which is actually Persistence Lane, No. 706.


Calico Craft Parts used: 

- House Shape - MDF Mixed Media Board
- Sheet of Mini MDF Label Holders Wood Shapes
- Sheet of Mini MDF Hardware Wood Shapes
- Ornate Scroll Decorative Hinge MDF Wood Shape
- Shields - Mini MDF Wood Shapes
- Spider Web - MDF Corner Wood Shape


Before I started the collage, I primed the MDF house shape with DecoArt "lace" Chalky Finish paint that I scraped on loosely with a palette knife. For gluing scraps of book pages, tissue and designer papers to the base I used matte DecoArt Decou-Page - my go-to glue and sealant.


The back of the house was left untreated for now - I will start another house on this side whenever I feel up to it and it does not have to be thematically connected to the other side.


I used a sanding block to remove any excess from the glued on scraps.


Next I blended the house's edges with black archival stamping ink to create a black edge that repeats the black from the text and imagery.


Using the very tip of my palette knife I spread some white DecoArt media Crackle Paint here and there and especially on the black frame that forms the focal piece.


More inspirational rummaging - this time in my box of smaller Calico Craft Parts! I came up with some screw heads, label holders, a mini shield, a hinge and a spider web corner from a previous taken apart project.


Before gluing these in place, I decided to paint a smudged brown outline around the house shape in Raw Umber media fluid acrylic paint.


To repeat the yellow-ish tint from some of the scraps I sprinkled on some Primary Yellow from a media Mister. That was followed by more sprinkles done with a Carbon Black media Mister.


I had found a portrait of a French writer on one of my dictionary page scraps and used that on the Mini Shield Shape that was to go right under the roof top.


The label holders were toned in using Titanium White media Antiquing Cream. In the meantime I had also added some haberdashery to the frame for a bit of dimension and interest.


The shield with the portrait of Monsieur Charles Nodier was given a thick coat of DecoArt Triple Thick after it had been glued in place.


Finally I toned down the white crackled areas on the black frame using a wash of (which means heavily diluted) Carbon Black media fluid acrylic - that made the frame stand out from the background and much more visible. At that point I also changed my mind and painted the previously white hinge black.


Voilà!


Some close ups:


Hope to see you again in two weeks!

Hugs and happy crafting!
Claudia
xxx


Monday, 11 November 2019

See the World - by Claudia

Hi, servus and welcome back to our creative little corner here!

I guess you all know by now how much I love autumn (even if it is the hardest time of the year for me when it comes to health issues...but the beauty of this season always makes up for this) - and I do not only love the rich colours of mid-autumn, when there is this explosion of warm reds, oranges and browns, but also that time when the colour palette gets more reduced to warm greys, matte browns and last traces of faded yellowed whites and light greys.

I think what I love about it is that there is less and more subtle contrast and you have to look closer and rather have to distinguish objects by their textures and patterns than by their colours. I tried to capture that in this little "beer mat make" (and it was quite a challenge, but using paint washes always helps with tweaking lightly until you are finally there and have nailed it).


I have used this fabric already in one of my Halloween themed makes over here (which you can check out HERE) and loved that so much that I used it again - this time to kind of form the forest ground with loads of fallen pine needles, little dried twigs, grasses and other forest ground texture.
It was a find in the Halloween decorations section of a dollar store, but I can see it be used for so much more...


Calico Craft Parts used: 

- Square MDF Beer Mat
- Flat Cap Mushroom -  MDF Wood Shape
- Sheet of Mini Insects - MDF Wood Shapes Style 1
- Sheet of Mini Insects - MDF Wood Shapes Style 3
- Sheet of Mini MDF Acorns & Oakleaves


I started with priming all the MDF wood shapes with a layer of DecoArt Americana Chalky Finish paint "primitive". I painted the flat shapes that had no engraved patterns and dry brushed the engraved ones so no detail got lost. I used the Flat Cap Mushroom shape flipped over - without the engraved patterns so it matched the rather "flat" design of the background I had in mind.


Then I painted the forest background using Chalky Finish paint "relic" which is a beautiful dark grey.
I kind of painted in watercolour technique - using very light washes, starting with the lightest wash and working my way towards slightly darker washes (=with less water added to the paint).

I watered down the paint on my palette and started with the trees that were farthest away and almost fading in the foggy forest background...


...and ended with the layer that is closest to the spectator and the darkest in the foreground.


I have taken images of the single layers being added so you can see how it all developed:


Don't think too much about which tree should go where when adding the layers, just work each layer on top of the other as if the layers before weren't there - this leads to the most natural looking results!

Then I put the painted and dried beer mat into my spray box and added sprinkles of diluted DecoArt media Translucent White and Burnt Umber fluid acrylics using a loaded brush and tipping it with my index finger.


I painted the mushroom using DecoArt media fluid acrylic paints Burnt Umber, Translucent White, Paynes Grey and Titan Buff.


I worked wet on wet to create blends and shading.


Then I sprinkled some Burnt Umber dots on the cap, dried these with my heat tool and added white highlights and dark shades with a very fine detail brush (using Translucent White and Carbon Black media fluid acrylics).


Once that had dried I added a thin wash of Burnt Umber on top.

The acorn was done the same way (just without the dots of course) and I painted it very dark as it is already dried out and has started to rot on the forest ground at that time of the year. To highlight the laser engraved texture on the acorn's cap I dry brushed that with a mix of Titan Buff and a little Paynes Grey. The little spider and the earwig were painted and shaded too using the same colours.


I added a generous coat of DecoArt Triple Thick to the earwig and used the left overs on my palette to add thin layers to the mushroom and the acorn (but I left the acorn's cap untreated). 


Time to glue the mushroom and the other bits in place (with matte DecoArt Decou-Page). In the picture below you can see the back of the acorn to which I have glued a left over scrap from some Calico Craft Parts Mini Craft Shapes. I always keep these left overs because they are perfect for layering the pieces and do not dry out or warp over time as sticky foam pads tend to do.


The spider got two large dots of DecoArt media Liquid Glass once it had been glued in place.


The acorn was glued on top of a layer of heavily frayed fabric (a kind of "mummy cloth" from the Halloween section of a dollar store) and I added a bit of watered down Burnt Umber to the fabric here and there once the glue had dried.


Then I found I needed more texture on my forest ground and the mushroom, so I quite thinly scraped white DecoArt media Crackle Paint onto some spots using the very tip of my palette knife. I sped up the crackle process by putting my beer mat project under the warmth of my desk light bulb.

Once that had dried it was time to go in with some washes!
I used a heavily watered down mix of Burnt Umber and Transparent Yellow Iron Oxide fluid acrylics and added that to the crackled areas and an even thinner wash of that to the mushroom.


I was still not content with that as it still lacked some texture from a different "kind of forest ground". Some Irish Moss here and there was the perfect addition!


Now I only didn't like that the mushroom and the forest looked too same-ish (colour-wise), so I decided to be brave and add a VERY light wash of a contrasting colour to the background - Prussian Blue Hue became the colour of my choice as it is a "cold" blue that rather tends towards green instead of purple - so the best fit for a forest themed project!

The wash seems as if it is really almost not there - but it makes a huge difference!!! It's maybe one single drop of paint diluted with three to four brush loads of water on the palette! But it was exactly what my forest background had needed to be turned into a cold, foggy November forest.


To finish off my project I added a word sticker and shaded the beer mat's edges with black archival stamping ink using a piece of blending foam. 


Some detail shots: 


...and once more the finished beer mat. 


Thanks for stopping by! Hope to see you again in two weeks! 

Hugs and happy crafting!
Claudia
xxx