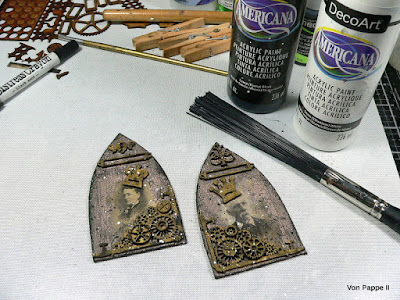
If you have been following my personal blog (Von Pappe II) or the steampunk challenge blog I am running (SanDee&amelie's Steampunk Challenges) you may already know that today's make and post over here form the missing part and tutorial for a duo of arch shaped mixed media panels I've made.
So if you have already met "The Emperor", you might be pleased to now meet "The Empress" and learn about the how-to behind the make.
Don't the two make for a lovely and impressive couple?
Calico Craft Parts used:
- Gothic Arch Shape - MDF Mixed Media Board (100mm x 60mm)
- Sheet of Mini MDF Label Holders Wood Shapes
- Sheet of Mini MDF Hinges Wood Shapes
- Sheet of Mini MDF Keys & Escutcheons Wood Shapes
- Sheet of Mini MDF Wood Crowns - Style 3
- Sheet of Mini MDF Wood Cogs - Style 1
- Sheet of Mini MDF Wood Cogs - Style 2
- Sheet of Mini MDF Hardware Wood Shapes
- Steampunk Pipes & Cogs - MDF Wood Corner (small, left hand and right hand style)
I used two portrait images from a sheet of a Tim Holtz designer paper stash and played around with all the Mini Wood Shapes until I was content with the look.
Next I glued the cut to size portraits in place using DecoArt matte Decou-Page. I also sealed the glued on images with a thin layer of the Decou-Page.
Then I mixed white DecoArt media Crackle Paint with some drops of DecoArt media Raw Umber fluid acrylic paint on my palette.
I scraped the mix onto the arch shaped panels only leaving the portraits visible but covering up the edges of the glued on images. While the tinted Crackle Paint was still wet I placed the wood shapes in their spots and used the paint to glue these in place.
Then I put my panels on our central heating to speed up the drying and crackling process. Afterwards I took a detail brush and DecoArt media Metallic Gold fluid acrylic paint to colour all the glued on elements. I also painted the little cogs, screw heads and washers that would be glued on later with the Metallic Gold paint. Once these had dried I glued them in place too using the matte Decou-Page.
I let the glue dry thoroughly before I went in with some slightly diluted Carbon Black DecoArt media Antiquing Cream to tone down everything. I heat dried the Antiquing Cream before I went in with a soft damp cloth to wipe back the Antiquing Cream where needed.
Using black soot Distress Crayon and my fingertip to smudge it, I darkened the arch shaped panels' edges.
I added tiny sprinkles of slightly diluted DecoArt Americana Lamp Black and Snow White acrylic paint using a splatter brush.
Time to cut out the titles "Emperor" and "Empress" from my vintage dictionary. Using a detail brush and matte Decou-Page I glued these in place inside the label holders.
To add a finishing touch to my panels I used more media Metallic Gold paint and the very tip of my palette knife to scrape it on here and there.
Et voilà!
Please, allow me to introduce the Emperor and the Empress!
Some detail shots:
...and once more the lovely couple
Thanks so much for stopping by!
See you in two weeks!
Hugs and happy crafting!
Claudia
xxx


As if it couldn't get any better they look so happy now they are together Claudia a beautiful duo executed to perfection.. That crackle is cracking!! Thanks so much for sharing. Tracey x
ReplyDelete