Monday 30 September 2019

Go for the Brain! - a Zombie Shadow Box - by Claudia

Servus! I am so happy you're stopping by and I hope you are in the mood for a bit of gory Zombie fun! There are some new fabulously grisly Halloween wood shapes in the Calico Craft Parts store and I just couldn't resist using some of these to immediately create a Zombie shadow box for Halloween!


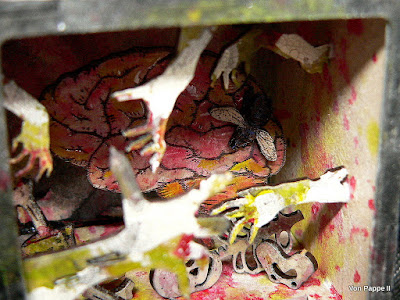
Watch out! Zombies are coming to feed on some fresh brain!!! Don't let them grab you!!!


Calico Craft Parts used: 

- Anatomical Brain MDF Wood Shape
- Zombie Arms and Boots - MDF Add On Sheet 
- Artist Trading Block Cube Kit - Square Aperture - medium size
- Zombies - Sheet of Halloween Mini Wood Shapes
- Bones - Sheet of Halloween Mini Wood Shapes
- Word Elements - Horror & Halloween
- Sheet of Mini Insects MDF Wood Shapes - Style 2


Yuk! The first fly has just landed on the fresh and still humid brain....but I guess the Zombies don't bother about flies sitting on their luncheon.


I created all my gory paint effects using DecoArt media Misters and Shimmer Misters. This time I didn't want to spend much time on painting in details or on shading so I went wild with the Misters and used the spray paint left overs in my spray box to dip the smaller Craft Parts into. The brain, bones, little zombies, zombie hands and word element had first been dry brushed with DecoArt premium Titan Buff acrylic paint which gives a perfectly pale but not clean white.


The Artist Trading Block was glued together using DecoArt matte Decou-Page and then I sprayed the insides with media White Shimmer Mister and Red, Primary Yellow and Yellow Green Misters.


I worked wet on wet and also used a lot (actually a huge lot) of water from the spray bottle to create drip lines but that obviously was too much this time (the MDF Craft Parts can really take a lot of stress from Mixed Media and paints) because it caused some of the cube's sides to warp and bend outwards and this way create gaps where the sides usually would touch being glued together...that wasn't intended (and also an effect that could not be unmade) so I decided to embrace imperfection and instead of neatly covering the cube's outsides with designer paper (as I had originally planned) go for some additional texture to even stress the wonky look of the cube.


The cube's outsides first got covered with a layer of DecoArt media Carbon Black Mister spray paint and once that had dried, I generously scraped on the DecoArt media black Modeling Paste with a palette knife to fill the gaps and also create yummy worn looking texture!


I heat dried the zombie hands and then scraped on some traces of white DecoArt media Crackle Paint here and there using the very tip of my palette knife. I put the pieces under my work desk lamp to speed up drying and crackling.


In the meantime I loosely added DecoArt Triple Thick to the painted and dry Anatomical Brain craft part. I made sure I didn't cover it evenly, so the Triple Thick would stress the brain's structure - which it did just perfectly! Yay!


This picture shows how I left some areas untreated and how the Triple Thick nicely domed while it dried!


And this picture shows how nicely this effect turned out! 


All the finished elements were glued in place using matte DecoArt Decou-Page for the larger bits and super glue for the tinier pieces that didn't have large areas that could be used as adherends.


I added some finishing touches using diluted DecoArt media Carbon Black Antiquing Cream as the Zombie hands looked way too neat and tidy. ;)


The two little Zombies were glued to the top 


and I used four tiny spools as box feet. 

The brain was glued to the cube's back using a small spool as a distance piece. 
The fly was a left over from an earlier project and was painted using DecoArt Dazzling Metallics Ice Blue and Titan Buff premium acrylic paint. 


Done! 


I hope you like my Zombie Shadow Box (at least a little if it is too much gore and Zombie horror for your liking)!

I had a lot of fun creating it and by dabbing the primed Craft Parts into the paint left overs in my spray box it also was quite quickly done and didn't need any fiddling with shading and adding realistic detail (I sometimes love to fiddle and go for a realistic look but at other times I aim for a more splatter-y and random look and in this case splatter-y was just perfect)  . I also love the cube's outside that turned out way better because of my "accident" than the originally planned version!


I wish you a lot of fun with lots of joyful spookilicious Halloween crafting and leave you with some close ups and images of the finished "Go for the Brain!-Zombie Box". 
(as always you can click on any image for a larger view)


Hugs and happy crafting!
Claudia 
xxx


Saturday 28 September 2019

BlackBerry Wood ATB by Jannet


Hi, I am delighted to have been invited to guest design for you today. It was difficult deciding what to create, with so many wonderful wood products to select from! I love hares so I knew I just had to pick them!


I used acrylic paints to colour my hares, and mixed a little fine marble dust into the paints to give some texture to the hares furry coats.  After painting the yummy blackberries, I applied some glossy accents over the top to give them a juicy, irresistible appearance


I covered the inside panels of my cube box with gesso, and water coloured  a background. I also stamped a few trees, and birds. Some autumn flowersoft added depth and texture to some of the trees.


I covered the bottom panel in a generous application of DecoArt texture paste. I arranged my hares, blackberries, twigs, and other items from nature into it. After setting it aside to dry overnight, I covered the outside panels of the cube with texture paste. When everything was dry I painted  some autumn colours over the texture paste. 

Before assembling and gluing the cube together, I hung a bird from the inside top using a little thin thread. When the cube was set, I adhered a twig to the front of it, and perched some little birds onto its branches. I then draped some  autumn coloured moss over the top of the cube, and down over the branches to give the appearance of autumn leaves.  I finished by adhering some painted art stones all around the bottom of the box cube. 

I had great fun playing with the hares and all of the enchanting wood products. I will be back on the 12th October with my final guest  project. Have fun, there are so many different and wonderful things you can create with the vast array of wood shapes at Calico Calico Craft Parts . xx


I used the following products for Blackberry Woods


Wednesday 25 September 2019

House Paintbrush Pot - by Lesley

Hey everyone. Lesley here with a little altered house shape turned into a paintbrush pot.


This is one of the block style tall houses without the roof. I glued it all together and then gave it a coat of gesso.


I used water soluble sticks to create a background, then added printed tissue over the top.


Some random stamping was added, and I used metallic wax around the edges.
I sealed the pot with Mod Podge and then gave the girl a little love heart.


Thanks for reading,
L.xx

Ingredients used
Block style tall house kit
Primitive heart mini plaques

Sunday 22 September 2019

Autumn Mists - Storage Box

Hello, it's lovely to be here at Calico Craft Parts Blog, sharing an Autumn themed project with you.


When I'm not creating, one of my favourite things to do is to go on a country walk. Wandering in Nature is such an inspiration and, although there's something wondrous to see in every season, I find that autumn's light, colours and textures never fail to spark ideas for me.


I love to keep my art supplies on my desk in decorated storage that I hope will stimulate ideas for new projects, so I decided to try covering some cube storage in a combination of re-cycled tea-bags and napkin tissues. What I love about this mini-frame from Calico is that it can be adapted to evoke spring, summer or autumn.


The combination of napkin fragments, tea-bags and gesso was a great one for creating the impression of autumn mist.


Placing a single layer of tea-bag over the napkin, covering this with a diluted coat of Gesso and then painting over with a water-colour wash gave me the autumn mist effect I wanted.


A collage of autumn coloured napkins; washi tape and Acrylic paints diluted with Matt Medium helped create the mellow days of autumn when the boughs are heavy with fruit.


It's fun to create the effect of the turning leaves and to blend Calico Craft Parts in with the napkin design.


The Sheet of Mini Acorns and Oak Leaves is one of my favourites, reminding me of that thrill when we find Nature's treasures at our feet.


My Nature Goddess and her squirrel companions remind us that autumn is the time when we prepare for the future winter days. We bid farewell to summer, but it's a time of new educational terms too when we add to our store of knowledge.


Turquoise water-colour over Gesso co-ordinated with with the napkin tissue and tea-bag portraits and recalled those misty autumn skies. Now my storage box is finished and ready to my collection of oil pastels and to provide inspiration for lots of sketches and paintings over the coming winter months. Enjoy the fruits of autumn until we meet again in 2 weeks' time.
Calico Craft Parts used in this Project
Cube Storage Box Kit (large)
Wood Sugar Maple Leaf and Twig
Squirrels on a Branch Wood Shape
Mini Garden Birds Wood Shapes
Autumn Multi Frame Oak and Acorns (small)
Mini MDF Acorns and Oak Leaves

Saturday 21 September 2019

Bewitched by Kerstin

Hello crafty friends!

I was inspired to use an old picture frame in the shape of a house and created a shadow frame in mixed media style.

Some of you may remember last year when I was totally in love with this ravishing devil from Calico Craft Parts. I love that he so casually and lazily swings his leg over the edge, so he can always sit down very effectively.

Last year he sat on the fireplace
and this year he has made himself comfortable on the roof ridge.


We know a very funny saying here, which is always used with a wink of the eye 
when someone is too careful with his things:

 ... 'and he swung from chandelier to chandelier to spare the carpet'. :-)

Sometimes I don't dare to use all the wonderful craft treasures, 
but if they're just lying unseen in the closet, nobody can see 
what you're doing with them, right?! 


How I started


I used only three very amazing Calico Craft Parts
 wooden shapes from the great 

 Autumn - Halloween section 


Winged Devil MDF Wood Shape

Chandelier MDF Wood Shape - Style 14

Eyeballs & Veins - Halloween Wood Corner


some details


Happy crafting!

Kerstin