

Watch out! Zombies are coming to feed on some fresh brain!!! Don't let them grab you!!!

Calico Craft Parts used:
- Anatomical Brain MDF Wood Shape
- Zombie Arms and Boots - MDF Add On Sheet
- Artist Trading Block Cube Kit - Square Aperture - medium size
- Zombies - Sheet of Halloween Mini Wood Shapes
- Bones - Sheet of Halloween Mini Wood Shapes
- Word Elements - Horror & Halloween
- Sheet of Mini Insects MDF Wood Shapes - Style 2

I created all my gory paint effects using DecoArt media Misters and Shimmer Misters. This time I didn't want to spend much time on painting in details or on shading so I went wild with the Misters and used the spray paint left overs in my spray box to dip the smaller Craft Parts into. The brain, bones, little zombies, zombie hands and word element had first been dry brushed with DecoArt premium Titan Buff acrylic paint which gives a perfectly pale but not clean white.

The Artist Trading Block was glued together using DecoArt matte Decou-Page and then I sprayed the insides with media White Shimmer Mister and Red, Primary Yellow and Yellow Green Misters.


I worked wet on wet and also used a lot (actually a huge lot) of water from the spray bottle to create drip lines but that obviously was too much this time (the MDF Craft Parts can really take a lot of stress from Mixed Media and paints) because it caused some of the cube's sides to warp and bend outwards and this way create gaps where the sides usually would touch being glued together...that wasn't intended (and also an effect that could not be unmade) so I decided to embrace imperfection and instead of neatly covering the cube's outsides with designer paper (as I had originally planned) go for some additional texture to even stress the wonky look of the cube.

The cube's outsides first got covered with a layer of DecoArt media Carbon Black Mister spray paint and once that had dried, I generously scraped on the DecoArt media black Modeling Paste with a palette knife to fill the gaps and also create yummy worn looking texture!

I heat dried the zombie hands and then scraped on some traces of white DecoArt media Crackle Paint here and there using the very tip of my palette knife. I put the pieces under my work desk lamp to speed up drying and crackling.

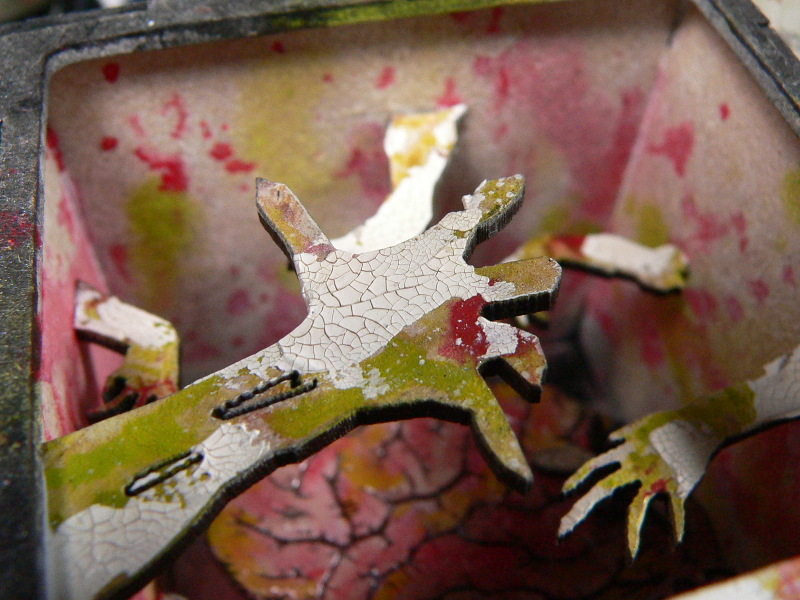
In the meantime I loosely added DecoArt Triple Thick to the painted and dry Anatomical Brain craft part. I made sure I didn't cover it evenly, so the Triple Thick would stress the brain's structure - which it did just perfectly! Yay!

This picture shows how I left some areas untreated and how the Triple Thick nicely domed while it dried!

And this picture shows how nicely this effect turned out!

All the finished elements were glued in place using matte DecoArt Decou-Page for the larger bits and super glue for the tinier pieces that didn't have large areas that could be used as adherends.

I added some finishing touches using diluted DecoArt media Carbon Black Antiquing Cream as the Zombie hands looked way too neat and tidy. ;)

The two little Zombies were glued to the top

and I used four tiny spools as box feet.
The brain was glued to the cube's back using a small spool as a distance piece.
The fly was a left over from an earlier project and was painted using DecoArt Dazzling Metallics Ice Blue and Titan Buff premium acrylic paint.

Done!

I hope you like my Zombie Shadow Box (at least a little if it is too much gore and Zombie horror for your liking)!
I had a lot of fun creating it and by dabbing the primed Craft Parts into the paint left overs in my spray box it also was quite quickly done and didn't need any fiddling with shading and adding realistic detail (I sometimes love to fiddle and go for a realistic look but at other times I aim for a more splatter-y and random look and in this case splatter-y was just perfect) . I also love the cube's outside that turned out way better because of my "accident" than the originally planned version!

I wish you a lot of fun with lots of joyful spookilicious Halloween crafting and leave you with some close ups and images of the finished "Go for the Brain!-Zombie Box".
(as always you can click on any image for a larger view)


Hugs and happy crafting!
Claudia
xxx

Very cool and eerie Claudia, love the creative use of hands, the random effects are always the best, you just have to know how to handle them, right?! Hugs Kerstin xx
ReplyDeleteYep! You're absolutely right, Kerstin!;)
DeleteThanks for the lovely comment. Have a good start into the week!
Hugs,
Claudia xxx