

Have you already discovered the new fabulous Tea Caddy in the Calico Craft Parts store? I love it and I first thought of maybe using it for something else than tea bags (maybe a new storage for embossing powder jars...?), but then decided to treat myself to a beautiful steampunk style tea caddy that I can add to my beloved "tea treats shelf".

- MDF Tea Caddy - Storage Box Kit
- Sheet of MDF Scrabble Tiles - plain
- Steampunk Mechanical Clockworks Motif - Style 27
- Steampunk Mechanical Clockworks Motif - Style 30
- Sheet of Mini MDF Alphabet Letters - Copperplate Gothic
- Sheet of Mini MDF Hardware Wood Shapes
- Sheet of Mini MDF Wood Cogs - Style 8
- Sheet of Mini MDF Wood Wings - Style 4
- Word Elements - Steampunk & Vintage

This is a picture of all the Calico Craft Parts sheets and pieces I have used. I also like to take a picture of the laid out pieces for my own reference (because during the process I tend to forget about the exact spots I wanted the pieces to go in ;)

For additional dimension on the tea caddy's lid, I added an MDF coaster that fit just perfectly.
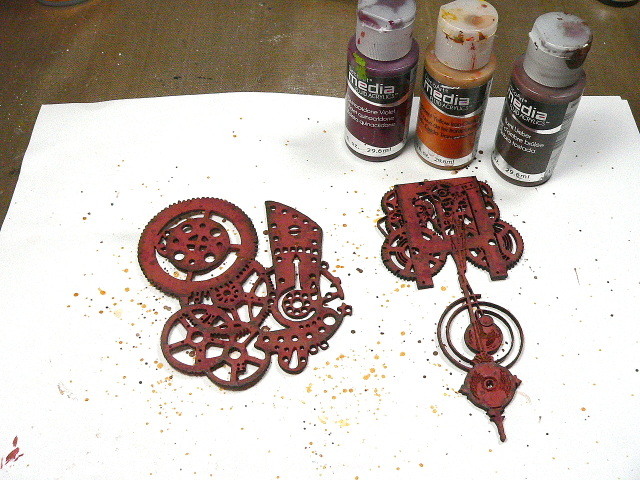
I started with painting the plain scrabble tiles, the two Mechanical Clockwork shapes, two mini cogs and the outer edge of the tea caddy lid in DecoArt Americana Red Iron Oxide. This would make for a lovely contrasting tone against the beautiful pale turquoise from the Americana "Sea Glass" paint. (as you can see I have even done a sketch this time on which I planned and marked the paints and colours I wanted to use).

While these parts were set aside to dry, I painted the coaster and the tea caddy box in DecoArt Burnt Umber StudentAcrylic paint. I used a soft wide flat brush to minimise visible brush strokes.

Now that was set aside to dry and the previously painted pieces needed some more attention. I painted dark edges in DecoArt media fluid acrylic Burnt Umber around the coaster's and scrabble tiles' edges and created a shading effect. To do so I first applied water with a brush around the edges I wanted to darken and then added the paint with a detail brush. The water on the pieces dragged the paint towards the center and I also used the clean brush to even out spots where there was too much dark paint.

It's a bit like watercolour painting on the Craft Parts. I did the same with the beautiful Mechanical Clockworks shapes.

I brushed an even coat of DecoArt Weathered Wood onto the painted box and coaster using the soft wide flat brush again. Then I put these pieces to the side to let them dry to the touch before I could add another layer of paint in Americana Sea Glass.

In the meantime I sprinkled some diluted DecoArt media fluid acrylics Transparent Yellow Iron Oxide, Quinacridone Violet and Burnt Umber onto the clockwork pieces.
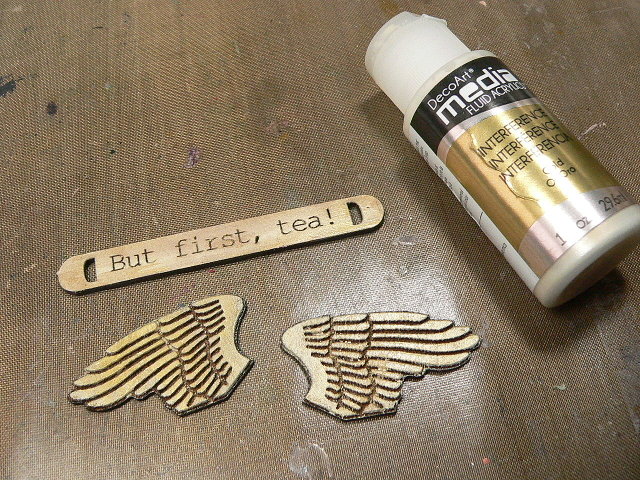
The Word Element was dry brushed with DecoArt premium acrylic paint Titan Buff into which I added traces of Burnt Umber fluid acrylic while the paint was still wet.

Time to glue the letters onto the scrabble tiles! I used tweezers to hold the small letters while I applied matte DecoArt Decou-Page with an old detail brush and also to put them in place on the tiles.

By then the Weathered Wood had dried to the touch - so I could add DecoArt Americana Sea Glass acrylic paint on top and watch the beautiful crackling effect happen. Then the lid and box needed to be set aside to dry again.
The wings had been dry brushed with premium Titan Buff too, but I found they lacked some metallic bling. So I added a thin layer of DecoArt media Interference Gold fluid acrylic on top.
The letters and part of the clockworks were painted using DecoArt Matte Metallics Vintage Brass and Aged Bronze.

I painted the letters and screw heads after they had been glued in place with matte Decou-Page.


Time to assemble all the pieces and finish off my steampunk Tea Caddy!

The back side:

Some detail shots:


and once more the finished tea caddy...

See you in two weeks!
Hugs and happy crafting!
Claudia
xxx

You're going to have the most beautiful and the most original tea caddy in town! I love the colour combo on this so much and great use of embellishments! It's fabulous, Claudia! xx
ReplyDeleteThank you so much, Julie Ann! :)
DeleteIt's my favourite go-to colour combo I guess...lol. Seems I never tire of that one. ;)
Hugs,
Claudia xxx
A wonderful wordplay, absolutely ingenious and clever just like the whole caddy box. Brilliant!! Hugs, K. xx
ReplyDeleteHach....! Thank you, danke, danke, merci beaucoup, liebe Kerstin! Freut mich, dass sie dir so gut gefällt!
DeleteBussi,
Claudia xxx