Thursday 28 December 2017

A New Year Gift (which lasts the whole year!) by Jennie

Hello and welcome! I hope you all had a wonderful festive time and are perhaps thinking about the New Year which is now only a few days away. I always like to have a couple of small new year gifts ready for when we get invited over the New Year to visit friends for supper or drinks. It is always nice when that gift lasts through the year as well.


Additionally with this project I have a particular friend in mind who asked me recently for some ideas for creating a book/box with scrapbook papers and Calico Craft Parts embellishments rather than mixed media products. Hopefully this project will appeal to those of you who might want to use up some of those scrapbook papers we all undoubtedly have (in my case more than I could possibly need in a lifetime!)


I have used the smallest of the vintage book/box kits and have used a single piece of 12 x 12 scrapbook paper which also had a little sheet of tags and flowers with it as well.


It was very easy to measure out the covers and then trace around the corners. I am using the smallest of the book/box kits and my page measured 4 3/8" by 3 1/4".


Before glueing the pages down I edged them with a little brown ink and once dry sanded the edges to reveal the white core of the paper. This also helps to even out any of the cutting.


I stuck the box together as I had decided to leave the inside as wood. Then I cut some 3/4" strips of patterned paper which I then cut to size to fit the edges of the box. Again I blended some ink around the edges before glueing them down. The box comes with a little notch which "clicks" into the book cover when shut. I found though that using papers instead of paints this little notch could not get through the hole, so I cut it off roughly and then sanded it down and made a different closure for the book (see below).


As this is a New Year's gift I wanted to put a timepiece on the front and what better than this fabulous steampunk clock (as you know one of my favourite CCP pieces!). I used a little bit of white paint dabbing it on with a stipple brush so that some of the brown of the mdf showed through. I did the same for the little butterfly as well.


I thought I would use some letters too on the front and painted the mini copperplate letters with a little more paint. These can be a bit fiddly to paint but I always put them on some masking tape to hold them still while I dab away at them with the paint. The masking tape had a done a walkabout here in the craft room, so this is a bit of double sided tape I stuck to my mat!


Finally a few embellishments for the front cover - some vintage ribbon and lace, muslin and some flowers. The little tag is beautiful but in the end I didn't use it.


As I explained earlier I had to think of another way of closing the book, so I have added ribbon as a closure. On the back of the book I cut two small pieces both for decoration and to hide the well stuck down ribbon.


On the front my ribbon is held securely under the clock.

A few close ups of the added CCP pieces.


I decorated the inside of the box with some more layered pieces from this gorgeous paper.


And added a little clustered sentiment on the inside front cover.

And the gift ......


The little box holds three votive candles - these are scented Vanilla and Cranberry, the scent of which I hope will last when the box is used through the year.  I have no idea whether this will be needed at the New Year, but if not then I am sure it will make a lovely birthday gift as well.


I really enjoy working with these little book/box kits and what I love the most is the beautiful spine which I never want to cover up!

I hope this has given you some ideas for using these fabulous little box/book kits and perhaps using up some of your scrapbook papers.

Thank you for joining me today and I wish you all a very happy and creative New Year when it comes!

Jennie x


Calico Craft Parts used:


Monday 25 December 2017

Calico Christmas - by Claudia

A most wonderful Christmas Day to you all, dear Calico Craft Parts friends!

Over here in Austria presents have already been received yesterday, on the 24th, in the evening (brought by Christ Child to be found under the lit Christmas tree), but I know that in other countries presents can be found under the tree on the morning of the 25th (and are brought by Santa Clause instead). However: merry merry Christmas and joyful holidays with your loved ones (and have fun with your presents)!

I thought it was the perfect time to share a Calico Craft Parts project that I have already done a while ago but not shared with a tutorial on here yet. It's made from one of the lovely tiny Calico Craft Parts house kits and hangs on our Christmas tree...


I shared it on my blog quite a while ago alongside a little art doll - also made from a Calico Craft Parts art doll kit...


Calico Craft Parts used:

- Mini Block Style MDF House Kit - Short


To have a kind of open mini house shrine I simply left out the front of the house kit and glued the other pieces together using DecoArt matte Decou-Page.


The inside of the house shrine was covered with old dictionary pages....


Self adhesive copper foil tape was added to the front edge and all other edges too for soldering. That also helped cover up the slots where the front house panel that I hadn't used was originally meant to go.


I also added a small jump ring during soldering so I could hang the house on my Christmas tree.


With the use of black patina liquid I darkened the solder for a more antique look.


A wash of DecoArt media Transparent Yellow Iron Oxide helped tone down the (too) clean white dictionary page.


I used a little piece of wood for a small pedestal and a frozen charlotte and toned both down with DecoArt media Raw Umber Antiquing Cream. If you find that the Antiquing Cream doesn't stick with the porcelain doll, simply apply a coat of matte Decou-Page as a base. That will provide some tooth for any media to stick to.


The soldered house had been given a coat of matte Decou-Page first, then - after that had dried - a coat of DecoArt media clear Crackle Glaze. (sorry, no images of these steps).

As soon as that had dried (naturally!) I added Carbon Black DecoArt media Antiquing Cream to make the cracks more visible and wiped off the excess as needed.

Once I was content with the look I sealed everything with DecoArt media Gloss Varnish.


Done! 


Happy holidays and a happy New Year!
Claudia
xxx


Thursday 21 December 2017

My Favest Makes of 2017 by Lesley

Hey everyone, Lesley here with my most favest makes of this year.

I loved scrolling back through the blog and looking at everyones work!

My first piece goes back to February and was entitled Broken. It was a very personal piece for me, but something I look at now and can smile at rather than feel sad. It uses one of the Calico cubes....a top ten fave of mine from the website!


Next, I revisited May and another dolls head make called Perched on her Throne. She was a fun piece to create and she still sits on my shelf in the room of trash today!


Finally, we go back to August with a piece called Flying Skull People. No dolls heads in this one, but we do have skulls instead! ha ha!


I hope you all have a very Merry Christmas and a Happy New Year. Am looking forward to returning in the new year with more slightly weird makes!

See you all next year!
L.xx

Monday 18 December 2017

Calico Christmas Robins - festive decorations by Julie Ann

Hello, it's great to be at Calico Craft Parts blog as we approach the Festive Season! Do you have your tree resplendent with lights and baubles yet? Have you a collection of much loved heirloom decorations that make an appearance every year and that have special memories for you or do you prefer to create new ones each year? 

This Christmas my daughter and her partner will be making memories with their very first tree and they asked me if I could make them some decorations for it. They gave me plenty of time, so I have been busy creating baubles and miniature houses; but just to add the finishing touch, I set myself  the challenge of creating some 'last minute' quick and easy decorations, using Calico Craft Parts robins from the Garden Birds sheet of mini shapes.


This project is quick, easy and inexpensive! All you will need are some empty wooden spools, a broken necklace, some copper craft wire, a Christmas napkin, some acrylics, gel medium and glitter.


There is something so magical about the presence of garden birds in winter. Even in the frost and snow, they carry the hope of spring in their winter songs and in the sunlight glancing off their wings. Robins particularly remind me of stories like 'The Secret Garden' in which a friendly robin led the lonely and irritable Mary Lennox to a forgotten rose garden and, within its walls, the joys of friendship and the natural world.


I chose the image of a dove to complement my tiny MDF robin. I've given the spool and the bird shape a thin coat of gesso and I fixed the napkin tissue to the spool with some fluid gel medium.


To add interest and dimension, when I had painted my spool,  I squeezed some 3D modelling paste through a stencil of trailing ivy.


This will become transparent, but raised when it dries and you can add further texture with some distress glitter and a little acrylic paint to create the effect of the frosty ivy.


It's so easy to thread the copper wire through the spool, adding beads from the broken necklace. To add the robin, drill a tiny hole through the eye with a Dremel, thread through the wire, snip and secure with some jewellery pliers.


By curling the wire at the top with the jewellery pliers, you have the perfect hook to fit over the tree branch or twigs in your winter arrangement. Thank You so much to those of you who have stopped by today at this very busy time and to all those regular visitors who leave comments and who take the time to look at our projects here on the Calico Craft Parts Blog. It's 'Goodbye' from me now until next year, but I wish you a very merry Christmas and a Happy and Creative New Year!

Calico Craft Parts used in this project
Mini Garden Birds Wood Shapes

Thursday 14 December 2017

Christmas Angel Bauble by Jennie


The month of December is fairly running away with us now and around our house little bits of Christmas are appearing here and there.  The tree is not yet up so I thought it would be an ideal time to make a little Christmas Angel Bauble to hang on it.


I chose the smallest of the little Angels which sits so beautifully on the middle sized MDF bauble.


The MDF bauble was given a coat of gold acrylic paint before being crackled with DecoArt Weathered Wood. I wanted to keep the background as light as possible, so used a very white acrylic paint for the top coat crackle.  It looks more woody in real life! I then edged the bauble with a gold pen and added some text stamping here and there with a light gold ink.


I used the same colours on the little Angel but first gave her a coat of gesso which I left blank on her arms and face as they had a light pinkish hue (much better than trying to find a skin colour amongst my paints!). I did add a little sparkly crackle to her wings.


I layered the Angel on some foam pads which allowed me tuck some vintage elements in and around her and which also left room to add a small sentiment.


I finished off with a few micro beads for a bit more textural interest.


I think this would make a lovely gift at Christmas either for hanging on the Christmas Tree or adorning a present as a tag, particularly as the bauble and angel are so very inexpensive. So do have a look at how you can use Calico Craft Parts for your christmas tags.

Thank you for joining me today at this busy time and happy crafting!

Jennie x


Calico Craft Parts used:


Monday 11 December 2017

Christmas Box Frame - by Claudia

Servus and merry Christmas to you, dear Calico Craft Parts friends!


Christmas is fast approaching and I gladly managed to create another piece to decorate my home with to celebrate the advent season. It was a rather quick project, but due to  Calico Craft Parts' fab Birch Plywood Box Frame Kit I used it has become a real eye-catcher on my wall.


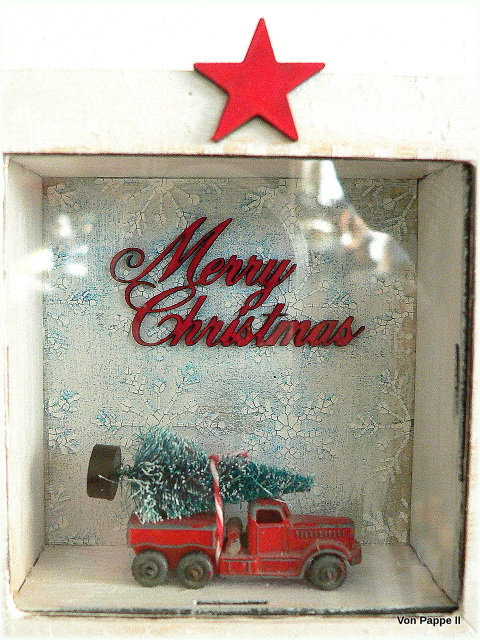
 I had this gorgeous red toy car that my mom brought one of my uncles from her stay as an au pair near Oxford when she was young and it had been sitting on one of my book shelves for ages - now it has found its perfect home, hasn't it?


Calico Craft Parts used:


I started with loosely brushing on white DecoArt media Gesso onto the plain parts of the Box Frame Kit using a very worn wide bristle brush to create visible brush strokes and texture. 


Once the Gesso had dried I masked the frame section of the back panel with masking tape and added some white DecoArt media Crackle Paint through a snowflakes stencil with a palette knife. I put the panel on the radiator to let everything dry. 


The other gessoed pieces were given a white star pattern by stencilling on white DecoArt media Gesso through a star stencil. I used one of DecoArt's stipple brushes for this. 


I only applied the stars to the outsides of the box sides, but I did both sides of the frame piece - back and front. 


In the meantime the DecoArt media Crackle Paint had done its magic...


... so I added some DecoArt Turquoise Sparkle to highlight the cracks and also add a bit of bling. 


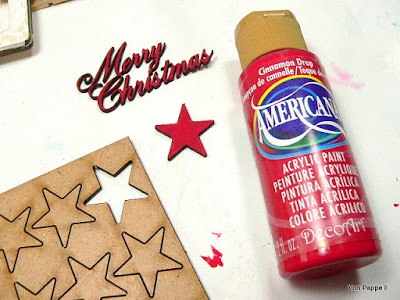
The Word Shape and star were painted with DecoArt Americana Cinnamon Drop acrylic paint. 


Time to mount the clasps that hold the acrylic glass pane in place:

I inserted the small dowels into the holes at the back of the frame using a pair of pliers to hold them in place while I gently hammered them in with a plastic mallet. 


Then I placed the V-shaped pieces onto the dowels and held them in place with my pliers - making sure the prongs were placed close to the hole so I could gently hammer them to slide my small pieces onto the dowels without braking them.  (see image below)


Once the painted quote and my car were glued in place inside the box , I removed the protective sheets from the front and back of the acrylic glass and inserted it into the frame.


Again I used pliers to gently rotate the little hammered on clasps so they slid into the slots of the box and kept everything in place.


The red star was glued to the front and the hanging hook was glued to the back of the box using matte DecoArt Decou-Page.


Et voilá! My Christmas Box was ready to be put up on a wall! Yay! 


But as the box frame is quite deep, you can also put it on a table or your mantelpiece if you want to. 


I hope you like my little 
"Christmas Tree Transport Scene in a Box"! 
;)


Wishing you
a very merry Christmas
and
happy holidays!!!!

Claudia
xxx