
How can "inside the box" be "outside" at the same time? Well, there's nothing philosophical to it (or maybe there is) - in this particular case it means that by looking inside my little diorama box you are looking out of the submarine you are in.

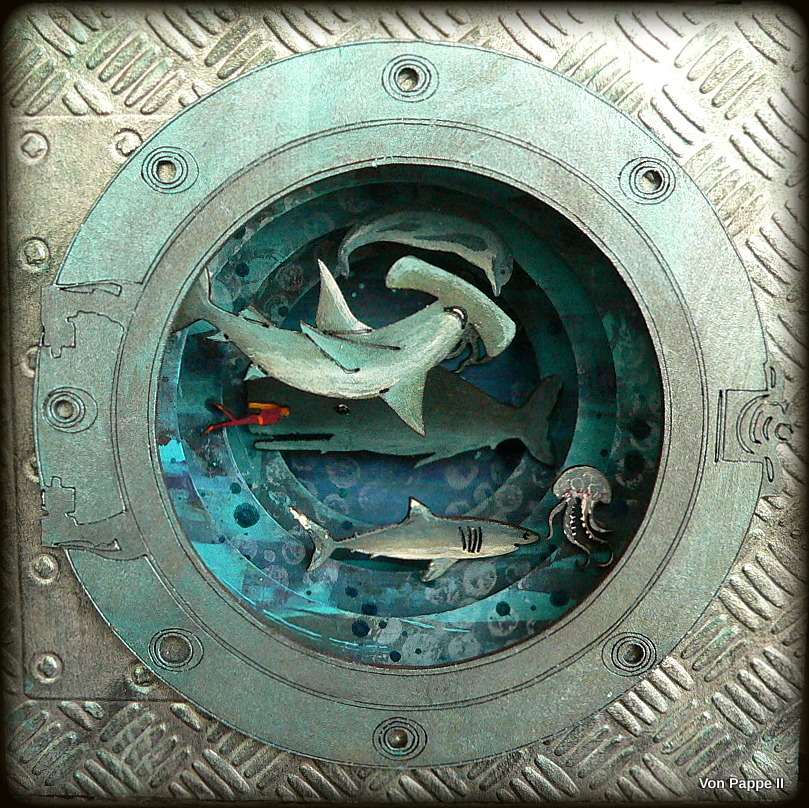
And this is my "looking inside is also looking outside the box"-box in whole.
As you can see it isn't too big (just 13cm x 13cm (5.1'' x 5.1'') high and wide and 6cm (2.36'') deep).

These are the Calico Craft Parts I used:
Ships Porthole MDF Wood Shape - large
Sheet of Mini MDF Nautical Motifs - Style 1
Hammerhead Shark MDF Wood Shape - small
I just love this ships porthole (and have already used a small one on this project HERE)! It forms such a beautiful "frame" for countless imagineable ocean scenes, so I started with this one and decided to create a kind of tunnel box with several layers that are meant to create the impression of looking deep into the ocean "out there".
First I laid out all the shapes I wanted to use to find their best positions for the different layers and holes:

The front and the four other layers were made from heavy black cardboard.
I cut five squares of 13cm x 13cm.
I used an embossing folder and my Sizzix to create the textured front panel in which I had die cut the largest hole. As you can see I used the smaller hole next in size for each following layer. (I had to make a little change of plans later during the process and glued the kraken to the back of the box and all the other animal shapes to the smaller holes instead). So I used just three layers with die cut holes in them (and not four as shown in the image above), a front and a back panel .

The porthole was given a dry brushed coat of DecoArt "Teal" Dazzling Metallics and a wash of DecoArt Media Carbon Black Antiquing Cream afterwards (to tone it down a little).

The animals were painted using DecoArt Media fluic acrylics in various blues and greens plus Titan Buff for the shading. I simply mixed away on my palette and used whatever tones I came up with. The fact that they were all created from the same few basic colours guaranteed that they would all go together well.


For the finest details I used a Size 0 fine tip brush that is normally used for painting miniatures. These were the colours I used. The little splash of red and orange (for the diver) adds some contrast that makes the blues even more intense.

The front panel was painted with "Moss Pearl" DecoArt Dazzling Metallic paint ..

....and then dry brushed with Carbon Black to give it a worn look and to make the texture more visible.

The other panels were painted using heavy body acrylic paints in various blues and greens. I simply added some dots of paint directly from the bottle onto the cardboard...

...and spread the paints with a wide palette knife in top-to-bottom motions, mixing the colours directly on the substrate. (If you are not content with the result, simply add some more drops of paint and repeat the process).

Using a rubber stamp and white stamping ink I added some bubbles. As the white from the first print would have been too intense I first stamped onto a scrap of paper and then used the "ghost print" from the stamp.
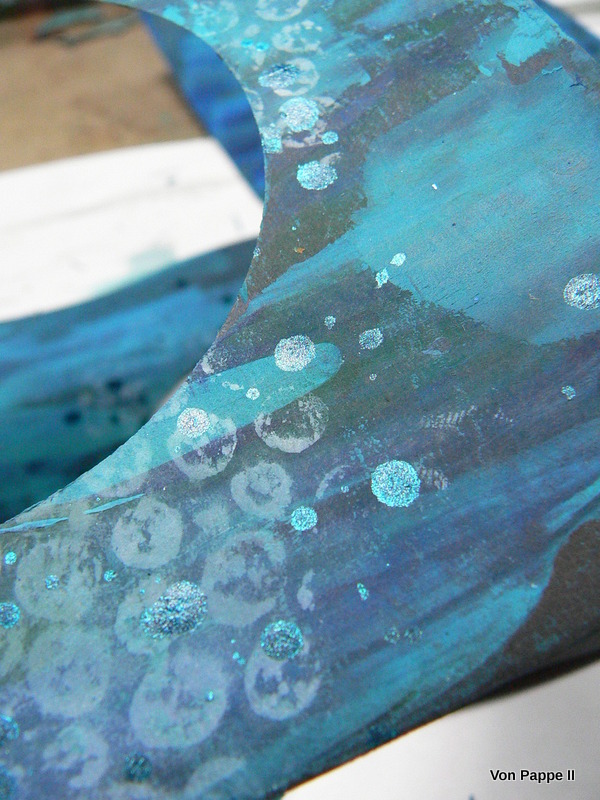
Next I added some splashes of DecoArt Media "Turquoise" Shimmer Mister by unscrewing the bottle and letting the paint drip directly from the lower end of the nozzle's tube.

To build up my box I cut eight strips of 1.5cm (0.6'')width and 13cm (5.1'') lenght of thick foam board. The 1.5cm distance between each layer guaranteed that no details would be covered up by the layer in front.

I carefully stacked my layers using matte DecoArt Decou-Page, paying attention to the perfect positioning of the animals ( a bit of overlap creates beautiful depth, too much overlap hides too much detail of the painted shapes).

The sides of the box were then covered by embossed and painted panels of 6cm (2.36'') x 13cm (5.1'') (done from the same heavy black cardboard). And to hide the white foam board that was visible on top of the box I covered it with two thin strips of embossed and painted cardboard.


I didn't cover the whole top though so my tunnel book box could be lit from above - like sunlight that lights the upper zones of the ocean:

I love how different lighting creates totally different moods!

Some more close ups:

See that bit of sparkle of the Shimmer Mister drops on the back panel?

And this diver is eye to eye with the sperm whale! (Divers who experienced this all said it has changed them forever).

The hammer shark is obviously peeking inside your submarine cabin and now pretending that it didn't.

And look at that beautiful jelly fish! (I have tasted jelly fish when I was in Hong Kong...and found that it is NOT edible - unless you have teeth made of steel! No - to be honest, not even then. lol)
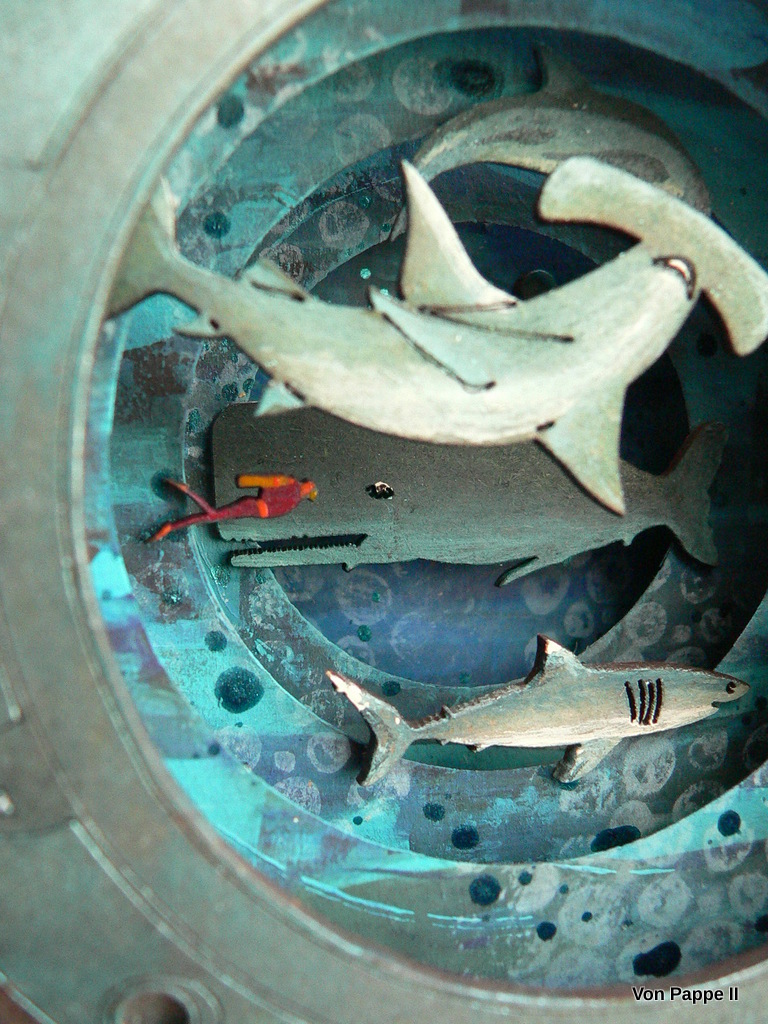
See the teeth of the sperm whale? It's such a gorgeous wood shape! (I cut off the little fountain it came with because it is underwater and not breathing at the moment).

Well, time to say good-bye for now. I hope you like my maybe-philosophical "looking inside is also looking outside" submarine box! I can also imagine this kind of project as a little book with pages to flip over...ah, so many ideas - so little time. ;) . See you in two weeks!
Hugs and happy crafting,
Claudia
xxx
Go shopping:

Wow, what a fabulous idea, it reminds me on beautiful pop up books and with my favourite topic :-) Many thanks for your Tuto! Hugs K.
ReplyDeleteThank you very much, dear Kerstin!
DeleteI too get never tired of telling tales of the Sea! ;)
Hugs back,
Claudia xxx
absolutely fantastic 3D result :)
ReplyDeleteThank you, Louise! XXX :)
DeleteYour project is totally stunning, Claudia! I love all the elements you put together on this one. An amazing design!
ReplyDeleteMar x
The title drew me in and I wasn't disappointed! Wonderful creativity and love how the DecoArt products have been used. So clever Claudia xx
ReplyDeleteThanks for the kind and lovely words, Margik and Julia! Highly appreciated! Mwah! XXX
ReplyDeleteWOW... just WOW !!!
ReplyDeleteOH, OH, OH this is so wonderful I can hardly stand it! Love love love it!
ReplyDeleteI love how you built up depth on this project and the idea of the lighting is just inspired! There's such a feeling of movement and wonderful 3D effects - a truly amazing project! xx
ReplyDeleteWow, breathtaking project Claudia!! Fabulous!!!! xx
ReplyDeleteGorgeous project Claudia and love all the details to look at
ReplyDeleteThis is unbelievably cool, Claudia! WOW oh wow!
ReplyDeleteFabulous idea and very inovative way to use the products. Tracy x
ReplyDeleteomg...what a great work.
ReplyDeletegreets
alexa
Brilliant design and construction Claudia xx
ReplyDeleteDas ist absolut brilliaant, Claudia! Ich liebe die Idee und deinen philosophischen Ansath ;)
ReplyDeleteTolles Projekt, ich bin begeistert!
Liebe Grüße
Evelyn
Sooo happy that you all like my project and tutorial so much, Chiller Giller, Lisa, Julie Ann, Coco, Katie, Autumn, Tracy, Alexa, Brenda and Evelyn! Thank you so much for the lovely comments! XXX
ReplyDeleteSo clever and original with such wonderful depth and dimension - and the metallic look is beyond amazing!
ReplyDeleteAlison x
Thank you, Alison! :) xxx
DeleteAmazing and inspirational work. This is going on my to do list for sure. Thank you.
ReplyDeleteThank YOU, Donna! :))) xxx
DeleteOh my gracious - what a FANTASTICALLY FABULOUS project Claudia. It seems this took hours and skills deluxe. It completely looks like fish swimming in the ocean. Your colors are just right on perfect swirling round and round. I actually feel a little sea sick - eheheheh. This is as close to the inside of a submarine as I want to get!!! Although when hubby and I were dating 44 years ago - we did go to the submarine races at Lake Hold-her-closer aptly names because we didn't come up for air while kissing!!!!!!!!!!! JUST WONDERFUL. You never cease to amaze me with your INCREDIBLE creativity. LOVE LOVE LOVE.... XXj.
ReplyDelete:)))
DeleteThank you very much, Joi! I didn't know that one can go to submarine races. lol
Hugs,
Claudia xxx
WOW, WOW and WOW! I think I have rug burn on my chin because my mouth opened and it hit the floor. FANTASTIC WORK OF ART.
ReplyDeletegigggle. Thank you so much, Karenliz! :) xxx
DeleteSuch a wonderful project. Thanks for sharing.
ReplyDeleteThank YOU, Linda! ;) xxx
Deleteamazing, truly.
ReplyDelete