Sunday 28 June 2015

Vintage Scrap Page by Astrid

Hello every one, Astrid here with a new project to hopefully inspire you.....


With this project I hope to show you, how the wonderful Craft Parts can be used in a lay out. As you can see mine is all vintage, but of course you could use them just as easily on a more modern Scrap page.

The Craft parts used for this project were as follows:

My substrate was obviously the Mixed Media Grey board. Mine was only 8 x 8 " (200 mm by 200mm), but you can get them up to 12 by 12".


I started by adding some texture paste through a stencil.

Next I covered the whole board with a thick layer of gesso and when it had all dried added some stencilling, using Archival ink. I also added background stamping with a variety of back ground stamps and added more colour with the help of mica sprays.

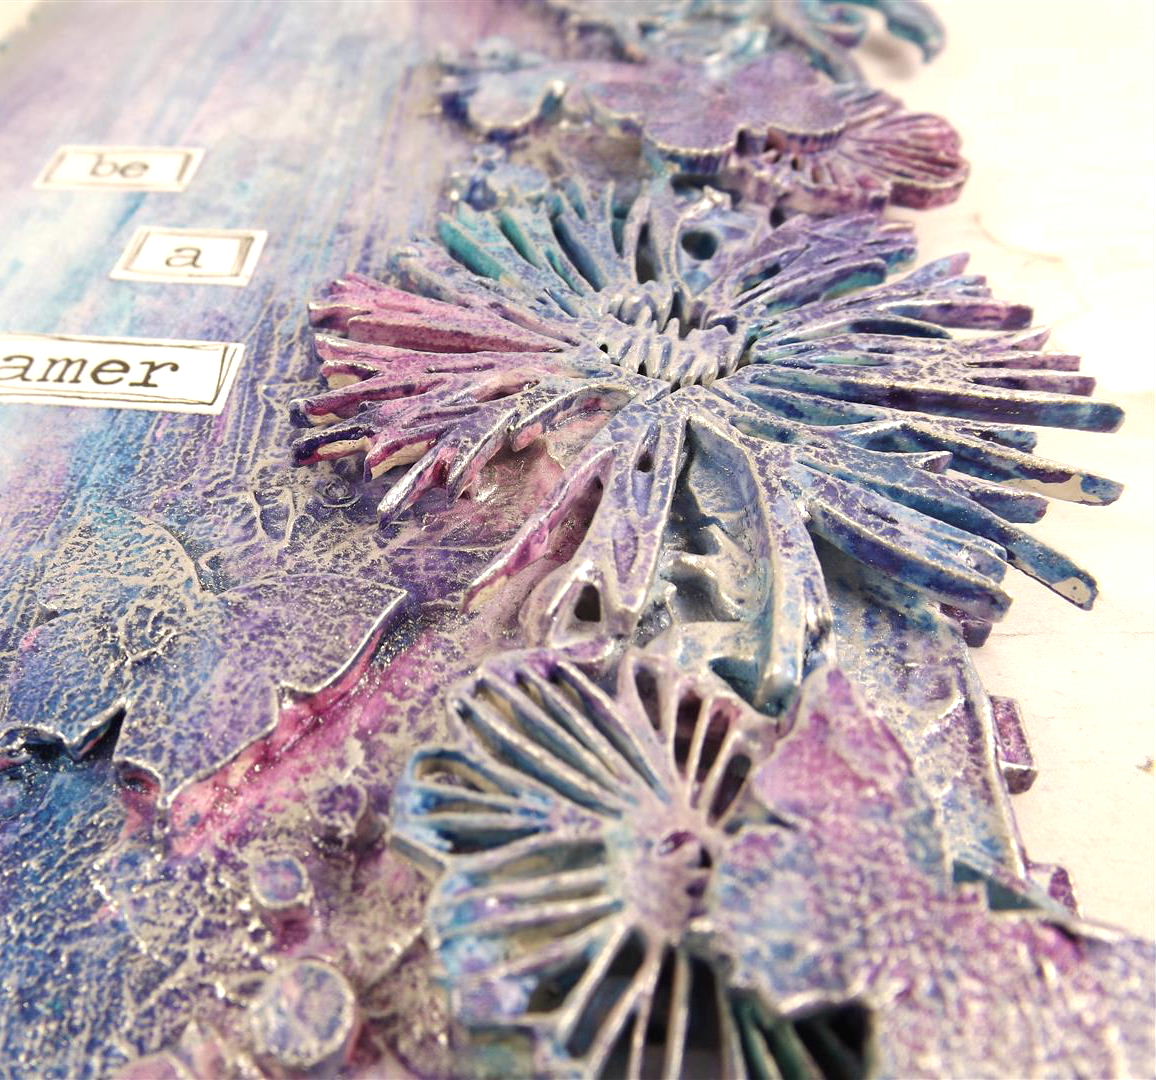
I then went to work on my chosen Craft Parts.


I covered them with a thin coat of crackle paint, mainly for some texture. When the tiny cracks had appeared I coloured them with the same colour of Archival ink I had used on my background stencilling. These inks colour the craft parts quickly and easily. I spritzt the surface with some surgical spirit (rubbing alcohol) in a little spray bottle. This lightens the inked surface and gives a mottled effect, a bit as if you use water on Distress Inks. When all had dried I edged them with some treasure gold. 

Below is a close up:

Finally I gathered some ephemera and a vintage photo (my dad and his big brother, one of my all time favourites), and layered it all up with some lace and flowers.


Here are a few close ups still:


I decided to keep the word Memories untreated, so that the brown tones would fit in with the vintage look ephemera and the brown tones in the lace.


Well and that is pretty much it. Do check out the mixed media grey boards, they come in many different shapes and make for a fantastic and sturdy surface to work on.


Thanks so much for dropping by, I hope you enjoyed your visit.

Friday 26 June 2015

Rusty distressed ATC trinket box kit: By Zuzu


Well here I am with my second ATC Trinket Box Kit.

I have gone a bit more mixed media on this one and of course there is rust and distressed grunge.
And just to show that it is really an ATC box and not really for soap, tarot cards and healing crystals, I have put in some of the gorgeous Calico Craft Parts individual ATC shrine blanks. I love those little blanks as you can use as is or separate them and use the backs for your ATCs (or as craft blanks) and the fronts can be used for frames etc.


I have stuck with using them as "cabinet cards" to display vintage photos. I was going to use photos my own ancestors but my printer decided it wasn't going to print. I had to use what I had to hand.


I used an embossing folder on some metal tape for the lid before adding paints and antiquing creams etc; then I simply added a few popular craft supplies from my stash (a different handle a metal word plate some rubber stamps), to give a more eclectic rustic look than the previous shabby chic one.


Calico Craft Parts Used:

ATC Trinket Box Kit
ATC wood blanks
Mini Butterflies (from Mini sheet)

Wednesday 24 June 2015

What On Earth? by Lesley

I love skeletons and skulls. In fact, i love bones in general.....they fascinate me.

No actual bones in this piece........but i did use one of the fab wood skulls!


I started off with one of the square plaques......these are ideal to use for bases of any art.
I painted the whole base with black gesso, and then added some rusty touches in the centre. In the corners i added glue squiggles. Once dry, i covered some of the board with two layers of tissue paper.........the glue makes great texture. I then painted over the top with rusty gold paint and brushed black mica over the top.


The skull was painted with various layers of rust coloured paint, finishing with a top coat of crackle glaze. I gave him some eyes and added rusty nails and feathers.


He's a handsome fella! I added the words 'What on earth?' because really.........who has a skulls head with nails and feathers as a head-dress?


Thanks for reading.

L.x

Ingredients used.
Square Birch Ply wood Plaque
Skull Wood Shape


Monday 22 June 2015

Flourishing Butterflies by Alison

Hello everyone, Alison here from Words and Pictures, and I've brought along some Flourishing Butterflies to share with you today.


What I mean by that is that I've been playing with the fabulous Mini Butterflies again, as well as some of the scrumptious Mini Cogs, and they're all nestled around one of the glorious ornate Flourishes now available to create an altered notebook cover which, I will confess, I'm rather in love with!


First I planned the layout roughly.  You'll notice I didn't end up with quite this many butterflies!


I had a lovely time creating the background - book pages, tissue tapes and various layers of gesso and crackle mediums are at the heart of it.


I applied texture sand paste and gesso to the large flourish (this is Curled Vine Fancy Flourish Style 2, but there are so many lovely ones to choose from) before gluing it in place.  I added the metal flowers and filigree pieces, and gesso'd all of it.


I decided I needed a bit of extra crackle texture, so I applied that and let it dry before going on to the next stage.


Ah yes, the next stage - lots of spritzing inky colour over and around it all - such fun.


As well as spraying on inky colour, I also used a paintbrush to apply paint (shockingly conventional, I know) to intensify the colour in places.


That also gave me a bit more control in deciding where and how much colour I was applying to the flourish, the flowers or the crackled "sky".


Both the butterflies and the cogs have been given a touch of golden shimmer using some iridescent gold paint - Interference Gold, which changes as it catches the light.


I've used some of the same stuff to add highlights and gilding on the flourish texture and the metal elements too.


The butterflies gleam as they catch the light (these are mostly from the Mini Butterflies Style 4 sheet) ...


... and the cogs add a little hint of Steampunk glamour...


(... or should that be Glampunk? - something I explored with one of my first ever posts for Calico way back when!!)


These are from the Cogs Style 1 sheet, and I love how they glow amongst the other elements.


I quite often leave my Calico Craft Parts "naked" as I find them so beautiful, but as you've seen in my last couple of projects, they're also fabulous when altered and so much fun to play with!


So there's my notebook cover for you - I hope you like it.  If you're tempted to go shopping, you can click on any of the links in the text to go straight to the relevant Craft Parts.  See you again soon.

Alison xx

Friday 19 June 2015

Shabby Chic ATC Trinket box kit: By Zuzu


Hi there everyone.

Have you checked out the new kits that have begun to appear in the shop? Shrines and ATC trinket boxes for example?


I shared a couple of ideas for shrines last time and this weekend I am doing ATC trinket boxes.I love them and so far I have found that I can fit lots of things in them (not just ATCs.). I am using the ones with the castellated edges but you can also get them with straight edges. I like how these ones have the lid click into place.


Of course ATCs are the exact size of traditional playing cards so I was able to put my "Gypsy Witch Tarot Cards" in to one. the full pack fitted in perfectly. You can buy some beautiful looking retro vintage playing card sets these days that would also go in there and make a great gift.


Something else that fitted in perfectly was my favourite hand made lavender soap bars.I love the combo of lavender and old lace. I painted the butterflies to match the soap on this. I think this would make a stunning gift (but I am keeping this one).


You can, of course, use it for what it was intended for and keep ATCs in it (I did that for next weeks example). you could fit in quite a few of your favourites or do a themed set to give as a gift.
I also have one that I am keeping some healing crystals in.


To make these shabby chic looking ones, I simply painted inside and out with white chalk based paint (a couple of coats), sanded it down gently for a smooth surface on the lid then stamped an image on to it. For things like this I often prefer to have the stamp face up and then press the wooden lid down into it. then i added some craft/washi style tape. I gave it all a white wash (very watery so the stamped image and the print on the washi tape still showed through), and then added some craft part embellishments. I don't always use whole flourishes on things, I break bits off to fit with what I am making and that's what I have done in this instance. I think these bits came from a fancy flower flourish, but I had used the flower head on something else.


So there you go... some ideas for these great ATC trinket boxes.

Calico Craft Parts Used:

ATC trinket box kit
Fancy flower flourish (parts of it)
butterflies (from mini sheet)

Thursday 18 June 2015

Be A Dreamer Today By Trish

Hello!

I have a 'Finnabair inspired' project to share today! There are so many Calico Craft Parts that work wonderfully for this type of project, so if you're into that kind of thing, head on over to the shop lol!


As you might imagine, the techniques involved in creating this are messy... but not that difficult! Use LOADS of gel medium to glue squillions of embellishments down, use LOADS of gesso over the top to give yourself a nice white base, then use LOADS of colour over the top! Simples!

I used watercolour paints with added mica powder to colour my project..


Then rubbed the dried paint with gilding wax to give the silver sheen. The gilding wax picks up the texture left by the gel medium as well...


I'll list the actual parts I used at the end, but really anything and everything can go on there! If you look carefully, you will see lots of dots..


These are the 'waste' from the holes of some mini cogs ..... Use everything!

Have a fab day!
Trish xxx

Calico Craft Parts used:
Base: part of a shadow box kit... on the web site soon hopefully!
Flowers: Knapweed , Poppy Flower
Flourish: Baroque Swirl, Fancy Flower Flourish
Butterflies: Mini Butterflies Style 4
Dots: from the Cogs style 5 sheet


Sunday 14 June 2015

Vintage travel album by Astrid

Hello everyone and thanks for stopping by here today!!


I am very excited as in about 3 weeks time I will be off to Australia for 7 weeks to be with my grand children there. I wanted to make an album for memories, photos, keepsakes and some art journaling when time allows. I decided the Nothched Rectangle Birch Ply Wood Plaques would be just perfect for the covers, as they are incredibly sturdy yet light and I somehow love their shape. When ordering you can ask for holes to be drilled in various places, so I asked for mine to be drilled on the left side, so my album could be closed with book rings.

This was a quick and fun project to do. I started by covering both plaques with some scrapbook paper:

The front


The back

Once the glue had dried I sanded the edges and then played around with stencils, stamps and inks until I was happy with the result.

Next I cut my inside pages using various kinds of watercolour paper, card, scrapbook papers and even tags. I cut holes with a cropadile and cut the notches with a circle punch.


Here you can see the finished front cover. I chose the words Travel Adventure from the stunning Olde English font. You can order any word with up to 12 letters and there are various fonts to choose from.
I finished it off with the wonderful Vintage Car Style 1 wood shape, as I wanted a totally vintage style to my album.

Here is a close up of the car, the detail is incredible. I thought it looked so beautiful the way it was, that I just glued it on, but of course you could do all sorts of alterations with it too.

And here is the back cover, this time I chose the Galleon Boat Wood Shape style 5.

Again, I left it just as it was for this project, as I just love the dark colour of the wood, but it would look amazing too if you painted it I'm sure.

The inside covers were covered with scrapbook paper again and I made an envelope for the back cover to keep memorabilia from the journey in.

A little flap will keep the envelope closed to keep things safe while traveling.

What I love about an album like this is how you can simply take the pages out when you are working on them and add more as and when needed.

Thanks for visiting here today