Saturday 29 May 2021

Altered Bottle Fairy House by Kerstin


Welcome creative friends!


I was inspired to create another bottle in altered art 

with an illuminated effect. 

It's a little fairy house in an enchanted forest.


Tips & Tricks - DIY a bark roof
 
which materials I used and a 
How to
 can you find here


some close up's


some stairs created with a worked fence


used Calico Craft Parts


Arched Door with Window Panel 

Blackberry Bramble

 Wild Rose Vine - Flora & Fauna Flourish Style 1

Sheet of Mini MDF Window Wood Shapes

 Picket Fence Panel MDF Wood Shape - Style 3

Sheet of Mini MDF Hinges Wood Shapes

Sheet of Mini Insects - MDF Wood Shapes Style 1


I hope I could inspire you! 

Have fun realizing your 

own visions and ideas!


Thanks for your visit!

Kerstin


Friday 21 May 2021

Embellishing a layout: by guest designer Liling Payne


Hello Everyone

Again, thanks go to Louse Crosbie for the invitation to be a Guest Design Team member for May. You will have seen my first blog post which was an ocean theme and for this second one, I decided to do a completely different theme based on the lovely floral and butterfly elements that are among the wonderful range of products Calico Craft Parts sell. I also ordered an ATC blank with rabbit to do for my granddaughter as she has just lost her pet rabbit, so I thought this might be a nice wee memorial.

I used to think that mixed media was only about gothic, steampunk or grungy type media and it’s only since I started playing around with the media, that I realised it can be anything you like and it meets all crafting styles e.g. scrapbooking, cards, boxes and basically anything that you wish to embellish with the fabulous parts available from Calico Craft Parts so go ahead and give it a go.

I prepared all the pieces with a fine layer of white gesso and let it dry overnight (you can dry in a few minutes using a heat gun if you prefer). This gave me a base colour to which I added distress inks and a glacier paste for some shimmer

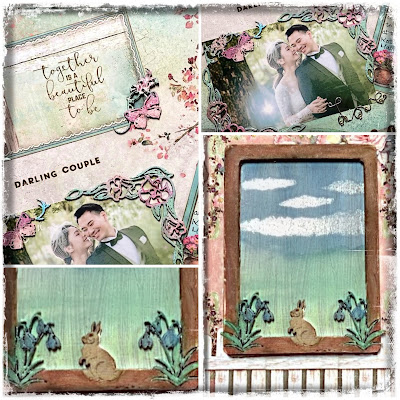
I decided to do a scrapbook page of my nephew’s wedding and used these parts to form a frame around the photo which I laid onto co-ordinating cardstock. I had coloured the beautiful calico craft parts to match the floral theme of the wedding.


I love how versatile the embellishments are and will definitely be using more elements

I then decided to use the ATC to make a memorial tag for my granddaughter and loved the rabbit in the bluebells which I coloured accordingly.

First of all I laid a base of white gesso and let it dry overnight (or you can dry in a couple of minutes with a heat gun if you do not like to wait).
I then decided to use my distress inks as watercolour to paint the background scene which I wanted to be an outdoors one for the frame which had the rabbit and bluebells.


Then I joined the frame and background to provide this lovely little ATC tag.

I hope you’ve enjoyed seeing how versatile the wooden embellishments can be and check out the website to see all the fabulous themes and designs you can make at an incredible price to enhance and embellish your crafty makes.

Thursday 20 May 2021

Timeless Beauty by Liz

  Hi guys, I'm back today with another dt post for

Calico Craft Parts,

Have you seen the amazing MDF and Plywood pieces they have in their online store? do check them out thery are well worth a visit,

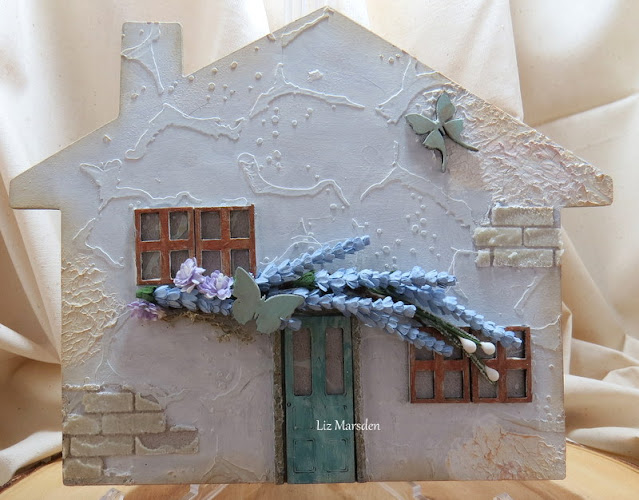
So today I have altered one of the MDF House shaped mixed media boards, so many possabilities with these, but this time here's what I created


I also used the Mini MDF wood windows and the Panelled door with frame,


I gave them all a coating of white Gesso,


When dry I used a couple of stencils from my stash to decorate the House, this gives depth and added interest to the base, 


I adhered the windows of which I glued two single ones side by side both times to create a larger window effect, then I adhered the Door which I had previously painted with a light Patina effect paint and I had used some stone effect paste on the door frame,

I then added some brown paint to the window frames and another layer of white Gesso along with some crackle paste here and there too,


I went along the outside edges of the house with some distress ink, this gives a little definition to the house, as you can see I wanted a rustic look to the house so I went for a random look,

To finish off I took some flowers from my stash and adhered them as shown, then I adhered the Butterfly on top of the flowers and one on the top of the House for balance, these again I had first painted with white Gesso, then when dry a light Patina paint,

I hope I've inspired you to have a go,

Mdf House shape - Mixed Media Board

Mini Butterflies - Style 4

Mini Wood Windows - Wood Shapes

Panelled Door With Frame - style 8

Happy Crafting!!

Hugs Liz xx

Monday 17 May 2021

Ideas for ATC frames: by Louise Crosbie.


Hi there. 
I know a lot of you will make and swap ATCs (Artist Trading Cards) but I also know a lot of you don’t. 
But that doesn’t mean you can’t still make great use of the ATC frames.

An ATC should be the same size/dimensions of all other official trading cards like baseball cards, Pokemon cards etc. And thus, they should fit in to the official trading card pocket pouches for collectors.
Sadly, nowadays, folks call just about any small piece of mixed media or paper raft an ATC, regardless of its actual shape and size. This makes it impossible to collect them the way they were intended. This is the reason I stopped collecting. I have two beautiful large lever arch folders filled with the official collectors pockets and each with a beautiful display of ATCs of the correct dimensions. But in my last few months of swapping, my returns were sadly not proper ATC dimensions and wouldn’t fit in to my collection.

However despite not doing ATCs anymore, I still had some of the gorgeous little (correct dimension lol) ATC frames. 
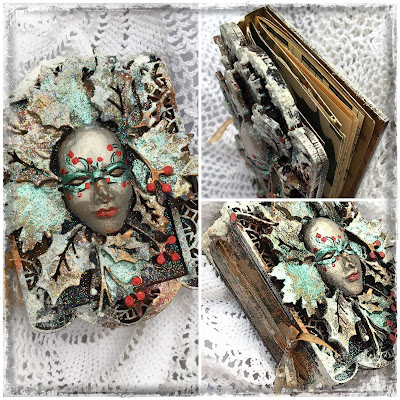
I turned one into a sort of miniature cabinet card for my little vintage fairy and put it on a rusty canvas. 


The second frame, I turned into a miniature junk journal which I intend to complete in a Yule theme so I can give it as a stocking filler gift.


These little frames are so versatile. They make great key fobs, wooden tags, embellishments for scrapbook pages and cards... 

Thanks for reading. 

Supply list 

Saturday 15 May 2021

Atelier Mixty Motions by Kerstin


Welcome creative friends!


I was inspired to create a mini atelier in grunge style 

with a touch of steampunk.

 I used the lower part of a cardboard gift box and as background 

old book paper with white crackle paste

 and distress ink for stains and splashes.


 some close up's


I love to design shelves in 3D look, here 2 supports

MDF Wood Corner Style 6 - Sunbeam 60 x 60 mm

+ one

Rounded Rectangle Shape - MDF Mixed Media Board 

100 x 50 mm

+ and as front panel

Steampunk Mechanical Cogs Motif Style 1

 colored with black acrylic paint 

and a special embossing powder


used Calico Craft Parts


MDF Wood Corner Style 6 - Sunbeam 

2x +

 Rounded Rectangle Shape - MDF Mixed Media Board 

100 x 50 mm for handmade shelf


Steampunk Multi Frame - Pipework

Steampunk Mechanical Clockworks Motif Style 31

Steampunk Mechanical Cogs Motif Style 1

Steampunk Mechanical Cogs Motif Style 22

Rounded Rectangle Shape - MDF Mixed Media Board 

2 x 75 x 38 mm


Clock Hands

Sheet of Mini MDF Hardware Wood Shapes

Sheet of Mini MDF Wood Cogs - Style 8


I hope I could inspire you! 

Have fun realizing your 

own visions and ideas!


Thanks for your visit!

Kerstin

Friday 7 May 2021

Marine plaque by Liling Payne


Hello Everyone

First of all, thanks to Louse Crosbie for the invitation to be a Guest Design Team member for May.  We were fellow DT members of another craft blog so it’s been a privilege to learn from all the talented crafters out there.

This has been my first foray into mixed media and a bit of a learning curve, but thanks to You Tube and Pinterest, I was able to find inspiration to help me choose what I wanted to make from the amazing range of products and themes that Calico Craft Parts sells.

I love oceons, sea life and the colours of the seas and oceons so I decided to choose ocean themed  products:


Helen, the owner, included an extra plaque with my order so I decided to use that as the base for today’s project. 

So first of all I decided to prepare the oval plaque and the craft parts with white gesso. 


I gathered a selection of ink pads and paints I thought would suit the project focusing mainly on aquatic themed colours.

I stamped the seahorse with some of the inks starting with where I thought the shadows would be so darker shades on the head and tail. I sprinkled water to activate the distress inks so it gave a nice mottled look to the sea horse. I then used the darker brown distress ink to draw some markings on the element then I used some bronze coloured modelling paste to highlight some areas and give a metallic sheen, then I added some sparkle with a glitter based products. This also helped give the shell a nice glossy effect (which, sadly does not show up in the photos). I also covered the base in various shades of green and blue mica spray, then added texture with some mesh fabric I had as well as muslin. I then played around with the different gesso, pastes and sprays until I got the look I wanted on the base, however it did end up very blue and green so that’s why I did some of the embellishments in paler colours and glimmer/glacier paste. I also laid some bubble wrap over the base to give me some more texture which I thought I could then use embellishment drops or glossy accents to highlight the bubbles.


Once all my elements were painted, covered, embellished, I laid them out on my board to decide on placement. To try knock some the blue back, I found a piece of burlap which I left natural to give me some dimension and then lightened the base below the burlap and added more gesso for texture before deciding how to place all my pieces. I played around with layout, took photos each time until I found the layout I wanted.

So here is how I decided to place everything which I then glued down.

think I’ll probably use this as a wall hanging as the plaque had holes in the top which have been covered by the gesso and pastes, but to showcase it for the blog, I found some ocean themed papers in my stash which I felt co-ordinated well.

So I hope you like my first ever mixed media project.  Thank you to Louise and Calico Craft Parts for giving me the opportunity to try the products and design something as a complete beginner and novice and hopefully this will inspire other beginners to mixed media to just jump in and find your theme then be creative.

Happy Crafting 

Liling

xoxo

Supply list:

Seaweed style 12

Coral style 1

seaweed style 7

starfish 

starfish

sheet of mini shells

oval plaque


Thursday 6 May 2021

Quirky Themed Phone Stand by Liz

 Hi guys, Gosh it's gone chilly again as I'm writing this, I hope the sun returns soon,

to cheer myself up I altered this fabulous Plywood phone holder from

Calico Craft Parts


The holder fits my phone easily and even has space for the charging lead to go through while it's sat there, Lol

I have a small tutorial on how I got this look,


I glued the sections in place by placing the back section through the pre cut slot on the front as shown,

I then painted a fine layer of white Gesso over all the sections, when dry I took some benders with three colours of Distress oxides and randomly added colour to the sections, going over the other colour where it meets to blend it in, I used Blue Lagoon, Twisted Cirton and Fossilized Amber, next to stop the inks coming off I lightly sprayed the surfaces with a cheap hair spray, let dry,

I then stamped onto the sections, using Versafine Clair in Verdant, this went with the colour's I'd chosen but still showed,


As you can know it already has the back stand attached, so to make it easier to stamp and do the rest of the media on it I took a mixed media tub I had in my stash, (any tub will do as long as it's roughly the same height or a little bit higher as the back stand, but it needs to give a firm surface to be able to place your stamp on, (so the front surface is flat to work on)

This is the stamp pad with the ink I used to stamp onto the surfaces, I didnt add my stamp to an acrylic block so I could press my fingers on the back of the stamp to get it into smaller sections too, this gives a variety to the stamping too as some are more defined then others, (this adds to the effect) let this dry as the ink will remain wet for a while, you can use aheat tool lightly over the top, but be careful not to burn the plywood,


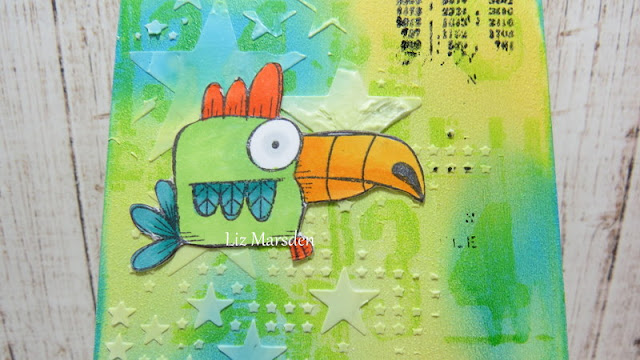
Next I took a star stencil with some Modelling paste, this I randomly spread through the stencil here and there, again some parts missed or were thinner layeres, I wanted this effect as it gives the quirky look and lets a bit of the colour show through,
Leave to dry naturally, if you use heat it could make the stencil paste bubble, I didn't want this as I wanted it kept flat,


I had stamped coloured and fussy out out the bird images, then adhered them onto the front over some of the stencilled stars as shown, again I kept these flat to the surface of the phone holder, I decided I wanted a little more stamping at this stage so using a smaller text stamp and Versafine Clair Nocturne ink to make it stand out a little more I randomly placed it here and there, again I used just my fingers for the stamping to add small sections,


I used another stamped bird facing the opposite way, placing it lower down on the holder, glued in the same way,


I fussy cut out a sentiment on a separate piece of card, then glued it in the middle again keeping it flat,


And there is my finished quirky themed phone stand,
Just the thing to brighten up a dull day!! lol


Happy Crafting!!
Hugs Liz xx