Tuesday, 15 February 2022

A Dive into the Subconscious - Tag - by Claudia

Servus and thanks so much for stopping by! 

I have taken quite a long break from regularly crafting - mainly caused by moving and adapting to having two studios in two different parts of Austria (which has the benefit of getting to enjoy the beautiful city of Vienna AND the wonderful nature of Austria's beautiful Salzkammergut district). I found that the "new life" also changed a lot of habits - one of these being my former crafting routine. I re-discovered a lot of stamps that I had bought in my early crafting times, when I had just started to dive into the world of rubber stamps of all kinds and special stamping inks, embossing powders and a lot of other cool techniques and crafty miracles. 

So one of these stamp sets was what sparked the idea for this tag and for a new (or maybe old...but in any way different) approach to using the many Craft Parts that I still have in my stash. I also had to find new ways to get back to enjoying a bit of crafting besides developing new routines with the two spots I am now living in - so I am now trying to focus more on experimenting, doing smaller projects or simply not finishing a larger one in one go as I used to. This tag emanated from some very spontaneous and joyful play with what I had at hand mostly...some really cool Calico Craft Parts, a re-discovered stamp set and beautiful and inspiring book pages and collage paper scraps. 


I picked the Craft Parts that spoke to me most and that I felt corresponded with the stamped focal image in a way that the tag could evoke stories in the beholders' heads...stories from the Subconscious. I definitely followed my subconscious when creating this tag. ;)

Calico Craft Parts used:

- MDF Tag Shape - Rounded Rectangle (150x75mm)

- Crucian Carp MDF Fish Wood Shape (small)

- Word Elements - Art & Journaling

- Mini Star Wreath (medium size)

- Star Shape - Mini MDF Wood Plaques

- Sheet of Mini MDF Hardware Wood Shapes

- Sheet of Mini MDF Label Holders

I started with tearing and gluing some book pages to the MDF tag. For that I used matte DecoArt Decou-Page as it dries fast and does not wrinkle the paper too much. I primed all the MDF Wood Shapes I wanted to use with a thin almost dry-brushed on layer of DecoArt Beige Chalky Gesso. Then I painted the fish with a very thin wash of DecoArt media fluid acrylic Prussian Blue Hue, the single star with Titanium White media fluid acrylic and the star wreath and label holder with DecoArt Americana True Red acrylic paint. 

You can also see the fussy cut stamped image of a young woman and pair of wings in the picture, as well as a golden German Dresden Scrap crown that was a perfect fit! 

I had decided to have my stamped fairy queen sit on a Word Element and have a fish swimming in the ocean underneath (=her subconscious). I found this old black and white gel plate print and tore off a scrap to use it as my "deep sea" background.


The bright gold of the crown got toned down using DecoArt media Carbon Black Antiquing Cream and DecoArt media fluid acrylic Metallic Gold was used to paint the two screw heads and the jump ring that I used for the fairy queen's necklace.


I like how the random black and white patterns of the ocean background repeat the irregular black and white patterns from the fairy queen's face and sleeve! Using more Prussian Blue Hue I painted some ocean waves on top - mainly to repeat the blue from the carp. More blue was added by using the thin washi tape above the Word Element band. 
 

My original idea was to use the whole bright red star wreath around my queen's head, but that covered up too much of the crown and other lovely detail, so I had the idea to cut the wreath in two and only use one half on top of the tag...for me these are all the shining brilliant ideas emanating from the fairy queen's thoughts...or maybe her reign is under more than just one good star...

Final touches were added using a white Sharpie pen (the tiny dots border around the tag's edges). The hand painted ocean waves got a white outline too and the fairy queen's cheeks needed a bit of pale red - done! 


I am sure the tag will tell you a different story than the (not too precise) one I had in mind when creating it - or at least different in some aspects. But that was what I wanted - to give you some visual "hints" that will let your minds run free and evoke your own stories. I hope you'll enjoy them (and the tag of course)! ;)


Hugs and happy crafting!

Claudia

xxx



Thursday, 10 February 2022

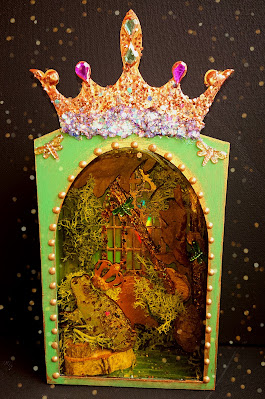
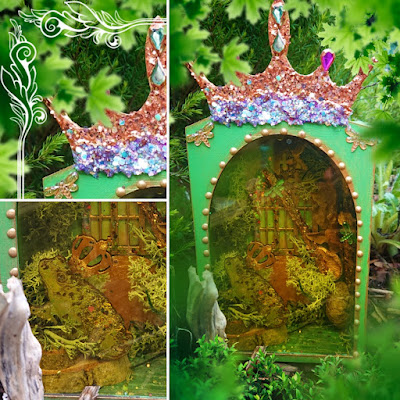
👑 The Frog Prince!

The Frog Prince sat by his pond. 


The Frog Prince is a German fairy tale collected and first published by the Brothers Grimm in 1812.

The tale of The Frog Prince has varied over the years but the basic story circles around a beautiful, if spoilt, princess who drops a golden ball into a pond where she meets a frog. In exchange for giving back her golden ball she reluctantly promises the frog friendship allowing the Frog to eat at her table, even to eat off her own plate and to sleep in her bedroom on her pillow. Eventually the Frog in the story turns out to be a handsome Prince who was cursed by magic spell to become a frog by a wicked fairy. In the more romantic versions of the story the princess kisses the frog and he turns back into his human form! Though earlier Grimm editions have her throwing him against a wall before he becomes a handsome Prince! Not so romantic! But whatever version they both seem to have a happy ending together!

To make a Frog Prince pond scene you will need

https://www.calicocraftparts.co.uk/crown-mdf-shrine-kit-style-4.html

https://www.calicocraftparts.co.uk/sheet-of-mini-mdf-wood-crowns-style-1.html

https://www.calicocraftparts.co.uk/common-toad-mdf-wood-shape-style-3.html

https://www.calicocraftparts.co.uk/toad-mdf-wood-shape-style-2.html

https://www.calicocraftparts.co.uk/stone-mullion-double-gothic-arch-window-mdf-wood-shape.html

Acrylic paints. 

Pva glue. 

Moss, sticks, dried leaves from the garden or local walks. 

Dry culinary mushrooms bought from supermarket. 

Glitter and gem stones. 

Liquid Pearlised drops or metallic paints. 

Mirror card. 

Plain card. 

Acetate sheet either coloured or clear. 


I started off by painting all the sections to make the shrine. I used a vibrant green acrylic paint and painted them both sides. For the pond base I painted on blue and added glitter for watery sparkles!


I then cut a piece of mirror card to fit behind the beautiful Gothic arched window. I left the arch it's natural colour and glued on some glitter 'ivy' to add a magical sparkle. I then started to put together the shrine gluing it with pva glue.

 I glued on the Gothic arched window in the centre of the back panel of the shrine. I also added the Princesses golden ball, this was made from a circular cardboard shape painted gold with acrylic paints. I then added foliage gluing on moss, dried leaves and twigs. To add mushrooms I cut real dried culinary mushrooms in half and glued them onto my twigs.

Frog Prince wearing his crown! 👑 


I then painted my frog with acrylic paints and added a crown! Well he is a Prince!

Then I added a sheet of yellow acetate. You can use clear but I wanted my scene to look more stagnant pond! 


I then glue on the front of my shrine. Adding glitter, Pearlised drops and gem stones to the crown to make it fit for Royalty! 


Little extras I added an additional Prince Frog to the back of the shrine. I used the left over feet which came with the shrine kit to decorate around him to represent the Princess golden ball. 


The Frog Prince scene is now done. Let's hope his princess gives him a romantic kiss soon! 
I hope you enjoyed another 'Kat make'. If you have any questions please feel free to ask, I will be happy to help if I can. I shall be back again soon with another make. 
Until then 'enjoy crafting' . 
Kat 😊 


Saturday, 5 February 2022

Be creARTive - Album Cover Hello Spring


Welcome creative friends!


In this eternally grey winter weather, it helps to get into a better mood with handicrafts. 

I made myself a mood book that gives me hope that spring will come soon. 


Today I want to share with you the cover.


I used a mixed media board as base for the album cover 
and covered it with fabric

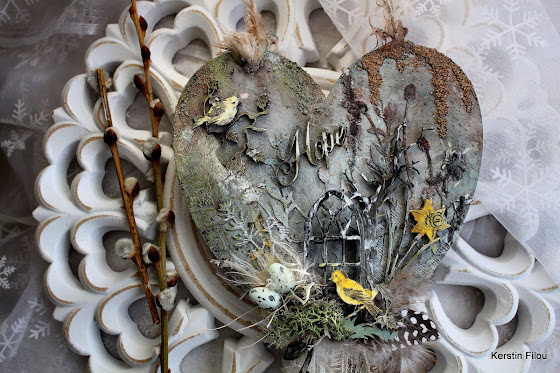
Arch ATC was used as photo frame

 
some details


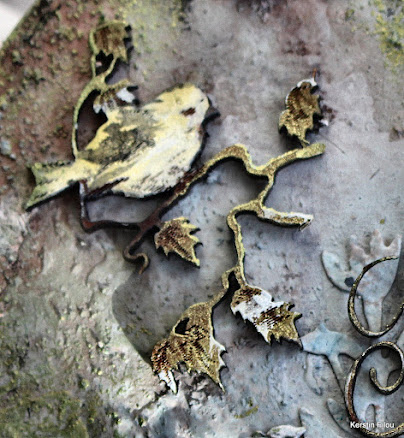
still had a small bird from

Songbird Trio on Spring Branch

left over, love to break up  parts, 
it often creates completely new impressions 
 
next to it three little willow catkins for the cuddle factor 😀


used MDF shapes from Calico Craft Parts


Rectangle Shape - MDF Mixed Media Board

 200 x 100 mm +2 holes
Ancestry MDF Wood Font - Create A Word

Hello Spring

Arch ATC Wood Blank with Plain Frame

Snowdrop - MDF Floral Wood Shape

Songbird Trio on Spring Branch MDF Wood Shape


soon there will also be a look inside the album


Thanks for your visit!

Hope I could inspire you!


Happy crafting!

Kerstin


Thursday, 27 January 2022

'Sailors Valentine' and 'The Octopuss Garden' by Kat Hazelton


Throughout the centuries shells have always fascinated people. They have been used as symbols in art and religion, been made into jewellery, used to adorn tribal costumes, and have been collected by wealthy travellers to put in curio cabinets. During the Victorian period shell craft or shell art became popular with all classes of people, including Queen Victoria. Stately homes often had shell decorated furniture and Grottoes, which where highly decorated with exotic shells and pebbles worked into patterns and pictures. Some society ladies took up shellcrafting as a hobby often buying kits to make exquisite shell dolls and dolls house furniture. Those from a more working class background found there was money to be made by making and selling shell craft souvenirs to tourists. Sailors would often buy 'Sailors Valentine's' to give to their love ones. These wooden boxes or framed pictures, sometimes octagonal in shape, were highly decorated in shells, starfish, seahorses, corals and pearls. Depending on who the gift was for some would come with names, hearts, shell flowers or sea themed scenes including carved mermaids. 

Inspired by Victorian Shellcraft here are two fun shell projects to try. 

First project is a 'Sailors Valentine'. This ornamental seafaring keepsafe has two scenes. On the left a giant sea monster is attacking and pulling down a ship to it's watery doom! The other side a more gentle scene of a beautiful mermaid who in my heart rescued the human crew and maybe fell in love with the Captain! I am a romantic! 

The second project 'The Octopuss Garden' is a lavishly adorned bauble of seacreatures and shells enjoying their underwater home. 

You will need.

https://www.calicocraftparts.co.uk/plain-atc-wood-blank-with-boat-on-waves-frame.html

https://www.calicocraftparts.co.uk/plain-atc-wood-blank-with-seashells-frame.html

https://www.calicocraftparts.co.uk/sheet-of-mini-mdf-nautical-motifs-style-6.html

https://www.calicocraftparts.co.uk/mermaid-mdf-wood-shape-style-2.html

https://www.calicocraftparts.co.uk/MDFSEAHSE06-60x30S.html

https://www.calicocraftparts.co.uk/MDFSEAWD09-60x27S.html

https://www.calicocraftparts.co.uk/MDFSEAWD03-60x32S.html

https://www.calicocraftparts.co.uk/MDFANCHOR04-60x42S.html

Beads and glitter in sea colours.
Clear cabochons for bubbles.
Metallic paints. 

Textured paste. 

Liquid pearlised drops, used in card crafting, or gems stones. 

Watercolour or acrylic paints.
Paint brushes. 
Water colour paper and sheet of glitter foam. 
Reindeer moss and natural string. 
Tacky glue.

For 'The Octopuss Garden' you will need these additional mdf shapes. 

https://www.calicocraftparts.co.uk/MDFOCT01-90x69M.html

https://www.calicocraftparts.co.uk/MDFJFISH02-60x40S.html

https://www.calicocraftparts.co.uk/MDFBAUBLE01F-60x48S.html

https://www.calicocraftparts.co.uk/plain-bauble-mdf-wood-shape-style-1.html


I started off by doing two simple paintings. One of ocean waves and one of an underwater scene with seaweed. To add some bubbles to the underwater scene I dabbed the tube of white paint directly onto my paper. These paintings will be used as backgrounds to both projects. I did my paintings on two A4 sized pieces of water colour card which was more than enough for these two projects. If you prefer you can do your painting on smaller sized card such as A5 or A6.  Personally I like to do a bigger painting so I can keep the left overs for other projects and card making. 


I then painted and decorated all my mdf shapes using metallic paints, glitter and liquid pearl drops. 


I also painted my ATCs, frames and baubles with metallic paints. I also added some texture paste to outer side of the ATCs to add some rocky details. I then cut out and glued on my painted sea backgrounds and frames. 


To glue the two ATC scenes together I created a hinge using a strip of blue glitter foam. I glued the hinge to both ATC's directly onto the paintings, making sure the hinge was narrow enough to be unseen once the frames where glued on top. 
I then arranged and glued on my shapes to create the two sea themed scenes. 


Next I glued on creatures, shells and clear 'bubble' cabochons to my bauble to create my Octopus's Garden. 


To hang my pendant I added a length of natural gardening string. 


To add final finishing touches to my 'Sailors Valentine' I added reindeer moss, some more beads, glitter and clear 'bubbles'. Notice I deliberately turned my ATC ship upside down so that the seacreature looked like it was dragging it down to it's doom! The seacreature is in fact Calico Craft Parts furbellow weed!  


'Sailors Valentine' and 'The Octopuss Garden' by Kat Hazelton 2021 

I hope you enjoy another 'Kat make'. 

If you have any questions please feel free to ask, I will be happy to help if I can. I shall be back again soon with another make.

Until then 'enjoy crafting' . 

Kat 😊


Saturday, 22 January 2022

Thursday, 13 January 2022

'The Coming of Spring' by Kat Hazelton


Firstly may I wish you all a happy new year. I hope you all had a happy and healthy Christmas and enjoyed the festive holidays. I cannot believe we are already half way through January and steadily approaching the half way point between Winter and Springtime, which is at beginning of February. This marks the central point between the Winter Solstice and Spring Equinox and are marked by a number of festivals including Imbolc, St Brigid’s day, Groundhog day, and Candlemas, which is held on the 2nd of February. Even though all of them seem on the surface to have differing religious meanings and traditions when delving further back into history the root of all of them intertwines. All of them celebrate and make welcome the changing of the seasons. Saying goodbye to the long cold dark winter months and welcoming daylight and the beginnings of new life. 

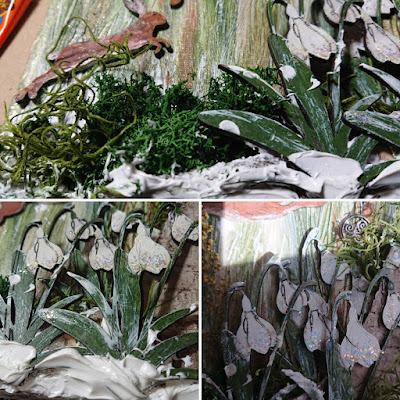
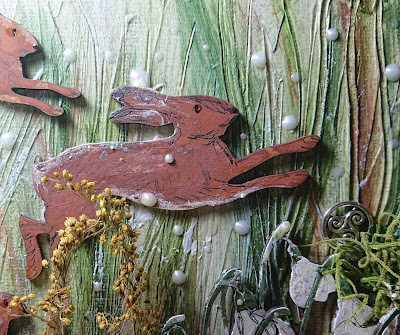
One of the first flowers often seen at the beginning of February is the arrival of beautiful beds of snowdrops and in fields the appearance of hares dancing, boxing and chasing each other! Hares are often depicted as magical creatures, often representing fertility, new beginnings and good fortune.

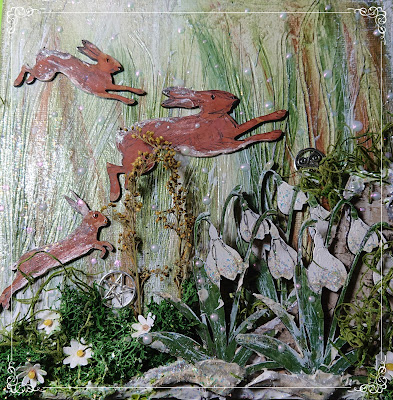
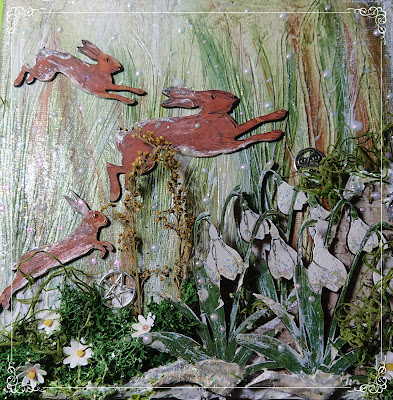
So for my first project I thought I would celebrate the coming of spring by making a mixed media picture showing a group of hares having fun leaping amongst frosty snowdrops. 

To make your own 'Coming of Spring' mixed media picture you will need. 

Canvas board or panel. 

Paints & paint brushes, I used acrylic paints. 

White mixed media sculpting paste and sculpting tool. I used a combination of palette knife, bamboo skewering sticks and an old paintbrush. 

Calico Craft Parts snowdrops

 https://www.calicocraftparts.co.uk/snowdrop-mdf-floral-wood-shape-style-49.html

Calico Craft Parts hares, I used the following. They also have other wonderful hares and rabbit shapes. 

https://www.calicocraftparts.co.uk/leaping-hare-mdf-wood-shape-style-2.html

And

https://www.calicocraftparts.co.uk/running-hare-mdf-wood-shape-style-3.html

Pearl drops

Black fine liner pen. 

Glitter paste or glitter to add some sparkles.

And assortment of moss, twigs, wood bark and charms. What ever you can source in your craftstash or in your garden! 


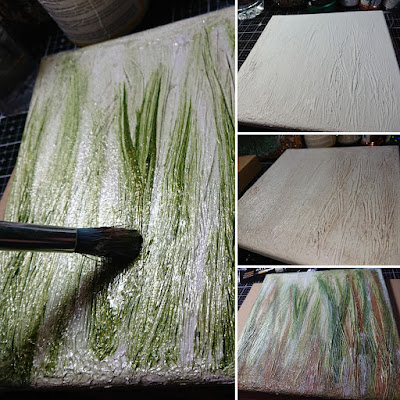
I started off by adding a layer of sculpting paste onto my canvas board. Using a palette knife, old paint brush and a bamboo stick I added lines and rough grass shapes. I then let this dry overnight. Once dry, using acrylic paints, I added  'grass like' leaves in greens and browns. 


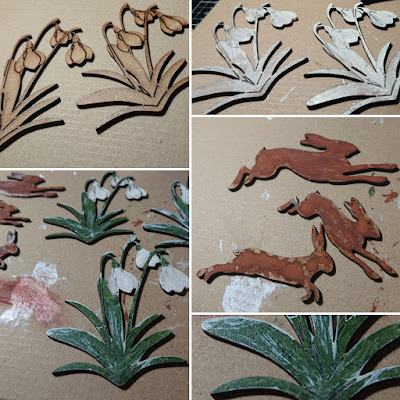
I then painted, again using acrylic paints, my hares and snowdrops. I left these to one side to dry over night. 


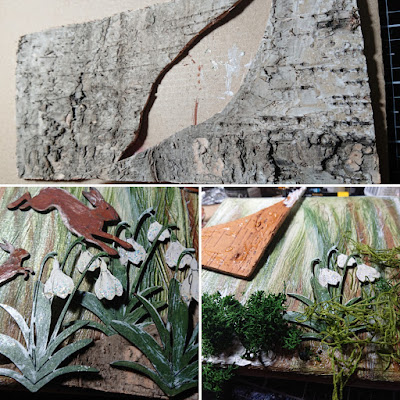
To add a tree stump I cut a shape from a strip of tree bark. I then arranged all my pieces and glued into place. To glue the wood bark, moss and snowdrops I used some sculpting paste. I found this worked really well as I wanted a snowy frosty scene so any white showing didn't matter. I also added some details to my hares with a black fine liner pen. 


To finish off my frosty scene I added more sculpting paste and glitter to add some sparkle! 


Finally I added some extra foliage, some pretty pagan charms and some dots of 'snow' with little liquid pearl drops.

The Coming of Spring by Kat Hazelton 

I hope you enjoy my first 'Kat make' for this year. If you have any questions please feel free to ask I will be happy to help if I can. I shall be back again later in January with another make.
Until then. 
 'Happy Crafting' 
Kat 😊 

Saturday, 11 December 2021

Christmas Tree Ornaments by Kerstin

Welcome everyone!


Soon it will be time to decorate the christmas tree again and every year 

you want to discover something new and special on the tree.


Today a few inspirations on this topic, quick and easy to recreate with only a few parts.


Use


Plain Round Christmas Bauble

Plain Teardrop Christmas Bauble


 as base, in the meantime, the matching frames are also available, 

they give ornaments more depth and make it easier

 to attach additional pendants to the lower edge.


used MDF shapes from Calico Craft Parts


Deer Duo MDF Wood Shape Style 8

Holly Leaf Branch

Christmas Holly Wreath with Bow

Group of Deer MDF Wood Shape Style 6

Tall Trio of Winter Fir Trees


Should there be any questions about the How To 

please feel free to post on my personal blog.


✨  Merry Christmas  ✨

Kerstin