Monday, 16 January 2017

Encourage Your Hopes - ATB by Julie Ann

Hello and Welcome to my first project of 2017 here at Calico Craft Parts blog! It's wonderful to be creating again after the Holidays and what a privilege to have Calico Craft Parts to play with. For this project, I chose to alter an Arch style Artist Trading Block.


I've noticed that many artists and crafters choose a theme word for the year. For this project one word in particular suggested itself - Hope. Hope has always been a significant word to me, but this year - more than ever - I find myself turning the idea of 'Hope' over and over in my mind. 


With all the unrest and shocks of 2016 fresh in our memories, Hope for 2017 is going to be quite a challenge. With this ATB I wanted to encourage myself - and others - to choose Hope over Fear and not to be tempted to give up our individual quests.


The ATB is easy to assemble using a strong, white glue that dries clear. I wanted to enclose two of my own little wooden houses, so I experimented with them inside the ATB pieces before gluing. You can probably see that everything has been given a coat of Gesso as a foundation. I kept the edges clear of paint and Gesso by using masking tape.


To create the impression of an arched window on the plain panels of the ATB, I drew around a piece of card, using the arched aperture panel, stuck this on with a piece of double-sided low-tack tape and then applied Texture Paste through a stencil.


Hope looks both inward and outward, so I wanted my ATB to be a fortress and a refuge, but also a window onto a bright and hopeful world.


As I worked, concepts that give me hope formed themselves: blue skies, birds building with tireless industry and the reminder that Hope is all around us if we will only open our eyes to it.


I like to use hinges on my houses so that I can arrange them in different configurations.


Thomas Hardy's New Year poem about Hope amid Despair, The Darkling Thrush  https://www.poetryfoundation.org/poems-and-poets/poems/detail/44325 and one line in particular, was like a melody in my mind as I worked, Hardy glimpses the rather bedraggled thrush in a bleak January landscape and muses on his heartfelt singing, wondering if the bird knows  'Some blessed Hope' of which the poet is 'unaware'.


I was very happy with the roofing on the 2 little hinged houses. I used Texture Paste through a stencil onto strips of painted card, with a layer of DecoArt One Step Crackle and a Staining Medium mixed with blue Acrylic Paint to accentuate the Cracks.


My ATB is dedicated to Queen Hope who goes out into the World, gentle but courageous. With her shape-changing powers she can speak to us through Nature, sometimes in the form of a graceful deer...


sometimes through bird-song like Hardy's Darkling Thrush!


She holds the key to a better World...


and she asks us to trust her as we step into the unknown, to keep questing after Peace and Truth and to have the courage to look for answers in the challenging or scary places in our lives. 


Thank You so much for stopping by today. I wish you joy in all your creative endeavours.

Calico Craft Parts used in this project
Arch Style Artist Trading Block
Sheet of Tiny MDF doors and windows
Leafy Vine Corner Embellishment
Sheet of Mini MDF Oval 
Small Standard Art Doll Kit Style 2
Sheet of MDF keys and escutcheons
Sheet of Mini MDF crowns
Birds on a branch
Running Buck Shape

Thursday, 12 January 2017

Three Sisters by Jennie


Hello ! Jennie here with you today sharing a very small project but one which is destined to become part of a bigger one!


My original intention had been to make this small ATC wood blank into a little vintage hanging.

However, once I started looking for a photograph it struck me that it would make the start of a perfect triptych for a wonderful family photograph of the Three Holder Sisters - my Nana (Eva) and my two wonderful great Aunts Mary and Alice.

So this is Mary!


I started by painting the  ATC wood blank with a dark brown acrylic paint before adding DecoArt crackle paint very thinly.


As you can see there is a lightly etched pattern around the top and I didn't really want to lose this under a lot of crackle. It didn't show up too well so I painted it in with some gold paint. It's not great close up but it adds a vintage feel.


The smallest fleur di lis fence panel is just a perfect size for these ATC panels and it is easy to cut to size with some strong scissors. I like just dabbing these beautiful pieces with acrylic white paint - about three/four coats - to get this lovely vintage speckled covering.


I used the same technique on the mini Alphabet letters.


When everything had been assembled I ran a gold pen around the outside edge.

A very small project to share with you today, but I'll be back with the other two sisters fairly soon!

As always thank you for joining me today and I hope you are having a great crafting week!

Jennie x


Calico Craft Parts Used:


Monday, 9 January 2017

Shhhhhh! By Claudia

Don't make a sound, otherwise the deer will get wind of us and run away!!!!


They're already looking in our direction! But maybe, if we keep quiet and don't move, they will continue their search for food in the winter forest.

I love deer and I often meet some when walking my dog alongside the Marchfeld Canal (gladly my dog is too small to see them as the path lies a bit deeper than the fields...;).
I created this little winter forest scene in a turned over 6 x 6 inch canvas.

Calico Craft Parts used:

- Group of Deer MDF Wood Shape - Style 6
- Blackberries & Leaf Sprig MDF Wood Shape
- Blackberry Bramble MDF Wood Shape
- Oak Leaves with Acorns MDF Wood Shape - Style 3

I also die cut a tree line and some twigs to go with my shadow box and to enhance the impression of thicket the beholder is looking through.

To start with I covered the back of my canvas with torn dictionary page scraps using matte DecoArt Decou-Page. Once that was dry I stamped on some trees, deer and pine needles using archival black stamping ink.


One dictionary page was glued to a piece of white cardstock and used for die cutting my tree line and several twigs.

Then I toned down my covered canvas using a wash of DecoArt media fluid acrylic Raw Umber.


While that was set aside to dry I scraped on some white DecoArt media Crackle Paint to my tree line using a palette knife. I put the trees on our heater to speed up drying time. 


The die cut twigs were coated with DecoArt Snow-Tex.


Parts of the canvas as well:


Then it was time to paint my deer and the foliage using various DecoArt media fluid acrylic paints, partly painting them on, partly dry-brushing them, partly adding them as a wash.


The finer details like the eyes and noses were drawn using a permanent black fine tip marker. 

For a finishing touch and a more wintery feel I sprinkled on some white DecoArt media Shimmer Mister (unscrewing the Mister and using the tube to sprinkle on the paint) and let that dry before I gave the canvas and my deer a coat of DecoArt media Ultra-Matte Varnish. 


Then it was time to layer all my pieces in- and onto the canvas shadow box. I used sticky dots (and also their "excess framing") to stack my pieces. 


Done!


Some close ups of the snow covered twigs, the oak and bramberry sprigs:


I love the frosty effect of the Snow-Tex!


And the deer MDF wood shapes are all so beautiful! I will definitely have to get me some more of these (and also some of the other designs) ! ;)


I used a photograph of a deer as a model. Especially their noses are very typical and have to be done properly so they don't look somehow awkward.  


What a peaceful little winter scenery!  I hope you like it as much as I do! 


I had so much fun creating this piece! I hope some of it shows trough.

Thank you so much for stopping by and a happy creative 2017! 

Hugs and happy crafting!
Claudia
xxx


Thursday, 5 January 2017

Caged - by Lesley

Hey people. Happy New Year and all that jazz!

I hope you had a very Happy Crimbo? Its good to be back after a nice little break.......i had missed the room of trash!

As per usual, i had no idea what i was going to create, so i did my normal "close my eyes and stick my hand in the my craft parts box" and pull something out. This happened to be a MDF arch shrine kit......and this is what i created with it......


Not your normal type of creation maybe, but i kinda like the wee man trying to escape out of the box!
I started by gluing the box together and giving it a coat of gesso.

Inside the box, i splodged on some texture gel and sprinkled in some texture powder. Then using various paints watered down, i built up the colour.


I added texture around the sides and back of the box with paste and a stencil.


The wee man was actually a clown originally. I stripped him down to just the body parts and corded limbs. These were painted black and then rusty wire wrapped around them. His head, arms and legs were primed with gesso, then i added various paints and a touch of crackle glaze.


By this point i knew i wanted to use some chicken wire (evil stuff) but the wee man didn't quite protrude enough out of the box. I took some of the circle plywood plaques in different sizes, glued them together and painted them. This is where i should have taken a pic! You can just about see them! The circles were ideal to use as a base, they were just the right amount of thickness to glue the wee mans head to.......giving him enough depth to stick his arms and legs out of the box.


Next was the chicken wire which i really struggled with! I love working with wire, but i was confuddled with how to attach the chicken wire to the box! Half a reel of rusty wire later, and it was in place. I snipped a few holes in the chicken wire and pulled out the wee mans arms and legs.


I then decided i wanted to use the arched bit of the kit.....which now didn't sit snugly to the box because of the chicken wire! Using the other half of the reel of rusty wire, i secured the arched bit to the front! This is exactly why it may help if i actually planned things just a little bit!


Looking at him now, i think the piece needs a bit of wordage on him.......which i'm off to add now!

Thanks for reading
L.xx

Ingredients used
Round birch plywood plaques
Arched MDF shrine kit, style 2


Monday, 2 January 2017

Julie Ann's Favourites of 2016

Hello and Welcome! I can't believe that 2017 is here! I hope you all had a great Holiday and that 2017 will be a creative and happy year for you! Thank you so much for the support you have given me on Calico over the last year and for stopping by the Calico Craft Parts Blog today. 

2016 was such an exciting year for me. It was a dream come true to be invited to join this lovely and talented design team - I've enjoyed myself so much! What a privilege it's been to be allowed to play with all these beautiful art parts, boxes and 3D kits! I'm so grateful to Helen at Calico Craft Parts for giving me this opportunity to create with her gorgeous products and to ZuZu, our wonderful coordinator, as well as my colleagues: Lesley, Claudia and Jennie who are so inspiring to work with.

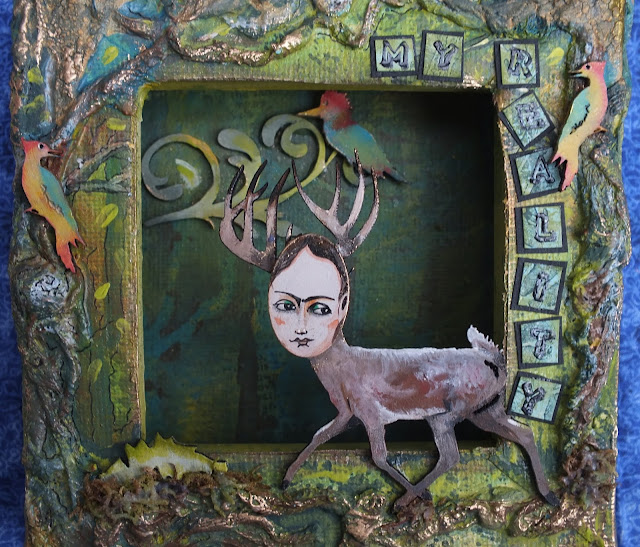
When I joined the Team back in June, I started off by using a combination of Calico birds and beasts to create this homage to Frida Kahlo, My Reality, a little reversed box canvas.


One of my favourite things about Calico Craft Parts is that they are the perfect inspiration for story-telling. Gather together some beautifully detailed pieces, mix and match and then add a sprinkling of imagination and there's a brand new story to be told.


With Delightful Discoveries, my blog post for 18th July, I decided to bring one of the charming Calico House Kits to life by giving it tiny clay sneakers! I wonder where my little house lady is travelling to and what discoveries she might make on her journey? If she gets tired she can always use those wings to carry her over the fields and the forests to her destination! 


Finally, everyone needs a helping hand sometimes. This Domestic Goddess, created from a combination of a Calico Art Doll and Shrine Kit with a heart plaque for a face, was at the ready with the twine for gift wrapping from October 24th throughout the Christmas Period. 

Thank You for re-visiting my 2016 Calico Makes with me today! I hope that 2017 will be a truly creative year for you and that you will be able to share some of your own projects on your blogs and in challenges during 2017. Please join me back here in a fortnight's time to see my first Calico make for the New Year.