
This is very likely my last Halloween-ish project on here for this year, but it is also a gift for a dear friend who is a chemist - so it refers to real life rather than Halloween to be honest.
But the new Laboratory craft shapes are of course perfect for creating the laboratory of some spooky scientist, searching for the formula to dominate the world ;)

Doesn't look too crazy, does he? But we know it is always the nice guys we need to take care of in any horror movies, right? ;)
Calico Craft Parts used:
- Chemistry Laboratory Apparatus - MDF Wood Shape 01
- Chemistry Laboratory Apparatus - MDF Wood Shape 03
- Laboratory Apparatus - MDF Add On Sheet 01
And there are many more Laboratory Apparatus wood shapes to find in the "Latest Products" section of the store! Check them out - you will love them!
Of course this needed to be taken - into my shopping cart at the Calico Craft Parts online shop. ;)
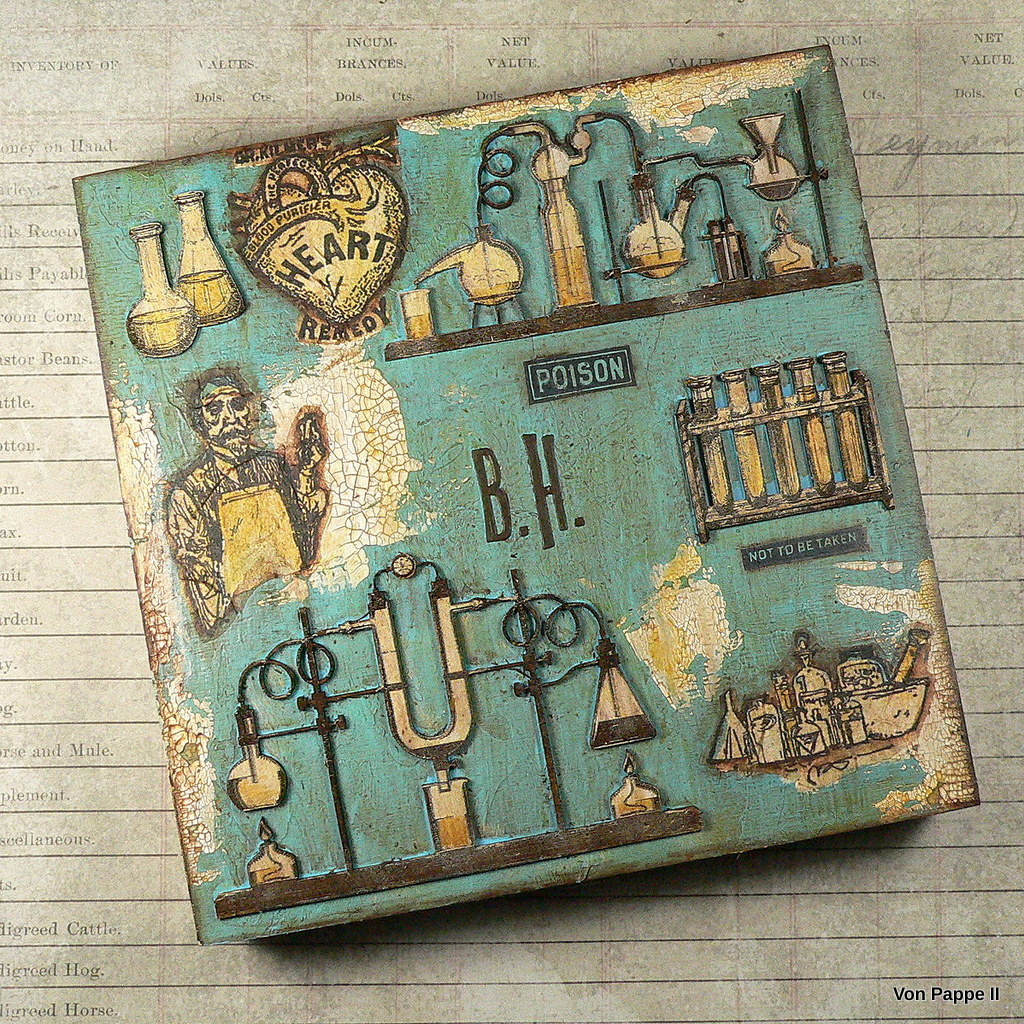
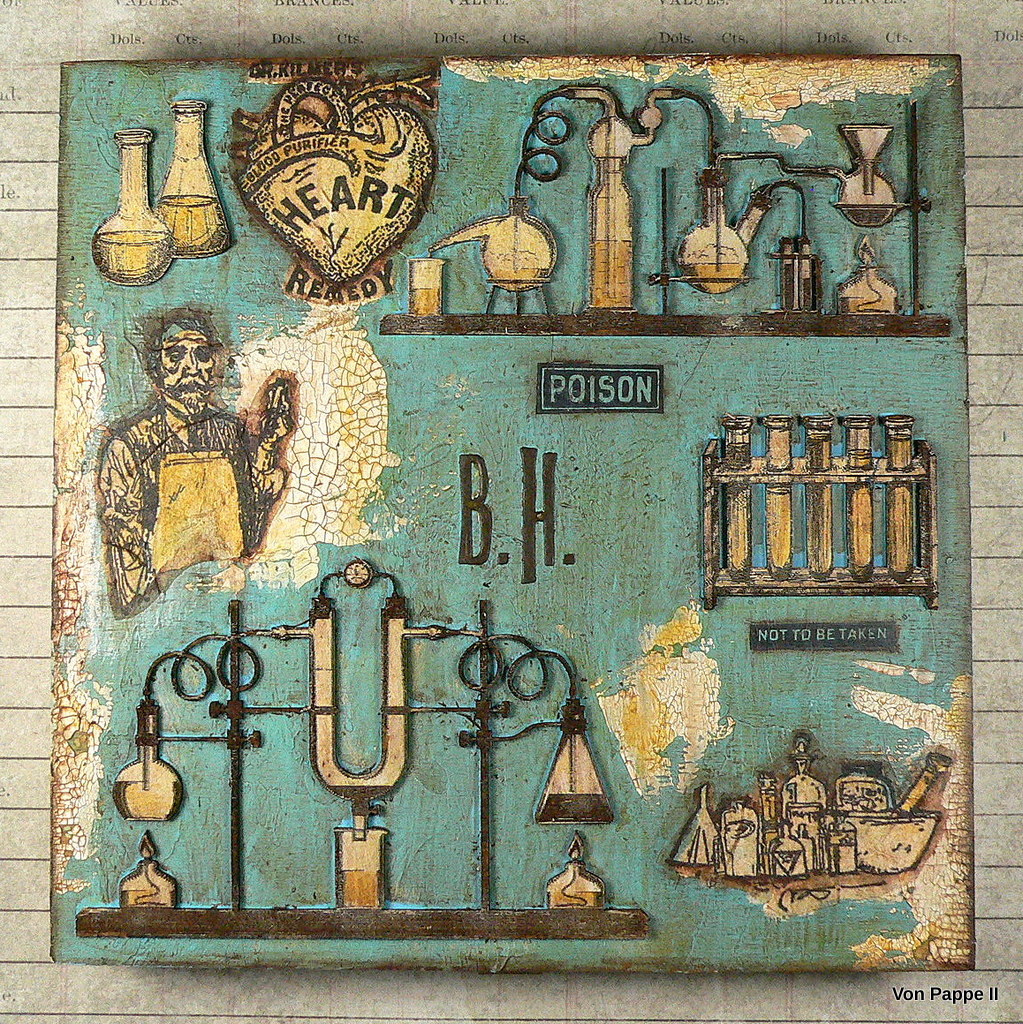
I once more altered a wooden box (that once contained an Austrian speciality, Linzer Torte (a special cake recipe from Linz), I guess).
Boxes are one of the most rewarding things to alter from my point of view - once an altered box is finished you do not only have a piece of mixed media art but also a cool looking storage for your favourite ephemera, letters or other treasured bits 'n bobs.

I kept the colour scheme quite simple this time so the Calico Craft Parts remained the shining stars on this project. I started out with priming the box lid with a scraped on thick layer of DecoArt Chalky Finish paint "escape". But first I used DecoArt media white Modeling Paste to hide the engraved label in the middle of the lid. I simply scraped on a thin layer and made sure it was evenly smudged out and had enough time to dry overnight.

Once the Chalky Finish paint had dried I also added some DecoArt media White Crackle Paint here and there. The box looked rather weird at that stage - the blue was quite intense (which was almost a bit intimidating to be honest), but I had planned to tone it down with some paint washes anyway...

But first I needed to dry brush the glued on craft shapes with a thin layer of DecoArt Americana Snow White acrylic paint. "Glued on" is actually the wrong word - I just put the craft parts in place while the Chalky Finish paint was still wet - and as that was a quite thick layer it worked perfectly as a glue.
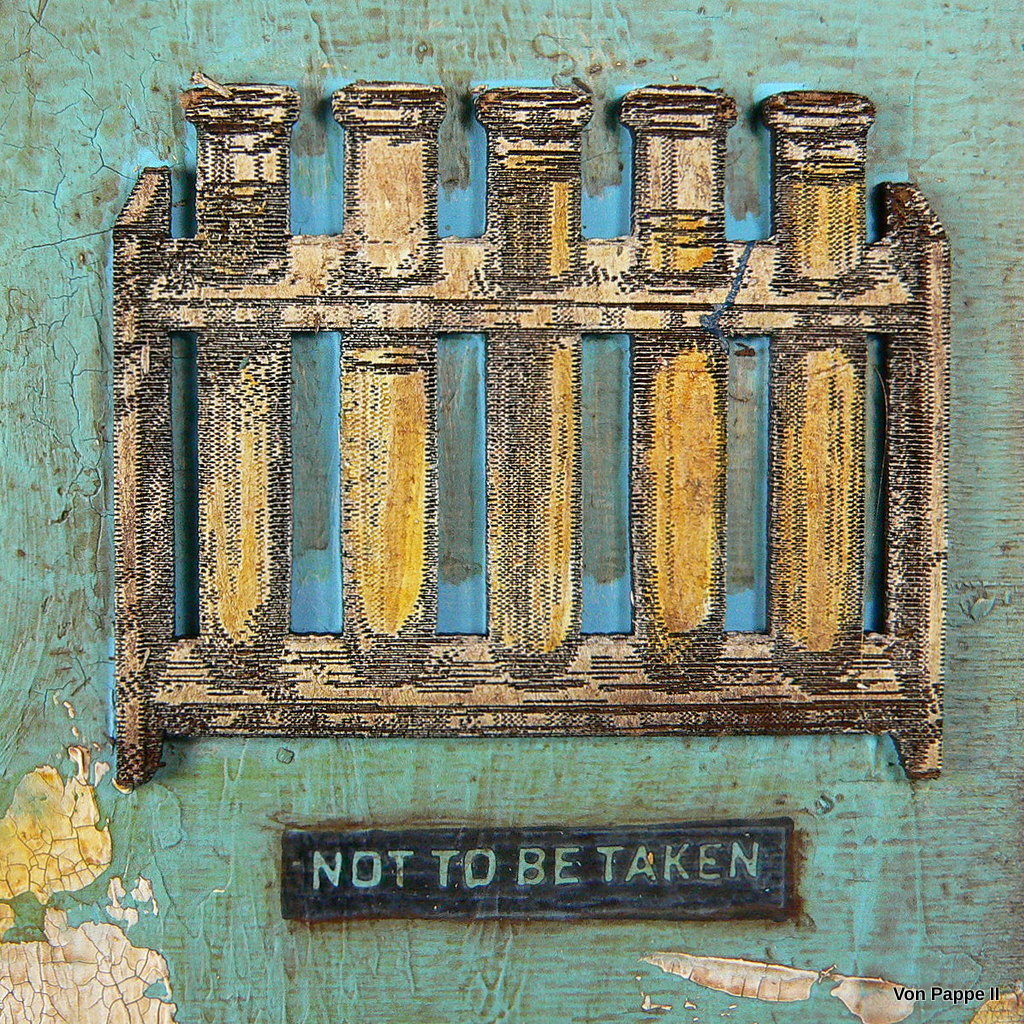
Dry brushing the Calico Craft Parts is always the best thing to do when you want to keep the laser engraved textures and patterns (and honestly these would be a shame to lose, right?)

I obviously forgot to do some steps images during the next few steps (sorry for that)...what I did was stamp the chemist, the heart remedy advert and the sketched bottles images (from Tim Holtz stamp sets "Mini Halloween #4" and "Eclectic Adverts") in yellow archival ink in the places I wanted them, then I dried that with the heat tool and painted over the images precisely with white DecoArt media Gesso.
The images got stamped once more - this time in black archival stamping ink onto tissue - and fussy cut. The top layer of the stamped tissue images was glued on top of the white areas using DecoArt Paper Decou-Page. The images below still show traces of the yellow lines from the stamped on and painted over images...

...but that was not going to be an issue as I was going to shade around the outlines anyway with a darker brown acrylic paint later.

I also stamped some of the tinier labels on directly using black archival stamping ink. To add my friend's initials to the centre of the box lid I die cut these from black card stock (using the Tim Holtz "Handmade" Alphabet die) and glued them in place using matte DecoArt Decou-Page this time.


The first wash showed that I was heading in the right direction, so I dared go in with another wash - this time with Burnt Umber media fluid acrylic. As it was only a wash the layer from the Transparent Yellow Iron Oxide still showed through and the two paints formed a lovely mix and beautiful depth this way.

Once that had dried I went around the box lid's edges and painted a smudged edge with a detail brush using the Burnt Umber again.

I also painted fading brown edges around the decou-paged images to make these stand out from the background.


Finally I added a thin wash of the Transparent Yellow Iron Oxide to the Laboratory craft parts to paint the contents of the flasks, vials and bottles. I also painted in some details on the decoupaged images to fuse all the elements on the box lid.


The initials were painted with Burnt Umber first and then given a wash of the Transparent Yellow Iron Oxide as well.

You see - I've really used only three colours this time and didn't go wild with too much texture which fits the laboratory theme I had in mind: a clean, organised space of a very organised chemist. Still the washes add a bit of a vintage feel to the make - so it isn't too clean to become boring or any close to a clean and simple project.

The crackle from the white Crackle Paint turned out just beautifully and together with the smudged brown edges it really adds some delicately aged feel to the box.


I really love how it turned out. I hope you like it too!


See you in two weeks!
Hugs and happy crafting!
Claudia
xxx

What fabulous new laboratory Craft Parts - brilliantly showcased here. And oh, that crackle!
ReplyDeleteAlison x
Aw...thank you so much, Alison! Yes - the new laboratory craft parts are amazing, aren't they?
DeleteClaudia x