

In my stash I found a very old IKEA box frame (in which my son had created dioramas with dinosaurs or sometimes fish as well when he was little...but this one never got finished and so I was allowed to take it apart and recycle the box frame for a new fish-themed project).

It was so hard getting a shot of this diorama without having nasty flares on the screen, so I had to play around for quite a while with lighting - and the one solution that worked made the soft pastel turquoise from the outer box almost invisible (sorry for that).
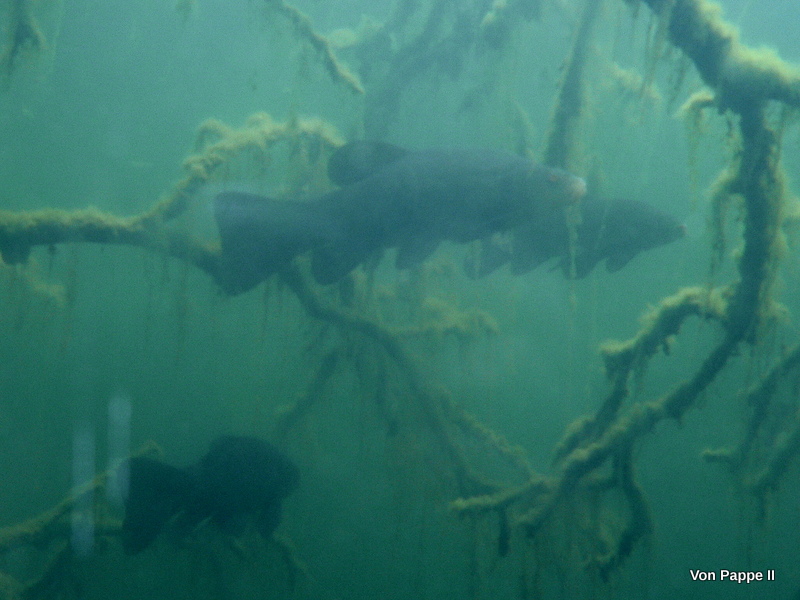
See the little spike that's trying to hide in the far back of the pond? (my son immediately spotted him...spikes are one of his favourite fresh water fish and he sometimes is lucky to spot one when snorkelling in the lake where we always stay in summer).

The colour scheme for this make was mainly inspired by a picture I took when we visited Castle Orth, which lies close to the Danube and in the midst of the Danube Wet Lands National Park. There's a walk-in underwater observatory where you can watch all kinds of fish in their natural environment which my son and I love a lot!
So my aim with this project was to capture the musty impression and monochrome colour scheme.

A biologist will immediately spot that I have combined fish and plants that usually come from different environments (some not even from underwater!)....but I went by the shapes that I found most pleasing together (and as I had some more wild grass and seaweed and fish wood shapes, I played around with all of them until I was content with the composition)...my son doesn't mind that I have created a biological impossibility...so I am more than fine with it ;).
Calico Craft Parts used:
- Brown Trout MDF Fish Wood Shape
- Common Carp MDF Fish Wood Shape
- Crucian Carp MDF Fish Wood Shape
- Pike MDF Fish Wood Shape
- Cladhymenia Iyallii - MDF Seaweed Wood Shape - Style 7
- Dotted Peacock Weed - MDF Seaweed Wood Shape - Style 3
- Wildgrass MDF Wood Shape - Style 1
- Wildgrass MDF Wood Shape - Style 5
- Wildgrass MDF Wood Shape - Style 6
I started with mixing DecoArt Americana Navy Blue with some DecoArt Watercolour Medium to make it more liquid - this way I needed less paint to paint the insides of the box frame. I added loose strokes of Leaf Green and Jade Green wet on wet to create soft streaks.

The background panel was also painted mixing paints directly on the panel to create an ombre effect. Then I brushed mixes of different greens and blue (Arbor Green, Leaf Green, Navy Blue) onto one of the wild grass wood shapes and used it like I would use a stamp to create my background image.

Using caps of felt tip pens and other small circle shaped items I stamped on airbubbles (in three different greens). Then I added light reflexes with a very fine tip detail brush.

The seaweed and wild grass wood shapes were painted with the same colours and I made sure I brushed these on loosely, wet on wet, to create the effect of moving light spots from above (as you see them from underwater when the wind is creating little waves on the lake's surface).

I did the same with the fish wood shapes, but this time I applied a dark green-blue to the bottom of the fish, and a light green to the top for more depth. The final highlights were still added wet on wet in Limeade DecoArt Americana acrylic.

Then it was time to lay out the shapes to find the perfect hights and layers for the seaweed, grass and fish shapes. I took a picture for later reference (already looking quite cool, huh?).

I used acetate from old packagings to create the stands for the plants. As these already had shaped edges, I simply cut these off the packaging as they were - this way I didn't have to create a template and fold the acetate, as it had all already been done for me ;)

I only had to adjust widths and lengths of my acetate stands. Then I glued them to the backs of the plants using DecoArt media Liquid Glass.

And this is how the glued in place plants look on the backsides:

The stands are really barely visible from the front!

Then I painted some small boulders from my collection with washes of blue-green (Navy Blue and Arbor Green) to tone them down.

I used matte DecoArt Decou-Page to glue everything in place. The plants to the bottom of the frame (of course), the fish "hanging" from the top (on acetate strips), and the boulders where I thought they would cover up any visible edges or glue spots from the acetate stands.

To cover up the nasty looking gap where the glass sits in the frame (on the bottom left and right), I applied some DecoArt media Texture Sand Paste and added some rough sand (that is usually used for home decoration) while the paste was still wet.

Once that was dry, I painted everything with the same mix of DecoArt Americana acrylics I had used on the other pieces (Navy Blue and Leaf Green...and whatever else was left on my palette sheet).

The outer frame of the box was given a coat of DecoArt Americana "refreshing" Chalky Finish paint.

Done!

Some details:


Ah, there you are, little pike! I can see you!

I hope you like my little fish observatory diorama!
There are loads of beautiful fresh water fish wood shapes and seaweed and wild grass wood shapes to play with - if you browse the Calico Craft Parts shop you will find that you could create dozens of dioramas without ever having to repeat yourselves! ;)
Hugs and happy crafting!
Claudia
xxx

Fabulous piece, so realistic and I love the colours. Tracy x
ReplyDeleteThank you, Tracy! So glad you like it! Hugs! XXX
DeleteWOW, absolutely fantastic, an awesome 3D effect with some very clever ideas, an aquarium that needs no food, filters or regular cleaning, brilliant!! Hugs Kerstin xx
ReplyDeletegiggle, yes, a low-maintenance fish tank, Kerstin! You're right! (that would be perfect for my son...) :)
DeleteThanks for the lovely comment! Mwah! XXX
What a brilliant use of colour and innovative use of background and craft parts. This is such a beautiful project, Claudia! xx
ReplyDeleteAw! Thank you so much, Julie Ann! Hugs! XXX
DeleteIt just looks like a real LIVE aquarium tank to me Claudia.... WOW. Love the monochromatic look but still the colors are so rich and GORGEOUS. Just WONDERFUL. Xj.
ReplyDeleteThank you so much, Joi! This really means a lot to me coming from you! XXX
DeleteA wonderful scene, Claudia! I love 3D scenes and this one has an amazing underwater atmosphere. You perfectly achieved the light coming from the surface, and the depth too. Beautiful!
ReplyDeleteThis is so clever and unique. Lots of good ideas but overall, just a really great piece. Thanks.
ReplyDeletebeautiful!! It really does have the feel of an underwater lake scene. The colors are great!
ReplyDeleteThanks so much for the lovely comments, ladies (known and anonymous)! They're much appreciated! XXX
ReplyDeleteYour imagination and talent know no bounds Claudia !! This really is quite amazing and really looks like a real underwater scene. Gorgeous !! and Stunning !!! Jennie x
ReplyDeleteAbsolutely Brilliant Claudia!! I love this!!
ReplyDeleteJackie xx
Aw! You're too kind, Jennie and Jackie! Thanks so much for the lovely comments! Mwah! XXX
ReplyDelete