Wednesday 30 September 2015

Nestled Amongst The Leaves - by Lesley

Its my most favest time of the year.....Autumn!
Love the colours, love that we get to wear boots again! Love that its still warm enough to go for long walks and its not chilly-willies outside!

With all that in mind.....i wanted to do something autumnal this week, and this is what i did.......


I started off by painting one the printers trays (with no compartments) with black gesso and glued it together.


I used lots of different wood leaves from the shop. There is a massive selection to choose from. The little bubby ones were snipped of the branches so they fitted into the tray ok. Using Decoart paints, i mixed colours together to get some nice rich Autumnish hues. 
Whilst they were drying, i applied a layer of sand texture medium mixed with a smidge of black and applied it to the tray. I then arranged the leaves and the face, pressing down gently in the sand. To fill in the gaps, i used chipped ballast.


I then drizzled on the leaves with crackle glaze. Some of the ballast got picked up along the way and got stuck to the leaves, but i kinda like that.


The resin face was painted a rusty colour with some crackle glaze dabbed on in places, and then some antiquing cream in white rubbed into the glaze.


The piece was finished off by adding a couple of words to one of the leaves.

Thanks for reading.
L.x

Ingredients used
Printers tray
Holly Leaf Sprig
Chestnut Leaf and Twig
Maple Leaf and Twig
Sugar Maple Leaf


Sunday 27 September 2015

Steampunk Travelling - by Alison

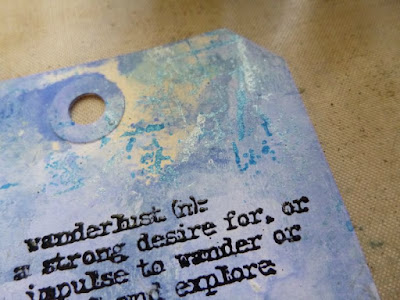
Hello all, Alison here with you again, and I'm back with another Steampunk-inspired creation.  This tag uses Calico Craft Parts from one of the new Steampunk Motifs plates.  You get a whole sheet of mini-Steampunk images, perfect to use as accents and to add 3D detail to a tag, layout or project.


I was also delighted to be able to ink up this La Blanche stamp for the first time since I got it at a knockdown price earlier this year.  The little balloon clearly needed some company!


The background started with some wrinkle-free distress technique, and I stamped the image in Versamark before embossing with fine detail black embossing powder.


I altered my accent pieces (these are from the Steampunk Motifs Style 3 plate) using DecoArt paints - the Dazzling Metallics Silver and Media Line Fluid Acrylics in Cerulean Blue and Phthalo Blue.


Love these wings - I hope they'll give the balloon a bit of extra lift in its flight.


I remember seeing this Montgolfier balloon for the first time in an article in one of my annuals when I was a very small child - it's been a favourite ever since.  They just don't make'em like that any more, do they?


I also did some texture stamping with the silver and the darker blue, to tie in the background in with the colours of the altered Craft Parts.


A touch of silvery wire decoration gives us a suitably Steampunk-y topping for the tag, and off they go into the blue.


Remember you can click on the links in the text if you'd like to hop straight to the Calico Craft Parts shop now we're done.  There are new designs arriving all the time, so it's always worth checking out the Latest Products page.  Thanks so much for stopping by, and I'll see you again soon.

Alison xx
Words and Pictures

Thursday 24 September 2015

Skeleton Tag By Trish

Hello!
I thought I show you a tag project today.... and to show you that you can use Halloween shapes all year around if you want to!


I created a blended painty background using a red/orange/yellow sort of colour scheme. A bit Autumnal maybe?


I added some black stamping to give the background a bit of detail!


I thought my skeleton looked a little fed up.... so typed out a suitable quote to go with the body language!


(Can you have body language when you have no body?!)
I sponged gesso onto the skeleton, a nice textured finish!


The final touch was a few ribbons, dyed with a little dye ink from an ink pad.


So... as far as I'm concerned... Skeletons are not just for Halloween!

Have a great day!
Trish xxx

CCP used:
Skeleton

Sunday 20 September 2015

Spooky House by Astrid

Hello dear friends and visitors, Astrid here with a spooky creation. If you come here regularly, you will know that the team has been showcasing some of the amazing Halloween Craft Parts in the last couple of weeks or so. Some of my teamies have put together amazing 3D pieces, to see them, just scroll down.

Being more of a sort of painterly person, I decided to create a wall plaque, so here goes:


I decided that my main focus would be one of the super Spooky houses, I chose this one


The original has a moon and two bats attached, but for my project I wanted a larger moon, so carefully snipped it off with my scissors. I painted it with black gesso, when that was dry I added Decoart weathered wood crackle and after that had dried painted the rest of the house with various colours of acrylic paint.

While the crackle was drying I started on the background:


I covered a piece of chipboard with gesso, then added some crackle glaze through a stencil and when it had dried I cut a circle mask and then coloured around it with a mix of paints and inks.


I darkened the edges further. You can see, I made a mess, just below the moon where some crackle paint had touched by mistake, but decided I was not going to worry about that..

Time to collect some more suitable Craft Parts:


Here are the links to what I used:

Skeleton, painted off white with some shadow added.
Spiderweb, painted dark brown with a white cross added
Haunted House word, painted dark brown and then overstamped with a crackle stamp in white
Bats from a collection of bat shapes, painted dark brown,
and finally the
Ivy leaf garland, one of many gorgeous leave and autumnal shapes.

Now all I had to do was put it all together.


Before gluing my craft parts down, I added some text stamping still and some splatters to add a bit more interest to the background. Below a few close ups still:


Once the house was glued down, I painted the inside of the windows yellow and added Decoart liquid glass.


Here you can possibly see a bit better how I added some shadow to the skeleton, not a brilliant photo, the lighting was terrible, sorry...


The Ivy trail, after painting it, I added some Decoart Metallic Glaze to add a bit of spooky sparkle.

Well that's it, thanks for visiting and do scroll down to see some of my teamies wonderful Halloween projects. There is no shortage of choice of Craft Parts, plenty to choose from for all your Halloween and Autumn projects.

Thanks for visiting today and see you next time


Friday 18 September 2015

American Gothic does Halloween: By Zuzu

It's been quite a spooky week on the blog. And who am I to break the flow... (besides, Halloween/autumn and Christmas are my favourite crafting themes of all)...
I altered this little shrine (they come with a choice of having a shelf too).
I used the lost coast rubber stamp based on the painting "American Gothic" as the background. coloured with watercolour pens and pencils and sealed before adding a coat of DecoArt crackle glaze. the cracks have been highlighted with Decoart media fluid paint. a nice bright Pyrrole Orange.
 
I covered the sides, top and bottom with some left over scraps of Halloween paper from last year. and gave them a crackle glaze finish.

I painted the front panel with black acrylic, let it dry and added more DecoArt Crackle glaze. I highlighted the crackle on this more than once to get a it of variation in colour. firstly i used the orange. when that had all dried I used DecoArt white antiquing cream. it really shows the fantastic crackle up well.
A bit more painting and gluing the embellishments and then I assembled it all. (the little orange apples (dots) are left ov er parts from the shrine feet. I didn't use them all)
Calico Craft Parts used:

Shrine Kit
Gravestone with pumpkin
bat
tree
web
insects

Wednesday 16 September 2015

Skeleton Kids by Lesley

Most people when they do scrapbook layouts tend to scrap their kids, family, pets, special occasions etc.
I haven't done any scrapbooking for years........but when i did, it was always of my kids. This layout is of my children, Halloween styley using the fab skeletons!


I started with a 12x12" sheet of black card. Using some white Decoart paint, i splodged a square shape onto the card. Once dry, i added some purple along the page. Then using a white mister, i sprayed over the purple and let it run down the page.


The skeletons were painted grey with a touch of black so they didn't disappear against the white background. I used various bits from the pipework maze set to make a frame, all painted black.


I used various Halloween bits from the shop, including a cobweb ATC frame, which i cut up so it would fit. The craft parts are so easy to snip apart.


I am in love with this font....so apt for spooky makes! I gave this a couple of coats of Decoart triple thick gloss to make it pop!


So many goodies in the shop right now for making Halloween stuff!

Thanks for reading.
L.x

Ingredients used.

Gothic Arch ATC
Skeleton
Pipework Maze
Skeleton Word
Flying Bat Colony
Spider and Web
Gravestone Border

Sunday 13 September 2015

Nosferatu ATC - by Alison

Hello again!  After my massive spooktacular He's Behind You on Saturday, I'm back today with a much shorter post but - in my opinion - a more genuinely spine-tingling creation.  The Spooky Shrine had a sort of Scooby Doo pantomime scare-factor.  Today's ATC taps in to genuine creepiness, leaning heavily on the amazing 1922 film, Nosferatu - the original vampire thriller... perhaps all the more eerie for being a silent black and white film.


Max Schreck plays Count Orlof, and the lighting, the ambience, the sheer creepiness of Schreck as the vampire has stayed with me ever since I was lucky enough to see it on a large screen at the NFT in my twenties.  There are images and scenes which have haunted my imagination ever since, and Calico Craft Parts have designed a piece which captures exactly one of those images.

How he looms over you there from the deck of the ship... with those claws of hands ready to reach for you...  Meet the Nosferatu Wood Vampire Shape.


I didn't feel I needed to do much - just a crackle background - DecoArt Crackle Paste on one of the plain ATC Blanks (though there are some Halloween ATC specials worth checking out too), the moon masked off while I added Prussian Blue Hue and Paynes Grey...


I just used a circular punch and some self-adhesive paper, and then peeled it away when I was done, leaving a ghostly penumbra which glows palely around the figure of Count Orlof once he's stuck in place.


Nosferatu himself has also been very simply tinted with Paynes Grey and Prussian Blue Hue for extra shading.


If you're still not quite in the Halloween mood, do check out the rest of the amazing spooky designs in the Calico Craft Parts Halloween section - from owls perched on branches, to Haunted Houses, to the skeletons and zombies you met in my Spooky Shrine, to fabulous Gothic words to put on pages and layouts.  I promise there's something for everyone.

That's pretty much it for today.  (See, I can do short posts.)  Sleep well won't you!

Alison xx
Words and Pictures

Friday 11 September 2015

He's behind you! - Spooky Shrine by Alison

Hello all, Alison with you again, and I've been enjoying getting spooky - so much so that this is a bonus extra project.  I'm not supposed to be here until Monday - but BOO... surprise!!  And here's what I've been playing with.  (You may want a pint of bat blood or witch's brew to see you through a photo-heavy post!)


There are so many amazing designs in the Halloween Craft Parts section - and some of them, like some of the bare trees for instance, will work on non-Halloween projects too.  I've been playing with just a few of them, and came up with this haunted house - I'm just not sure who's haunting whom!


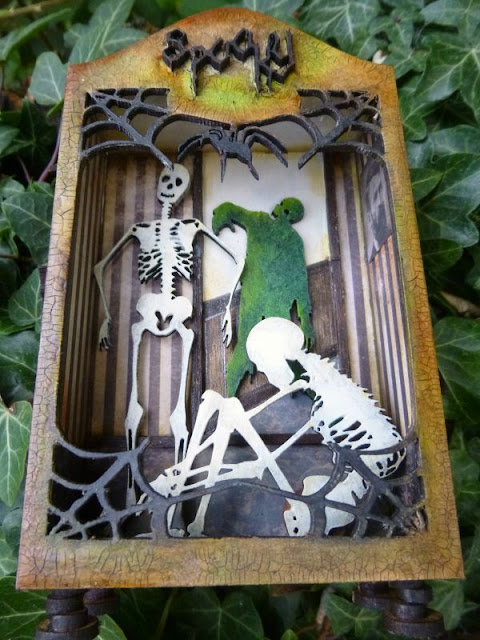
I started with the Spooky Shrine Kit, and I knew I wanted to try to get in a zombie as well as a couple of skeletons.  Given their relative sizes, I needed to pretend the zombie was in the background.  And given their relative shapes, I needed him to be part way up the back wall!  So I had to create a bit of a trompe l'oeil... a corridor for him to come walking down.


I plotted the basic position and laid in the doorway and the light spilling out of it.


I wallpapered and laid flooring, adding more light over the top.


I extended the papers onto the side walls and the floor.  I also did some distressing with the DecoArt Media Fluid Acrylics.  Turns out Transparent Yellow Iron Oxide, Quinacridone Gold and Raw Umber are perfect for creating a tobacco-stained look!


Putting in the corridor - hand-drawn dado rail and panelling - I had to cheat the perspective lines a bit, so now it looks as though the corridor arrives at a slight angle.  And I created a door frame with matchsticks painted in Raw Umber.  Once all that was done, I glued it all together.


Once glued, I cut papers to cover the back of the shrine.  I find it best to leave this until after the gluing together, as then you can work right to the edges of the walls, covering up the interlocking edges.


I had lots of fun painting my Craft Parts with more DecoArt Fluid Acrylics.  (You can see how they look "naked" in that first making-of picture above.)  The Zombie Style 2 is done with Green Gold and Viridian and maybe a touch of Paynes Grey, and the fabulous Carved Pumpkin has Red Iron Oxide, Quin Gold, Raw Umber, Transparent Yellow Iron Oxide and Green Gold.  They each got a bit more touching up after this stage.


My somewhat depressed seated skeleton needed something to help him sit further "downstage" in the room.  In the end, the simplest solution was to glue his pelvis to a small wooden reel.  As you can see, he's now self-supporting, so I was able to glue him in his position quite easily.


And here they come... the Zombie in the doorway...


Skeleton Style 1 a little further forward, supported partly by the matchstick doorframe...


And Skeleton Style 3 slumped in the foreground.


I think he's so exhausted with the whole haunting business that he can't even be bothered to warn his pal that "he's behind you"!


You'll see that the spooky old portrait on the wall has changed position - it was just getting lost behind Skeleton 1's head.


Around the back and sides, the Halloween fun goes on.  The Carved Pumpkin sits on the back under the excellent advice to "Scream".  I shaded the papers using Quinacridone Gold, Green Gold, Viridian and Raw Umber so that it would all tie together.


And on the sides there are some Bats hanging about - of course! - very simply painted with Paynes Grey.  These are from the Flying Bat Colony - a whole plate of tiny bats to play with.


Very happy with the look of the pumpkin - I think he's one of my favourite Jack o'Lanterns I've seen, even before you get the paint on him.  I'd happily use him "naked" on cards or tags too.


I love the sheen you get using the translucent DecoArt paints on the Craft Parts - very cool.


And because the Craft Parts are of such good depth and quality, the bats cast their own spooky shadows.


And finally, the Spooky Shrine front panel... same paints in action and then some DecoArt Crackle Glaze, Raw Umber rubbed into the cracks and wiped back, followed by a coat of Ultra-Matte Varnish because for once I didn't want it too shiny.


The Spooky word is done in Raw Umber with Paynes Grey - and the spider and his webs are basically Paynes Grey too.  It looks really cool over the dark wood of the basic Craft Parts.


So I hope I haven't spooked you too much...


No, I hope I have!  Mwaah hah haaahh!


I certainly hope I've inspired you to check out the Halloween offerings at Calico Craft Parts - there's enough inspiration there for even the most avid Halloween fiend.  As I said, I'll be back again on Monday - til then, sleep tight and mind the bugs don't bite!

Alison xx
Words and Pictures