I am back after a much needed break and would love to share my version of a haunted manor...Kerstin did one using the fabulous Haunted House Kit last year and has raised the bar for future manors considerably. I really admire how she manages to create her typical natural yet really spooky feel with her Halloween makes!!!! Check out her fabulous Haunted House by clicking HERE.
With my version I went rather in the direction of dolls houses and used the open back of the house kit to install floors and lighting. It was a bit of a hot glue gun fight for me, but definitely worth it! ;)
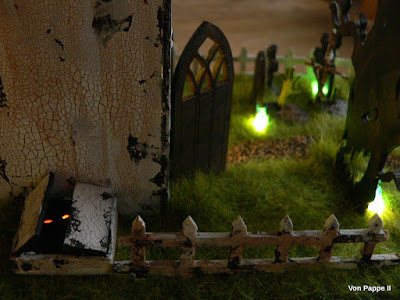
...and this is how it looks with the house lights on and the will-o'-wisps shining.
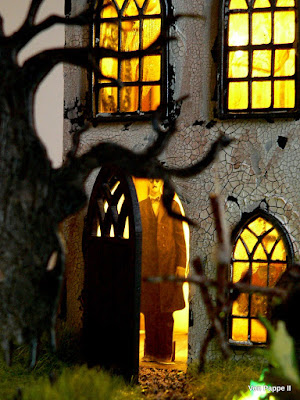
So....imagine your car has just broken down, it's late in the evening, you don't know where you are, it's getting darker and darker and the only lights you can see are the ones of this house in the distance.
You're sure you can get some help there!
As you approach the house, you notice that the garden obviously hasn't seen a gardener for ages, the grass being knee deep...and there are some strange blue-green-ish lights here and there, wavering in the cold evening air.
Well, at least they help you find your way...
Ah, there's the gravel path that leads to the front door...and someone is already awaiting you it seems...
How lovely! Maybe you can warm up inside, get a nice cup of tea and some help with fixing the car...
You are so focused on the person (who's still having a butler these days?!) behind the half open door that you scarcely notice the mobile hanging from the tree (obviously some happy, creative kids live in that house) and some movement to your right in the dark (a cat surely...or maybe a hedgehog).
Just when you are close enough to see the strange expression on the butler's face, you also realise you have just passed by a small graveyard...and what you thought was a hedgehog seems to be hands reaching out from the graves!!!!
But it's too late to turn back now, because you are suddenly hearing a deep growl and a heavy door creak from somewhere behind the house...and the shortest distance to run is towards the house. What should you do?????!!!!!
Well, first of all: become a true scream queen, right? :)
***
So this is Blair Witch Manor.

I've used Calico Craft Parts' cool
Haunted House with Graveyard - MDF Wood Kit
and it really is great fun to decorate and so so easily assembled! Downloadable PDF instructions for assembly can be found over at the products page!
As you can see I've turned the evil tree the other way round and didn't use the ghost on the roof (that also comes with the kit). I've also not used all of the tombstones and crosses from the kit but replaced them with left over arched shapes from the kit. There are actually so many different ways to customise this amazing kit!
But let me talk you through the steps in more detail...
If you decide to read on to the very end in one go (and I promise I am trying to explain everything I did in detail and with steps images), you maybe want to first go and grab a cup of tea... ;)

So here we go!
The basement door was not part of the house kit (in fact it was the idea of my son to add one), so I've used the
to build it.
For the red glowing eyes I simply used some cut to size black cardstock into which I poked the eyes. Then I glued red translucent paper behind that and inserted everything into my assembled basement door (I left some flaps with the black cardstock to bend and use as glue tabs). The light from underneath is one of the bulbs from the tiny chain of lights I used. You just drill a hole into the base plate of the kit before you fix the basement door to the base and glue the bulb from underneath in place with some hot glue.
The graveyard hills with the Zombie hands sticking out were made from white air hardening modelling clay (the really cheap stuff).
I simply let the little heaps dry in place (over night) and with the two hands of the
already stuck into them.
The texture that should mimic the piled up earth was done using my splatter brush. I simply held it firmly so the bristles couldn't move and used them like a texture tool.
Later the heaps were glued in place, painted with a mix of DecoArt Raw Umber and Carbon Black acrylic paint first and then dry brushed with DecoArt Americana Sable Brown to highlight the texture. The texture on the tombstones was added using DecoArt media Texture Sand Paste that I rubbed onto the shapes with my fingertip. For the larger one I used the very tip of a palette knife. These were painted the same way as the earth - only with much less and lighter dry brushing.
I also used the Raw Umber-Carbon Black-Mix to dry brush the glued on roof shingles (these were done using Kraft paper and the "Lumber" 3D Texture Fades Embossing Folder from Sizzix).
The walls and roof tiles of the manor, the base plate, the picket fence and the basement door were all first painted with my mixed black-brown acrylic paint too, heat dried and then I covered the walls and fence parts with DecoArt media White Crackle Paint. I used a palette knife for spreading the crackle paint and made sure I left some spots untreated for a more weathered look.
The window frames were given a coat of Black Shimmer DecoArt Metallic Lustre. I simply used my fingertip to smudge on the Lustre.
I love the beautiful result from the crackle paint! It really creates a grungy, weathered look.
To create my will-o'-wisps I drilled some more holes into the base plate and fiddled a light bulb from the tiny chain of lights through each one to move these to the top. U-Folding the light chain carefully right behind the bulbs makes them easier to thread through the holes - but do not bend the wire back and forth as this will cause it to break!
Next I took my hot glue gun and formed some flames on top and around the bulbs. That works best if you let the drop of glue sit until it becomes less liquid and then use a pair of fine pointed tweezers to pull little peaks from the glue. Finally I painted the hardened glue flames with diluted DecoArt media Cobalt Teal Hue.
The house kit comes with one "floor" that usually sits on top and fits into the two small slots in the left and right side panels. I though decided to create two floors.
To do so I first sanded off the two tabs from the MDF floor plate from the kit. Then I used that panel as a model to cut another from thick greyboard.
Next I gathered some MDF left overs from older kits and MDF sheets to create two bars on each side for the floors to sit on.
I could have used the slots and tabs for the upper floor but I wanted the floors to be mobile until I had my lighting done.
I decided to later cover the slots with two little MDF ornament pieces or something like that.
The house kit comes with an open back (so you can put an electric tea light in it), but I wanted to have it closed - so I cut a house shaped panel from thick greyboard and fit it right into the frame that goes to the back of the house to keep it sturdy.
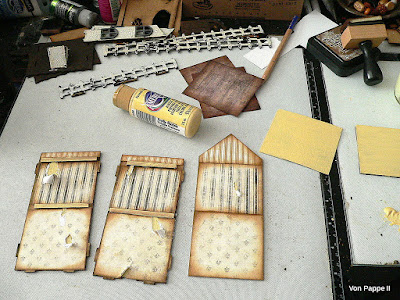
The outer side of the back panel was covered with some designer paper.
The inside of the back and side panels and the floors were covered with more designer paper - mimicking wall papers and wooden floor boards.
I inked the papers' edges with Distress Ink Gathered Twigs and also tore some parts off for an abandoned house look. The visible wall sections and the undersides of the floor boards were painted with DecoArt Americana French Vanilla acrylic paint.
Time to glue the house to the base (for which I used DecoArt matte Decou-Page)! Only afterwards I glued the ground floor paper in place. I didn't fix the floor boards and the house shaped back frame yet as I wasn't sure where exactly the wires from the chain of lights would go - so I left that for later.
For the window panes I used some acetate and coloured it with Ranger Alcohol inks.
Then I cut the panes to size and glued them to the inside of the house. I also added some frayed and trenched lace to form torn curtains.
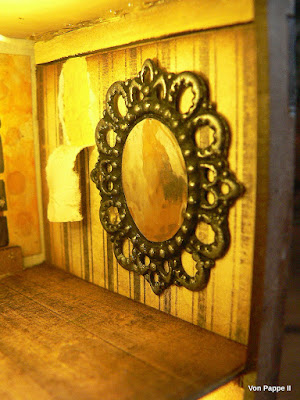
So the back opens up to reveal torn wall papers, forgotten old pictures and mirrors on the walls and two chandeliers. I didn't go into too much detail and fiddling as I mainly wanted a hint of these to be seen through the front windows and curtains.
(but maybe I will add some furniture one day (and also paint the back of the butler black))
The old portrait and mirror were done using cheap metal embellishments that I altered using DecoArt Black Shimmer Metallic Lustre and Liquid Glass, some mirror cardstock and a portrait from my stash of ephemera.
Before and after:
This picture shows where the left over section from the chain of lights got tucked through the slot for the fence (that I obviously didn't use all around the base) to create the lights from underneath for my will-o'-wisps. Only the switch that also holds the batteries was too wide, so I left that part of the chain of lights on top and led it around the back of the base to the inside, where I hid it from sight...
No need to work neatly on the bottom side (at least not for me as I am an impatient girl as you might know by now) - I used Gaffer tape to keep the chain of lights in place. The strange curves the chain forms underneath the base come from the spots of the will-o'-wisps. The ones not used are the ones under the pieces of tape.
...and this picture shows where I drilled a hole through the side panel to lead two bulbs of the light chain to the outside so they would light the upper section of the oriel on the other side of the wall.
I roughly formed the chandeliers from the chain of lights (using three bulbs each) and glued them to the ceilings with more hot glue. Once everything was in place it was finally time to fix the floor boards to the bars (with more hot glue).
What else needs some explanation? ...oh, yes...the evil tree in the front garden!
I had painted that one with my Raw Umber-Carbon Black-Mix as well. Then I applied some DecoArt black Modeling Paste on top and used the palette knife to also create some bark-like texture. I let that dry thoroughly before I dry brushed the dried paste with some light grey acrylic paint and added a wash of DecoArt media fluid acrylic paint Burnt Umber on top.
Oh, I just love the evil grin. The perfect tree to hang a Blair Witch sign in!!!!
The grass I've added is "wild grass" flocking that gets usually used with railway modelling.
Done!!!!!
Thank you so much for staying with me this far! I hope you like my project and found some of the explanations and techniques useful for your own future projects! The
Haunted House with Graveyard Kit comes in two sizes (I used the smaller one) and really leaves plenty of room for own ideas and decorations (on the out- and inside).
The base plate can be decorated in countless ways - or you can just use the crosses and tombstones and the evil tree that come with it. They definitely make for a spooky show!!!!
Hugs and happy Halloween crafting!
Claudia
xxx


