

I especially fell for this lovely flower bouquet from the wonderful Easter and Spring Wood Shapes collection...

...so I knew I had to make it the focal piece when altering my cigar box!
Calico Craft Parts used:
- Fancy Birch Plywood Plaque - Style 2
- Narcissus Flowers MDF Wood Shape
- Row of Chicks MDF Wood Bird Shape
- Sheet of Mini Hares
- Oval Shape - Mini MDF Wood Plaques
When I want to paint in more detail on MDF wood shapes I first dry brush them with white heavy body Gesso to seal the parts so they don't absorb any of the paints' pigments (which makes the colours pop).

Then I start with the brightest tone and work my way towards the darker ones.

My first colour that I added to the leaves, grasses and stems was DecoArt media Green Gold fluid acrylic. The media fluid acrylics have loads of pigment, so you really only need some drops of paint to go a long way.
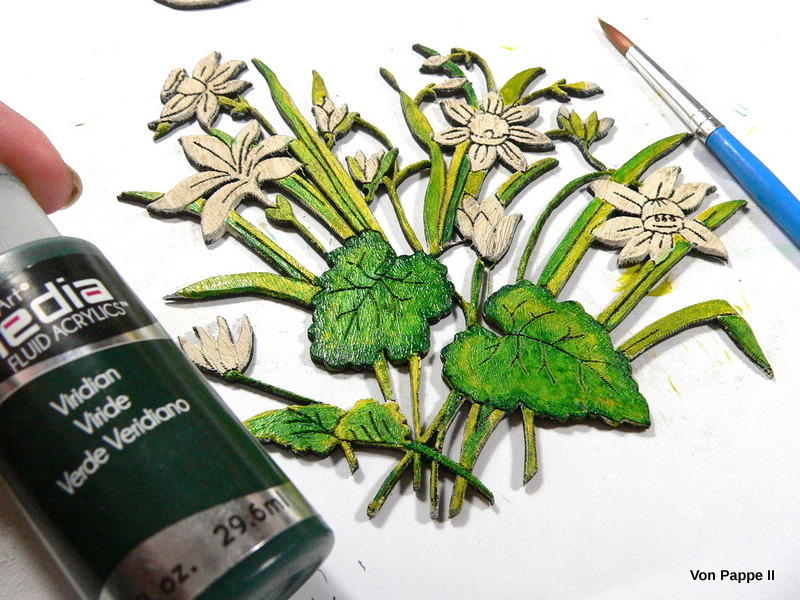
Next I went in with Viridian and as that is a semi-transparent colour I diluted it directly on my piece by "dragging" and thus diluting the applied paint with a waterloaded brush. This way you can create lovely shading and still have some of the other colours show through - which creates lovely layers and a lot of depth. If you want to know if your paint is opaque, semi-transparent or transparent, just check the labels on the bottles' backs.

To paint the blossoms I used Titan Buff, Diarylide Yellow and Hansa Yellow Medium.
You see that I added a thin wash of Gold Green to the large blossom to the left. I later decided that I needed a bit of blue to contrast the orange and yellow tones of the Narcissus flowers - so I went in with a wash of Ultramarine Blue. As the green from underneath still shows through you get a greenish-blue tone that fuses it with all the greens on the piece:

To prepare the plaque I wanted my flower bouquet to sit on I painted it with a dark brown heavy body acrylic paint. Once that was dry I applied a thorough coat of DecoArt Americana Weathered Wood and let that dry almost to the touch (so it was still a bit sticky).

Then I quickly brushed on a layer of DecoArt "lace" Chalky Finish paint using a very soft flat wide brush.

The plaque was left to dry naturally. Afterwards I went in with some diluted DecoArt media Raw Umber fluid acrylic paint to create a slightly smudged dark brown edge.

The cigar box was given at least three stippled on coats of DecoArt Americana "lace" Chalky Finish paint. I found that stippling on the paint instead of brushing it on helps with slick surfaces and also provides better coverage and lovely texture. The whole in- and outsides were painted like this. So I had to work in steps and use drying times to continue working on the other parts.

Once my last layer was dry I stamped on some crackle pattern using brown archival stamping ink. The edges were also blended with the stamping ink using a mini ink blending tool.

The mini hares and eggs were painted with Americana "timeless" Chalky Finish paint and were then given a coat of DecoArt media Clear Crackle Glaze. I set them aside to dry naturally.

To make the cracks more visible I added a layer of Carbon Black DecoArt media Antiquing Cream, let that dry and then wiped off the excess with a soft damp cloth.

I had taken the cigar box apart because I had noticed that the paper spine had started to go off (and it made painting the box easier too). So I covered the inner side of the box lid with some designer paper and fixed it to the box with a strip of linen bookcloth and some matte Decou-Page.

I let the glue dry by keeping the box shut and putting some heavy old dictionaries on top. Afterwards I glued on the painted Calico Craft Parts (using matte Decou-Page again) to finish my box off.

The gorgeous little chicks were the perfect piece to be put to the front!

And I simply used some oval mini wood plaques as "Mini Eggs" to decorate the sides with.

Done!

Just a quick last tip before I say goodbye for today: don't add any paint or papers to the left and right slim sides of the box lid. Otherwise your cigar box might become hard to close and open.

I hope you like the box and the tutorial!

Thanks for stopping by and see you again over here on Easter Monday!
Hugs and happy crafting!
Claudia
xxx

This is adorable, Claudia - wonderful paintwork and such cute Craft Parts all over!
ReplyDeleteAlison x
What a delightful box with wonderful 'crackle' and beautifully painted. I'm sure this would be treasured - the perfect Easter gift! x
ReplyDeleteA fantastic tutorial Claudia, your Easter box is beautiful, the flowers on top are gorgeous. Anne x
ReplyDeleteThank you both so much, Alison and Julie Ann! So glad you like my Easter Cigar box! :) xxx
ReplyDeleteStunning Claudia! wonderful crackle and your painting of the cluster is just so beautiful. I keep absorbing your techniques and am learning! Jennie x
ReplyDeleteAw! That's so lovely of you to say, Jennie! Thank you so much! Hugs! xxx
DeleteLove this project Claudia...it's beautiful. I love the weathered look of it, both 'classic' and with the stamp...Great! Hugs....
ReplyDelete