
Calico Craft Parts have recently released a lovely series of beautiful art doll kits - and I couldn't resist to lay hands on (at least) one of them (for starters...)!
Please, give it up for "Don Consuelo" - The Tattooed Man!!!

You can tell by the look on his face that he knows exactly about his looks and the effect it has on his female audience...

...and pure honey he is, isn't he? ;)
If you - like me - still have some decou-page glue for Serviette-technique and a load of unused flourish stamps at home THIS is the project for you. It is as easy and fun as it is quick!
Calico Craft Parts used:
- Standard Jointed Art Doll Kit - Style 2 - medium size
But I started with two different art doll kits as I couldn't decide at first which one suited my idea of a tattooed man best. So I compared the above kit to the Standard Jointed Art Doll Kit - Style 1.

For a muscle man I found the style 2 kit more suitable, but I am sure I will find the perfect project to make from the style 1 kit too! (giggle...the right doll is looking as if it was scratching his bum...I only see that now that I am writing this post...naughty boy!...lol...;)
I wanted to keep this project as simple as possible and also achieve the impression of a tattooed man as shown in this photograph from the early twentieth century. So I decided to use black and white only and started by adding a thin layer of white DecoArt media Gesso to the pieces.

As the white DecoArt media Gesso is quite liquidy, it mixed a bit with the MDF which brought a lovely brown-ish tint to my art doll. I could of course have fixed this by adding a second layer of white Gesso, but I loved the look - so I only added one layer and let that dry.
In the meantime I stamped some flourishes and other smaller detailed images onto a paper tissue using black archival stamping ink.

I found that some matched the shapes of my doll's body parts perfectly!!!

Slowly it all came together...
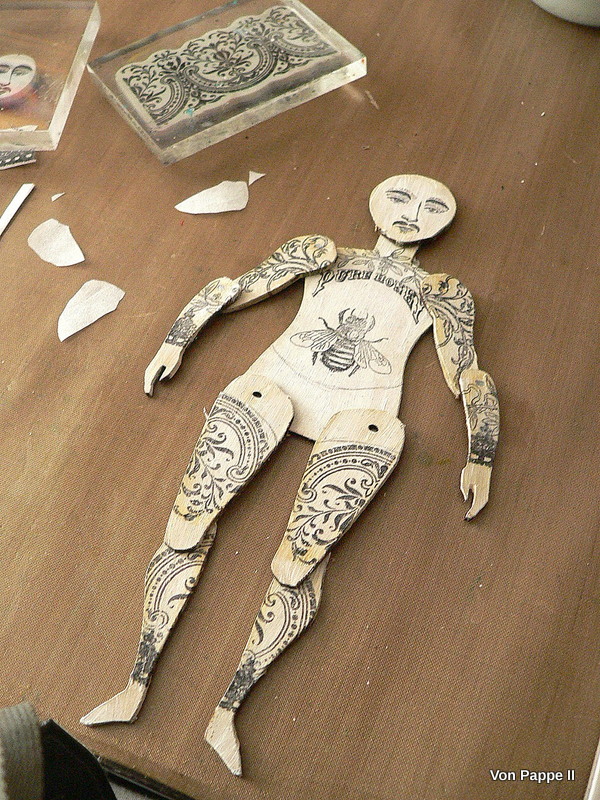
The stamped face was too small actually, but I simply cut the eyes and mouth-and-nose-bit apart and placed them on the head shape as needed.
His hair and smaller details were added using DecoArt media Paynes Grey and a fine detail brush, ...

... a fine tip black china ink pen and a white gel pen.

Small dark brads were used to join the doll parts ...

... and the head was permanently glued in place.

He would make a cute jumpin' jack too...

...but I think he looks very much like a modern guy (maybe even a little too modern) when he poses like this, doesn't he?

Thank you as always so much for stopping by! I hope you enjoyed your visit!
Hugs and happy crafting and see you in two weeks!
Claudia xxx

Stunning project Claudia!!!
ReplyDeleteLove your tattooed man Claudia, clever idea . Tracy x
ReplyDeleteReally clever! and very creative.
ReplyDeleteWow! Claudia I love your tattooed man! He looks like an authentic Victorian wooden toy and the black and white is stunning and so effective. It's hard to pick a favourite, but I think he's one of your best creations for Calico so far - and that's saying something! xx
ReplyDeleteThank you very much, ladies! Mwah! XXX
ReplyDeleteBrilliant tattooed man in every detail!
ReplyDeleteThank you so much, Patty! XXX :)
Delete