Sunday 28 August 2016

Owl Lady Jewellery Casket by Julie Ann

Hello, Julie Ann here at Calico Craft Parts with a story-book jewellery casket. Once upon a time I wrote a story in which a lonely jewellery-maker discovered a stray feather growing from her cheek. Daily more feathers appeared here and there on her body! Gradually more intricately patterned plumage sprouted from her shoulders and over her hands. She had been given a special commission for a mysterious client, a necklace that reflected the different phases of the moon, and when her project was completed she reached the final stage of her metamorphosis, sprouted massive, strong wings and flew deep into the moonlit forest - an owl woman! My story reached the final stage of a competition, but although it was not in the winning three, its symbolism remained with me. I find myself returning to the idea of 'Bird Women'. I created a set of brooches and earrings for a friend's daughter and I wondered, 'What if I had written a whole collection of Owl Woman stories and they found their way into a book?' It might look something like the jewellery casket I created for Claire.


It all started with one of the Calico barn owl shapes perched on a branch in the light of the moon.


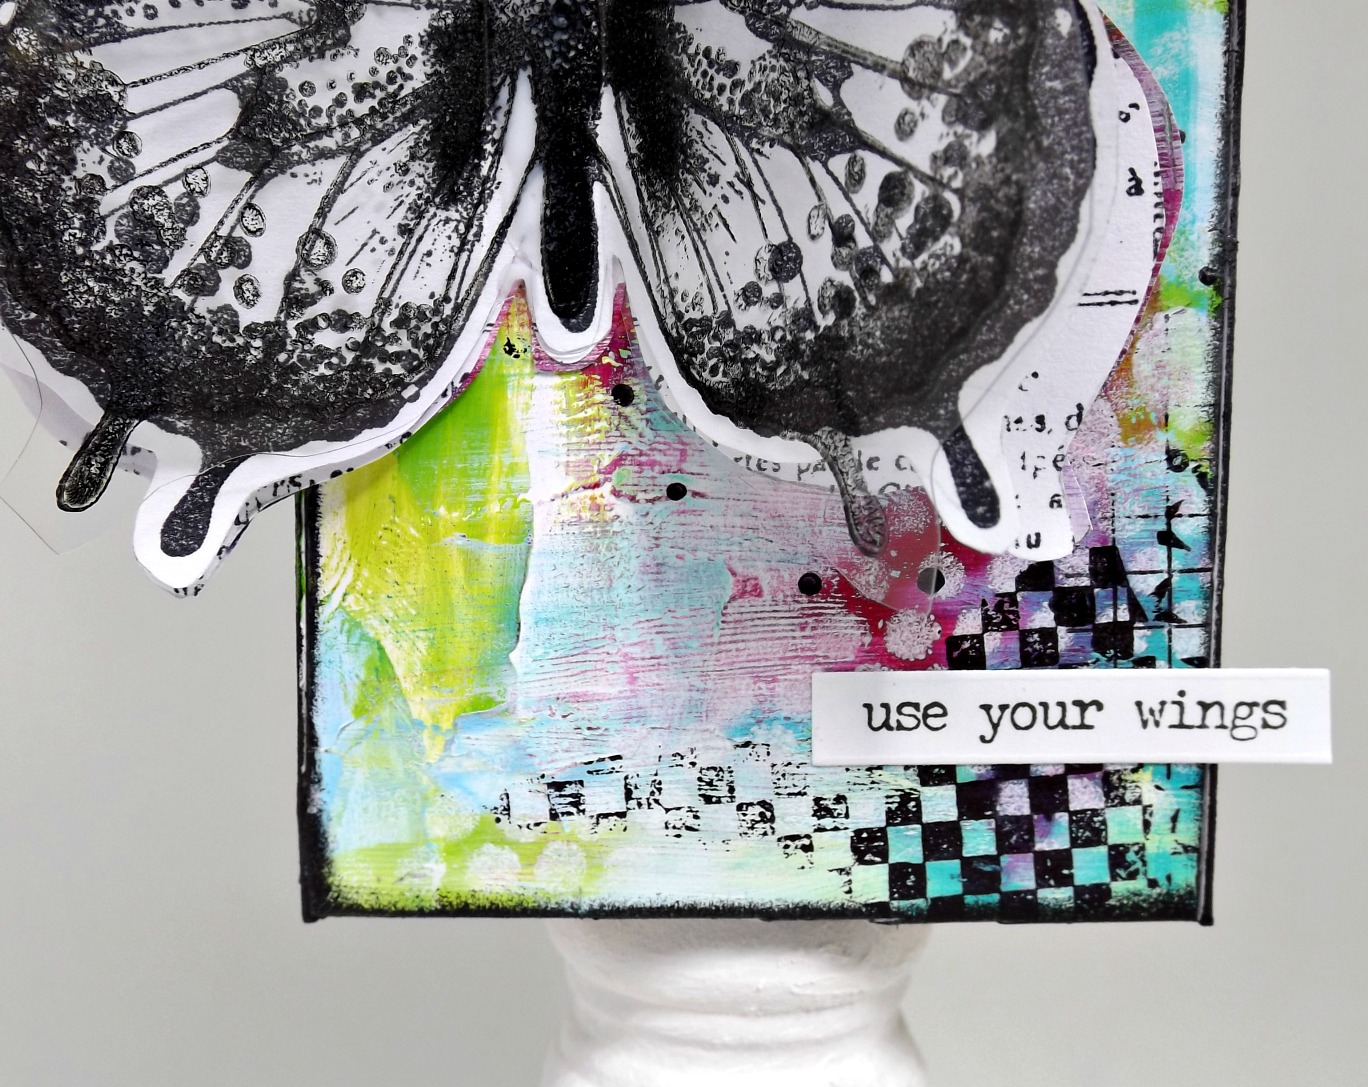
After colouring the shape with acrylic paints, I fixed on an oval plaque collaged with a face, adding some detail in the form of feathers with a fine, pigment pen.


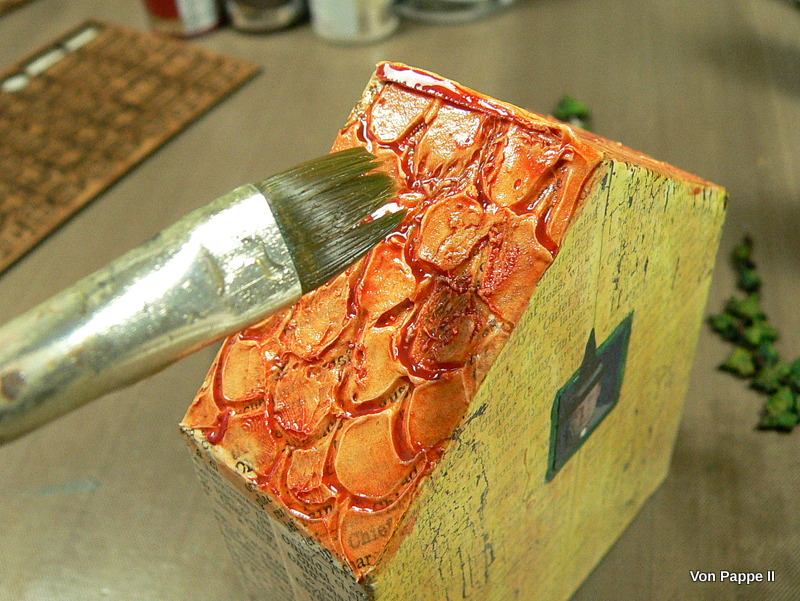
Putting my Owl Woman aside, I took one of the Calico Book Box Kits. Calico Kits can take no end of painting, ageing and distressing. I wanted this casket to resemble an old and mysterious tome that might have been passed from one magician to another!


Before assembling the kit, I painted a background in green, stencilling a woodland scene with birds over the top in different shades of blue; I stamped and embossed stamps of feathers over this and then dipped a juice lid into blue and white pools of acrylic paint to create a circle, which I then filled in with diluted white acrylic to form the centre of the moon! So that the moon would gleam, I dipped my lid into an embossing ink pad and then pressed it down, sprinkled with gold UTEE and melted to create a gleam!


I added layer after layer! Here you can see that I white and gold embossed feathers and stencilled some gold embossing paste through a script stencil. Spatters of melted gold UTEE and Frantage in blues and gold also found their way onto the project.


2 DecoArt products which really helped create the effect of ageing on this project were the One-Step Crackle and the clear Staining Antiquing Medium. Painting the One-Step Crackle over the project, leaving it to dry with a desk fan playing on it and then painting with a blend of equal parts antiquing medium and acrylic paint and wiping away, created a fine crackled effect.


I was pleased with the effect on the feathers. I added part of a flourish and a wren calling to the Owl Woman on her branch above his head.


A Kraft tag stamped with one of the feather stamps in an archival brown and a metal band with a sentiment provide the finishing touches. I also gilded the spine and the edges.


Some detail of the crackle on the back of the casket. Between the covers is a box where the gifts nestle.


Thank You so much for stopping by and listening to the story of the Owl Woman and how she inspired Claire's casket. Have a wonderful week full of dreams and stories.

Calico Craft Parts Used on this Project
Barn Owl and Moon Scene
Sheet of MDF Oval Shapes
Book Box Kit
Bird and Vine Flourish
Sheet of MDF Garden Birds

Thursday 25 August 2016

Butterfly House by Trish

Hello!

Another day.. another house!

This time, I've used the tall house with a wonky roof to create a butterfly assemblage :)


Once the house was glued together, I created a painty background on a piece of card. This was then cut up and glued to the house. As its so chunky, it gives a fab 3D look..


I created the butterfly by stamping it onto both a bit of acetate, and a bit of copy paper. I then traced the shape onto some stamped paper and painted paper, then cut everything out and glued them together. The finished result is a layered butterfly, with lots of detail going on!


I put the house onto a small candlestick base to give it a bit of height, then added a phrase to finish. I hope you like it!

Trish x

CCP used:
Tall house with wonky roof (large version)

Monday 22 August 2016

Hocus Pocus! by Claudia

Halloween is still some weeks from now but usually I am always late with starting Halloween projects and run out of time - so this year I decided to be an early bird and create my first little witch house already at the end of August.


The yellow paint, the green door and window shatters, ivy climbing the building - they are all typical elements of houses as we have them in the beautiful Salzkammergut region in Austria - mainly the region around Bad Ischl (where Emperor Franz Joseph used to spend his summers).

But the tiny second door.....and the gigantic mushrooms? So maybe it is a Salzkammergut witch who lives here. Who knows. (and maybe she is looking unhappy because it has been raining on and on for the last days. If you know the typcial Salzkammergut rain, you will know why she is in a bad mood...lol).

Calico Craft Parts used:

- Block Style MDF House Kit - Wide
- Sheet of Mini MDF Door Wood Shapes
- Sheet of Tiny MDF Door and Window Wood Shapes
- Sheet of Mini MDF Wood Lamp Posts - Style 3
- Mushrooms - Funghi MDF Wood Shape - Style 9
- Ivy Leaf Garland MDF Wood Shape - Style 2
- Stars - Mini Greyboard Shapes

The house kit was assembled using matte DecoArt Decou-Page (I love it as it dries so incredibly fast).


Then I glued on some dictionnary pages and also covered them with the matte Decou-Page.


I played around with all my Calico Craft Parts until they had all found their perfect positions. Then I put them aside and painted them with DecoArt media fluid acrylics. I have no images of this part of the process this time - simply because you are meant to choose whatever colours you like best. (I used two greens (a darker and a lighter one), Raw Umber, Quinacridone Gold, Titan Buff and Gold Green).


But before I started painting my little pieces to decorate the house with, I applied a very thin coat of DecoArt media white Modelling Paste with a palette knife and engraved a roof tiles pattern into it using a fine tip embossing tool. I let the modelled roof dry naturally.


The house was painted with a light wash of Gold Green and Transparent Red Iron Oxide afterwards to tone everything down. For more texture I added some stamped on crackle on the house's front, the star and the mushrooms. A copy of a vintage potrait was cut to size and glued in place. Then I painted around and over it and added the pointy witches hat.


I made a wash from DecoArt media Quinacridone Gold fluid acrylic paint and added it to the roof.
This way the texture became more visible and the tiles' shapes were accentuated.


Then I dabbed a frame around the house's edges using my fingertip and the same colour as before.


The cat was hand drawn using Faber Castell PITT Artist Pens.


I shaded the mushrooms using Raw Umber. Highlights were added using a very fine tip soft brush and Titan Buff.


I also added a lighter green to some of the edges on the window shatters and door to create more of a 3D impression.


Sancho, the wise raven, was added...


...and a word sticker finished it all off.


So here it is -  my little Salzkammergut style house! 
Thank you for stopping by today and I hope you have enjoyed your visit! See you in two weeks!

Hugs and happy crafting!
Claudia
xxx


Wednesday 17 August 2016

Cactus Pot by Lesley

Hey everyone. Lesley here with altered ATB for you.

I don't have any plants in my house........i tend to kill them all! But i did treat myself to a few cacti thinking even i can't kill them off......time will tell though. They came in these really horrid plastic pots and i had trouble finding small ceramic pots for them to sit in. So.......i thought i'd have a bash at making my own.


The ATB are so versatile. I used the medium size one with a square aperture. I started by gluing it together and priming it with gesso.


I applied texture paste through a leaf stencil to the sides of the cube, not bothering with the base. Once this was dry, i use a two step moss effect paint over the top. It still looked a bit bland, so i applied a rust coloured paint with my fingers over the top, concentrating on the raised areas of the leaves.


I randomly stamped using a crackle pattern stamp around the edges.

And then i painted a diluted wash of Paynes Grey paint over all 4 sides.


The bottom was painted with the rust paint, stamped and then the wash over the top. I drilled a hole in the bottom for drainage. Although, thats not need in my house as i never remember to water plants!


I won't lie........planting the cactus in the cube was a pain in the butt!. Its not quite in the centre, but i gave up after my finger started to bleed!

I added little feet to the pot which were painted black and some rusty wire was added around them.


To finish, i gave it a couple of coats of matt varnish (to protect it from all the water it will never see!!)

Now, i just have another 6 cacti to plant......any advice gratefully received!

Thanks for reading.
L.xx

You can find the square aperture ATB here.

Sunday 14 August 2016

Flying Matilda - simple birthday card by Julie Ann

Hello, Julie Ann here with a simple idea for a super-quick project this week. My daughter wanted to give her boyfriend a special card for his birthday so I used Calico Craft Parts to create an original greeting that could only have come from Matilda!


I used a sketch based on a photo of my daughter; but you could scan and re-size a photo of friend or family member and re-size it or choose an image scanned from an art-book, magazine or the Internet, of course.


With my image cut to fit just a little bigger all the way round than one of the birch plywood heart plaques, I fixed it with some Matte Medium. You could also use one of the collage glue sticks that are available. It's a good idea to spray anything you've printed out with some fixative before you stick it so that the ink doesn't run and spoil your finished piece. Then, when the image is smoothed down and firmly stuck, I like to sand the edges to give a nice, clean finish. I then paint the face carefully with any additional colour, a little pink water-colour on the cheeks and lips maybe, before finishing off with a glaze or a thin layer of the Matte Medium.


Ever since my childhood, I've loved to create little people from bits and bobs all around the house: scissors, spoons, pegs and bottle openers all became characters in my games of make-believe, so collage and assemblage often seems like that kind of play to me now. My daughter loves old clocks and watches, so what better component to give her for a body than one of the Steampunk clock parts?


 I aged this with sponged-on Acrylic paint, archival ink and gilder's paste. The wings were given the same treatment, and the crown has some UTEE in gold melted onto it. I like to keep a little library of scanned images that I can print out for projects so you might recognise these stripy legs from the woodland muse sketch-book I created a while back!


The background is so easy to create. I took a Craft Card blank, masked off the sides with some tape and then simply brayered horizontally and vertically in white, blue and green Acrylics. I also had some fun spattering diluted paint over the surface with a toothbrush. When the tape is removed - 'Hey Presto' - lovely smooth edges!


It's then just a matter of finding the right stamped sentiment before assembling your elements and arranging them on the card - I like to use a little clear embossing powder so that the stamped letters really stand-out.


Calico Craft Parts give great dimension without being too thick and weighty for a greetings card. I don't create cards that much these days, but I did have lots of fun creating a quick card caricature of Matilda. I like the way she seems to be fluttering out of the card towards us! One of Matilda's friends ex work colleagues referred to her as 'The Little Bird' so those wings seem very apt and she just loves sunny days. Wherever you are and whatever you're doing, I hope that you're enjoying 'Sunny Days' of creativity yourself!

Calico Craft Parts Used
Birch PlyWood Standard Heart Plaque
Sheet of Steampunk motifs (style 3) Clock
Sheet of Steampunk motifs (style 3) Wings

Thursday 11 August 2016

Happy Houses! by Trish

I thought I would use three of the smallest houses to create a (very) 3D piece of wall art!


A simple colour scheme, letting the houses take centre stage! From an angle, you can seee just how 3D this really is...


I stamped text background onto card, then cut it out and glued it to the front and sides of the houses. Red dotty card was then punched into loads of circle shapes and added as the roof. More punched shapes and a bit of cord were used as decoration to the front of the houses...


The three houses I used were (from left to right...)

Framed Style Tall House (Mini sized, I turned this around so the open side is effectively hidden)
Block Style Cube house (Mini)
Block Style wide wirh wonky roof house (Mini)

I hope you like it!

Trish x

CCP used:

Framed Style Tall House (Mini)
Block Style Cube house (Mini)
Block Style wide wirh wonky roof house (Mini)

Monday 8 August 2016

Pigs in Space! by Claudia

Do you know (or remember) Captain Link Hogthrob, First Mate Piggy and Dr. Julius Strangepork - the crew of the fabulous Swinetrek?

I loved them when I was a kid! And when I saw the awesome pig wood shapes over at the Calico Craft Parts Shop, I knew immediately that I had to use some of them to re-create my very own version of "Pigs in Space!"


Calico Craft Parts used:

- Artist Trading Block Cube Kit - Round Aperture - Large
- Pig MDF Wood Shape - Style 4
- Pig MDF Wood Shape - Style 3
- Pig MDF Wood Shape - Style 9
- Vintage Style Pig MDF Wood Shape Style 23
- Vintage Style Pig Head MDF Wood Shape Style 10

I started with cutting circles from acetate (from old packagings) and sanding their edges to create a visible outer edge.


Then I used DecoArt Americana Coral Blush and Dusty Rose acrylic paint to colour the pigs. I left the areas of the space suits untreated.


These were painted using Light Buttermilk and Charcoal Grey.


Once the paint had dried I drew on the details of the space suits using Faber Castell PITT Artist Pens.


I added a wash of DecoArt Media Prussian Blue to the sanded acetate circles and wiped back the excess.


To glue the astronauts helmets in place I covered the pigs' heads with DecoArt media Gloss Varnish and simply put the acetate circles on top while the varnish was still wet. This way the varnish worked as an invisible glue under the transparent acetate.


The ATB cube was assembled using matte Decou-Page, then generously covered with sprayed on DecoArt media Turquoise Shimmer Mister and sprinkled with tons of turquoise glitter while the spray paint was still wet (well, at least it felt like tons to me as I still found the glitter on my clothes, my workspace, hair and face days after!)


I drew four holes in a wood circle (that once was part of a wooden toy) and covered it with gold paint and gold glitter. Once it had dried I glued it to the top part of the ATB cube.


Captain Hogthrob was painted and then glued to a piece of round cork which I had painted dark blue.


Black thin wire was cut and bent into shape and then fixed to the backs of the pigs using sticky foam pads. I simply left the backing on the backs.


Then I inserted the wire ends into the drilled holes and added short tooth pick ends where the thread was too thin. You simply insert the pointy ends of the tooth picks in the holes and break off the (big) rests.


This way the thin wire is firmly held in place - even if the drilled hole is too wide.

I painted a die cut banner for my ATB cube and glued it to the front.


Then the top was finally glued in place - and I was done! I just needed to bend the wires until I was content with the positions of my pigstronauts.

"Captain Hogthrob! To the bridge!!!"


Ah, he definitely looks like the born spaceship Captain, doesn't he?


And here they are - my pigs in space (or in front of my husband's blue sweater to be more precise...but who cares anyway! lol)


This guy is an old stager obviously. 
Miss Piggy below has put on some lipstick.


That guy doesn't seem to be very focussed...


...and this one obviously needs addtional exercise at floating in space.


I just need to do it one more time...."PIGS IN SPAAAACE!!!!". lol


"So tune in next time for another digestive episode of..." - no, no! - no more pigs next time. I promise! ;)

But I hope you will stop by on Monday in two weeks to see my new project and tutorial then. And of course you mustn't miss the fab projects of my lovely teamies in the meantime!

Hugs and happy crafting!
Claudia
xxx