Wednesday 31 May 2017

She knew she loved him ....... by Jennie


... when home went from being a place to a person.

That lovely quote (E. Leventhal) was in my head when I started putting this little house together. 


The MDF Cube House Kit comes flat packed but is very easy to put together.  Before glueing the house together I gave everything a coat of blue chalk paint. 


It had been my intention to have the crackle on the outside but the house was just too dark, so the crackled outsides, became the insides! So easy to do with a cube kit!


The side panels were decorated with texture paste added through a brick stencil and finished with those gorgeous little mini hinges.


I kept the crackle (DecoArt Weathered Wood) on the roof and added muslin and a little cluster of flowers. I love the way the inks blend into the crackle to create the vintage shabby look.


I did decorate the inside of the box before putting the roof on! The box has quite a depth to it, so I bought the figures forward (glueing them to a small piece of wood) but it is worth noting that given the depth it will take a lot of items (note for the future!). There is a little MDF floral stem and leaf just tucked into the box - it must have been left over when I cut a piece up for a previous project. Always worth hanging on to all the little pieces!


As I have been on a bit of a run with "wedding present" ideas I think this could also make a lovely gift for either a wedding or an anniversary with the art dolls being replaced by the happy couple.  


Thank  you so much for joining me today for this little vintage project and I hope it may have given you some ideas for using the cube house kit for something a little different.


Jennie x

Live The Dream

Calico Craft Parts Used:


Monday 29 May 2017

Keep Out Sign for the Young Marine Biologist - by Claudia

Hi, servus and thank you so much for stopping by today! And I would also like to thank you all for the lovely comments you always leave with my projects - they're highly appreciated! :)

Today I want to share with you a "Keep Out" sign that I made for my son's new room. We have been busily renovating during the last weeks and my husband and I are switching rooms with our son. So he will soon have his own bedroom and small living room (and we are going to have a brand new bedroom with new furniture...so all are more than happy). 

Those who already know a bit about me and my family may remember that my son wants to become a marine biologist and that he especially loves sharks, whales and the coealacanth. So making a shark door sign for him was quite an obvious thing to do with Calico Craft Parts' awesome shark wood shapes


Calico Craft Parts used:

- Great White Shark MDF Wood Shape (please note: this design is now discontinued but link takes you to other shark wood shapes)

I wanted to create a vintage style sign, so I browsed the net for images of vintage signs and studied their colours, designs and font styles before I decided on which products and colour tones to use.


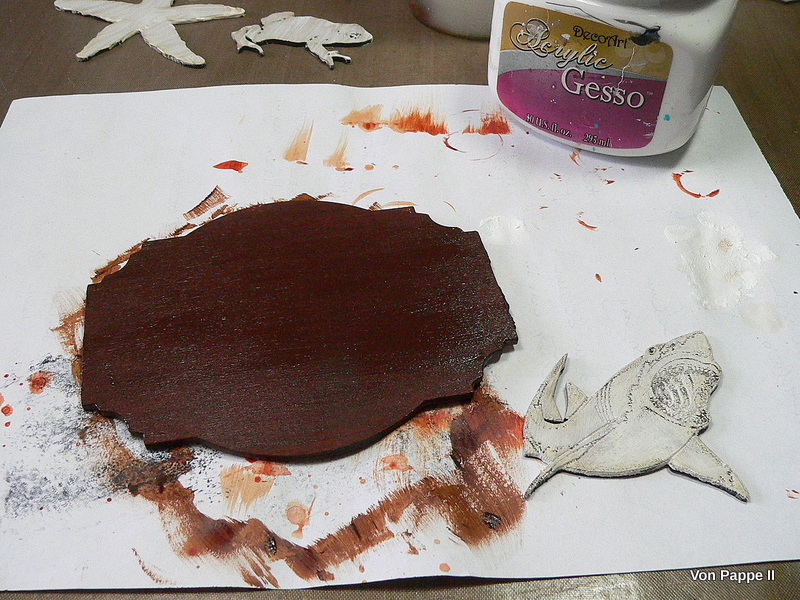
Then I started with adding some Burnt Umber heavy body acrylic paint and white DecoArt Acrylic Gesso to the plaque and the shark shape. 


Once the plaque was dry I added some DecoArt Weathered Wood to it with a soft brush. 


While that was set aside to dry I painted my shark using DecoArt media Titanium White, Phtalo Turquoise, Qinacridone Magenta, English Red Oxide and Cobalt Teal Hue fluid acrylics. 


I mixed some Titanium White, Quin Magenta and English Red Oxide to paint the mouth's inside. Once that was dry I dry brushed the teeth with Titanium White. 

In the meantime the Weathered Wood had gotten dry to the touch - perfect for quickly applying the top colour with a soft brush. I chose DecoArt Americana Sea Breeze as I think it is the perfect vintage colour for an ocean life themed sign! 


I let the painted plaque dry naturally before I mixed some DecoArt Americana Primary Yellow and DecoArt media English Red Oxide to paint a thin frame around the plaque. 


Once that was dry I drew a thin white border using a white gel pen. 


To make sure the font and letters were in the exact spot where I wanted them, I drew a template by outlining the plaque and the shark with a pencil and cutting it out. Then I marked the height of the letters with lower and upper lines that followed the shape of the plaque. 


I sketched my words on that template and then transferred them onto my plaque using DecoArt Americana Transfer Paper. I used a ball point pen for sufficient pressure and traced my letters precisely. 


They were then painted with DecoArt media Phtalo Turquoise using a fine tip brush. 


I also added two greyboard stars that I had painted with English Red Oxide. 


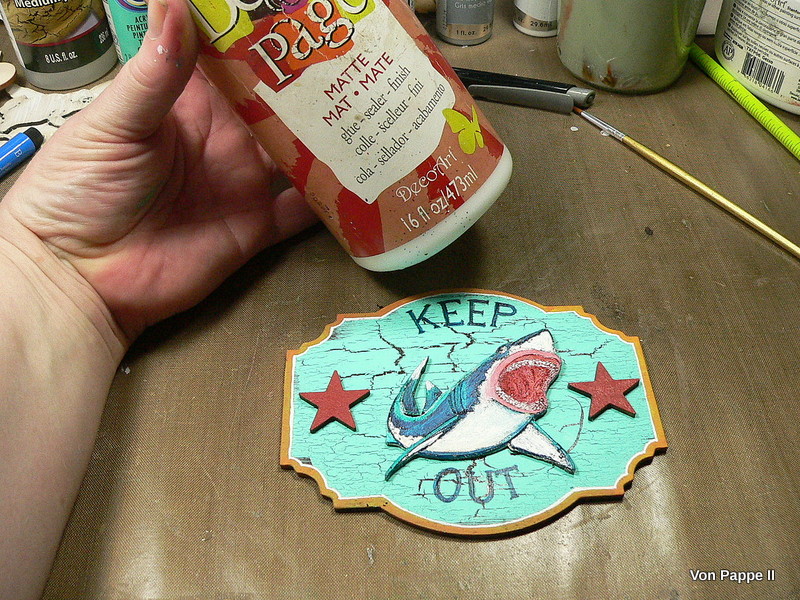
Everything was glued into place using matte DecoArt Decou-Page.


For a final touch I painted a very thin outline with English Red Oxide to repeat the colour of the stars and the shark's jaw. 


I drilled two holes using my Dremel to fix some rough cord for a hanging loop.


I simply tied a knot into the cord's ends. 


Done!


My son loves his new sign for the door to his new "realm". And I hope you like it too (and I am quite sure that there are a lot of future marine biologists out there who would love a "keep out" sign like this too). 

See you in two weeks!
Hugs and happy crafting!
Claudia
xxx


Wednesday 24 May 2017

Batting Her Eyes by Lesley

Hey people, i have an upcycled piece for you this week.

This piece originally started out as a hanging tealight holder which i picked up from a supermarket for 50p.


Because it is china, there was a good chance any paint would scratch off, even if it was primed with gesso. With this in mind........i decided to cover it in torn bits of printed tissue pieces using a matt medium. And the inside was coated with two layers of gesso.


I added a was of red paint to the entire piece, and then applied texture paste through a stencil. Once it was dry, i rubbed some gold wax over the raised areas. A few little rub-ons were added as well.


The bats were painted black and more gold wax added to the edges. I used a length of thick wire, and wrapped it around the bats and then around the top of the holder.


The dolls head was primed with gesso. And i then added black, red and white paint to her.


Using the last bat i had, i wrapped a length of wire around her neck, bending it around so that the bat sat in front of her eyes.


To finish it off, i added a length of chain so it can be hung.

Thanks for reading,
L.xx

Ingredients used
Flying bats colony

Sunday 21 May 2017

Anchovies Tin Shrine by Julie Ann

Hello Everyone. It's great to be here at Calico Craft Parts Blog. Today I'd like to share a project inspired by something that happened 30 years ago! My husband and I were visiting Russia and during a tour of the Kremlin we lost the rest of our party and found ourselves alone in a snowy courtyard. An old woman, typically Russian with a vivid floral headscarf brightening her drab layers of warm clothing, appeared out of nowhere and beckoned. She led us to a vast, heavy oak door, which she pushed open to reveal a tiny, dimly lit chapel. We gasped to see a vast array of be-jewelled icons, glimmering with gold - magnificent yet unexpectedly intimate . She spoke no English, but simply swept her hand around proudly, clearly enjoying our wonder and delight.


 A humble anchovies tin among my collection of 'alter - ables'; some bits and pieces discarded from past projects and some Calico Craft Parts inspired me to try to re-create in miniature a fragment of that moment, reminding me that sometimes beauty awaits us in unexpected places.


I always enjoy the early stages of a project - the excitement of gathering the elements that will go to make up the finished piece.


The heads from 2 small doll kits would combine to make the Madonna and Child, with a scrap of Dresden for a halo. I decided I would frame my anchovies tin with this beautifully decorated ATC frame. I wasn't absolutely sure how I would do this, but I wanted different layers to my shrine and I envisioned the ornate cross projecting out a little from my background.


I began to add more to my frame and centre-piece, although I was still not sure how I could create the glimmering, mosaic background I recalled from the tiny chapel. I love the shape of the Calico keys, which recall the heavy wooden doors and the significance of keys in Christian iconography. Bits of broken jewellery, crackle and gilding were beginning to evoke ancient splendour in an intimate setting.


Now it was time to create that background. I painted my tin with acrylics and decorated the interior with fragments of doily, touched with gilding paste and bead gel. My mosaics were created by stencilling with 3D gloss gel, allowing this to dry and then painting and gilding it before snipping it into squares and fixing to my background with heavy gel medium.


Time to bring the whole piece together. I found a little wooden cube I could adhere to my tin and also my cross so that it would stand out from the background. I am indebted to Alison Bomber for this tip! I was pleased with the way that my anchovies tin shrine seemed to invite the viewer in with welcoming arms. I hope that you will find time this week to create something from an item or items you might normally have thrown away. Thank You so much for stopping by today.

Calico Craft Parts Used

ATC with Engraved Fleur de Lis Frame
Curlicue Flourish Cross, small
Standard Jointed Art Doll Kit, small, style 2
Mini Greyboard Hearts
Sheet of Mini Angel Wings, style 1
Mini Keys and Keyholes

Wednesday 17 May 2017

Miniature Paris Couture by Jennie

Hello fellow crafters and welcome to a miniature project here on the blog today!


This Gothic Arch ATC is a super cute arch and great for incorporating some of the mini craft shapes.


This is really a Christmas ATC Arch with a Mistletoe embellishment but I thought I would show how versatile all these wonderful wood blanks are at any time of the year. It is very easy to snip out the embellishment for using elsewhere on the project.


I recently coloured some old text book paper with chalk paints, vintage inks and some texture paste. This was a small book I picked up in Rome on a market stall - well it was in a box under the stall as it had pages torn and missing. I couldn't tell the stall holder why I was so pleased it was in this state - my Italian is pretty non existent! - and I think he thought I was rather odd wanting to purchase it for 2 euros!


I had to fiddle around a bit before I could find a place for the arch to get as much of the textured words as possible. It was easier to glue this down with multi medium glue as the text paper was very thin.


I then added some watery vintage inks. I prefer to do this after I have stuck the paper down as the mdf gives the paper a bit of strength and allows the inks to settle instead of buckling the paper.


The outside frame was painted with chalk acrylic paint and then overstamped with a linen style stamp.


I then stuck the two pieces together and added some washi tape around the edges - I did this with one piece of tape cutting into the corners and snipping around the curved pieces. Washi tape is very maleable and just perfect for this type of project.


The  mistletoe embellishment was painted first with a chalky white acrylic and then the leaves with  DecoArt Raw Sienna Acylic Paint.  You can also just about spy a mini key there in the background dabbed with gold paint.


I finished the top of the arch with another mini and this hides where the mistletoe had been snipped off!


A fun little piece to make and despite being "miniature" not too fiddly for arthritic fingers!

As always thank you for joining me again and happy crafting!

Jennie x


Calico Craft Parts Used: