Wednesday 30 May 2018

Early Autumn Dreams by Jennie

Hello everyone and welcome to my final experimental ATC this month.


I am again using the same colours as before but this time with the addition of a little Paynes Grey and what a difference it has made!


I wanted to create a dark background on the ATC so blended these three colours until I was happy with the finish. This was a really good opportunity to try blending but without worrying too much as crackle was going to cover it up!


DecoArt Weathered Wood Crackle was then added on top  but I did rub away some bits and pieces here and there and around the edges. I didn't like the white as I felt it was too stark so I gave it a wash with a very watery Paynes Grey and then flicked some Quinacridone Gold onto the ATC and around the edges.


I felt very pleased with this effect and didn't want to cover it up too much. So this gorgeous leaf got the same colours blended onto it but this time with a very stiff bristle brush.


I then added DecoArt Crackle Glaze and rubbed in a little White Antiqueing Cream. I love how this mutes and blends the colours even further.


Lastly I coloured a few mini letters with the same colours. They came out a little darker than I planned but it is quite difficult to blend the colours on such a small item!


Both the leaf and letters are a perfect size for the ATC and allowing a good part of the crackle to be visible.

Calico Craft Parts used:


And so here are my three ATCs using the same DecoArt Fluid Acrylics but utilising different techniques.  The Calico Craft Parts pieces are just perfect for taking these mediums and the ATCs themselves allow experimentation with lots of layers without buckling. A perfect combination for experimentation!


As always thank you for joining me and I hope you have enjoyed my experiments as much as I have. I am sure I shall be using these techniques on larger projects in the future, but it has been great to experiment first on the ATCs. And of course they are a great reference too.

Jennie x


Monday 28 May 2018

Happiness Comes in Waves - by Claudia

Servus, hi and thanks so much for stopping by today!
Spring is in full swing over here in Donaustadt, Vienna, which means that some of the lawns and fields of the market gardens nearby are covered by thousands of poppies. There will be more poppies throughout the next months in the roadside ditches and little corners here and there, but now there's this ocean of red and only for a very limited time.


As there's the Old Danube and many little ponds as well, the large dragonflies and seagulls are back too. These together with the bright red from the poppies form a very special atmosphere that I enjoy so much when walking my dog these days. I wanted to treasure this special mood by capturing it in a tag.


And with the beautiful "Wild Poppies" Wood Shape this was quite easy to do. ;)


Calico Craft Parts used:

- Wild Poppies MDF Wood Shape - Style 55
- MDF Tag Shape - Classic
- Sheet of Mini MDF Wood Birds - Seagulls
- Sheet of Mini Insects - MDF Wood Shapes Style 1
- Word Elements - Summer and Seaside


As usual I started with finding the perfect spots for the Wood Shapes I wanted to use and took a picture (in case I needed it for reference).


Then I dry brushed the poppies, word band, sea gulls, bee and dragon fly with two layers of DecoArt media white Gesso. 


I used DecoArt Americana paints on the whole tag. To create the first background layer for the sky, I mixed Ultra Blue Deep, Sea Breeze and White Wash on my palette and on the tag, scraping the paints on with a palette knife.


After the first layer had dried, I applied pure Ultra Blue Deep and White Wash to add a cloudy look.


The background for the poppies was done the same way - mixing Festive Green, Avocado Dip, Citron Green and Limeade with the palette knife on the palette and while scraping the paints on wet on wet.
While I used only horizontal movements when scraping on the sky, I used only vertical movements for the meadow.


For the poppies I used Alizarin Crimson, True Red, Cadmium Red, Festive Green and Black Plum.


I worked wet on wet to create shades of reds for more dimension. The centres of the poppies were painted using watered down Yellow Light.


The sea gulls, bee and dragon fly were painted using a detail brush and Yellow Light, Charcoal Grey, White Wash, Sea Breeze and Red Iron Oxide.


The painted parts were glued to the tag using matte DecoArt Decou-Page. Later - after everything had dried - I added a bit of doodling with a white gel pen around the edges of the word band and the tag.


But first I added some DecoArt media Liquid Glass to the insects' wings. After that had cured I swiped on some Turquoise DecoArt Metallic Lustre with my fingertip.


A thorough coat of Triple Thick was brushed onto the poppies...


...but I left the stamina untreated so the lovely texture from the Craft Parts would not get lost.


Finally the word band was fixed to the tag using sticky foam pads and string. 


Voilá!


Some close ups as usual: 


I hope I have managed to capture this special time of year or at least the hint of what I love so much about it.  The sight of the fields covered in red, the sea gulls' cries and the big dragon flies buzzing by - that definitely touches me like a  "wave of happiness".

There are other lovely poppy wood shapes in the Calico Craft Parts shop...simply use the search function on the shop page or browse the Flora and Fauna section for the collection of Poppy Wood Shapes.

Hugs and happy crafting!
Claudia
xxx


Thursday 24 May 2018

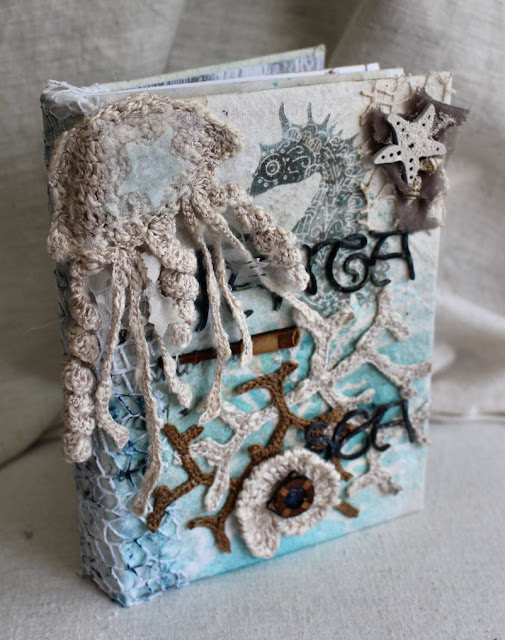
GD Minialbum 'FantaSea'

Hello everyone!

Kerstin is back and I want to share with you some pages from
 my new Minialbum or Junk Journal ''FantaSEA''.
Although it's still spring, we are already having summer temperatures here and it's also very dry. This makes me long for a fresh sea breeze at the beach, holding a shell  to my ear, closing my eyes and making the sea rustle in my mind. Absolutely beautiful and relaxing!


There are a lot of beautiful things which you can use on small projects like cards, tags, or ATC's.
I have discovered my enthusiasm for junk journals at the moment. With these you can combine and collect so many beautiful and beloved things. I love it because you can collect memorabilia and also try techniques and products.
 You leaf through it again and again and you can always take it with you to quickly show friends what you love doing.


For the cover of my Minialbum I wanted to try a new combination. I crocheted some marine motifs and sewed them on the fabric envelope.


some How-to tips


When a blank white page stares at me, I always feel the need to personalize it.
Mostly I use spray paints - here I did so in combination with a stencil. A bit of spraying, wiping, stamping and the page feels not so strange anymore.
 Then I found in my paper stash some beautiful papers from the Kaisercraft 'High Tide' collection. The delicate colours were very suitable to the brown shades of the gorgeous MDF shapes.
I also added a saying from this collection and  I thought it would be a good idea to frame them to make them stand out better.

To do so I used some leftovers from Calico Craft Parts kits; here from the Garden Shed Kit.


The small houses were painted thinly with white acrylic paint 
and then redrawn with a black fineliner.


These small MDF motifs 
with such great attention to detail
are absolutely awesome!


Bell, binoculars and anchor were completely painted with silver acrylic paint,
the lighthouse only a little bit in some spots.


You can see I have used both, the possibility to leave the MDF parts untreated, as well as to paint them.  I love their designs with great attention to detail; they give a lot of depth and character to the motifs.

Sheet of Mini MDF Nautical Motifs Style 2; 3; 4; 5 

This project was so much fun to create and I love the sceneries that you can build using all the fab mini wood shapes. I am sure this was not my last junk journal page with these parts :-)!

Thank you very much!
Happy crafting!
Kerstin

Sunday 20 May 2018

'Today!' Canvas by Julie Ann.

It's lovely to be back at Calico Craft Parts blog with a new project to share. There's something thrilling about waking up on a May morning, your mind bursting with new ideas for art projects. That's the mood I wanted to create with this chunky mini canvas, which I created as a companion piece to a canvas I called 'Take Flight'. Now, if we stand them side by side they read 'Take Flight Today!' That's something I hope you will feel like doing, but not before you've taken a look at my mini canvas.


I'm so glad that Helen at Calico Craft Parts created the wonderful little house kits. I've found the possibilities for creating not only free-standing 3D miniature wonderlands but also interesting 'stand-out' focal points on canvasses limitless.


For this project, I began with the snowy white bare, chunky canvas and some torn tissue and fragments of my own doodles.


Collage and mixed-media backgrounds have fascinated me for a long time. I love the challenge of integrating what - at first - are little more than random scraps into a cohesive background. This time it was fun to use my own doodles and see how I could transform them by spraying with diluted acrylics and randomly stamping with script in inks and white acrylic. I also did some dripping of acrylics mixed with a string gel medium in blues, pinks and turquoise.


You might remember I used this medium on a tag a couple of weeks ago? l had some left over that I had mixed in a small glass container and covered with cling film and I can report that it still worked well after 2 weeks' storage! I wanted to create the idea of flight and soaring high into the sky so I took one of the doves from the Calico Garden Birds sheet, painted it white and then added a coat of clear ultra thick embossing powder melted with a heat tool. These Calico Craft Parts can take more than their share of altering!


I love how box canvasses allow you to extend over the sides of the project with stamping, dripping and spraying.


Once again, I've left the roof open to the skies. This time I wanted to create the impression that my little bird-house character offers the visitors to her cottage refuge, but without them having to sacrifice their freedom to take flight when they wish. As well as the doves flapping above the open roof, a tiny wren has settled on her hand.


Once they were integrated into the canvas background, I was able to add just a touch of water-colour to the doodles. The face was drawn on to paper that had been stamped and collaged with various scraps of tissue, including paper patterns.


What are your plans for today? Who knows what adventures await you if you are open to all that the world might have in store. Step forward with an open heart and arms wide to embrace the day like my little bird-house lady. Have a wonderful, creative time until we meet again.
Calico Craft Parts Used
Block Style Wide House kit, mini
Sheet of Wood MDF Garden Birds
Standard Jointed Art Doll Kit, Style 1, Small

Wednesday 16 May 2018

A Little Bit of Verdigris by Jennie

Hello and welcome to my second ATC this month giving me an opportunity to try out some newly learnt techniques.


A couple of weeks ago I shared a Rusty Elements ATC and today I am using the same colours but in a different way.


I started, as before, with an ATC blank which I primed with DecoArt Tinting Base and stamped a lovely floral design using an Archival Ink. You may recall that on my last ATC I used a few drops of DecoArt Acrylic Fluid Paints with some water in a spray bottle. 


I used these same sprays but with a lighter touch and got this gorgeous effect behind the stamping.


I then used the same colours on the frame but this time daubing them with a paintbrush and adding in a little DecoArt Metallic Gold. I kept repeating this process until I was happy with the effect.


The tiny little crackle heart was actually made for another project, but I thought the colours fitted perfectly!


I managed to find a vintage photograph which just fitted the frame and raised the frame on sticky dots to give it a bit of depth. I love how the colours all merge together.


I didn't want to add much more other than the quote and the heart and flower.


Another little experimental ATC!

As always thank you for joining me today and look out for me again in a couple of weeks when I will be sharing the third of the experimental ATCs using the same colours but in a different way.

Jennie x


Calico Craft Parts used: