Hi, servus, boo, how do you do and thanks for stopping by today!
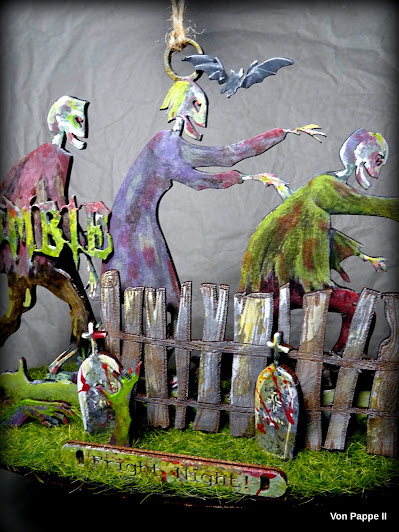
Who could resist some deliciously wicked Halloween crafting? Definitely not me - so here comes my "Zombie Fright Night" - Halloween Hanger Diorama...or whatever you'd like to call it.
These guys are definitely up to no good! Obviously they're just on their way out of the cemetery to haunt the hapless neighbourhood.
Golly! Who knows how many innocent victims will be crossing their path tonight?!
And even more of these grizzly creatures seem to arise from their graves! Beware!!!!
And where does all that ghastly blood on the tombstones come from?! I am not sure I really want to know...
What YOU might want to know though is which Calico Craft Parts I have used to create my little diorama of horrors and how I did it...
Of course the hanger kit by itself is already really cool - but I wanted to add a little more storytelling and liveliness to it by combining it with some of the other fabulous Calico Halloween Craft Parts (and believe me - there are oodles to choose from!!!)
Calico Craft Parts used:
But for now don't let yourself be followed by Zombies - rather follow me through the how-to! ;)
These are all the Calico Craft Parts I played with - the hanger kit consists of the three Zombies (which form one single piece), the oval shaped platform, two small tombstones and two large crosses as well as two Zombie boots.
The slots in the platform can be used for other parts though - if you want to add any like I did with the Zombie arms. I played around for a while - the picture below shows only one of the possible combos I liked - moving larger parts (like the giant cross) to the background after I decided to add the beautiful log fence to the scenery.
I also chose to add a little
bat and separate it from its
colony, the
Zombie Wood Word and the
Fright Night Word Element but to not use the second large cross (I am sure this will find a new home in a different cool Halloween project).
I started with priming both sides of all the Craft Parts except the backs of the log fence and the Zombie wood word with DecoArt premium Carbon Black acrylic paint. Once that had dried, I fetched my largest stipple brush and - while mixing black and white (DecoArt premium Titanium White) on the go on my palette - created a base layer of various stippled on shades of grey. This formed a kind of rotten looking texture to go over with some paint washes and/or transparent acrylic paints later in the painting process!
While the stippled on paint was still wet, I went in here and there with a mix of
DecoArt Americana Festive Green and some grey (which gave a lovely ghoulish green) from my palette using a smaller stipple brush.
The log fence and Zombie boot were dry brushed though - otherwise I would have lost the beautiful engraved patterns on these pieces.
For the fence I mixed some of the grey on the palette with
DecoArt Raw Umber Student Acrylic paint. I made sure to have several shades of the mix while dry brushing!
Once the paint had dried I started adding more colours - using them mostly as transparent washes (=heavily diluted) on top of the stippled on base (so it would still show through) and only some of the brighter pale green and light grey mixes as opaque highlights. Colours used were DecoArt Americana Celery Green, Deep Burgundy, Lavender, Milk Chocolate and a lot of mixes that evolved during the painting process.
The left over diluted Burgundy on my palette got sprinkled onto the cross and the tombstones using a heavily loaded detail brush flicking the paint on randomly.
So far, so good.
To have some of the green and orange tones pop more, I went in with another layer of paint - this time DecoArt media fluid acrylic paints Green Gold and Transparent Yellow Iron Oxide. I added these as washes to some of the Zombies' clothes and the Zombie Wood Word.
Finally I glued everything in place (using the slots in the platform to put the Zombie hands in) - except for the log fence - and then added model railway grass to the platform. I used
DecoArt matte Decou-Page for that - my all-time go-to glue and sealant. The
log fence got glued in place on top of the added grass - I used the right tombstone to have the fence kind of lean against it and added some Decou-Page there as well as to the two outer fence posts and that did the job perfectly. All I had to do was leave everything alone until the glue had hardened.
Time to test if the hanger kit was still in balance (as I had added pieces that weren't originally part of the kit) - nope! Of course it wasn't. To fix this, I added two pieces of collected driftwood in the needed spots at the back of the scenery.
This picture also shows why I hadn't painted the backs of the log fence and the Zombie word - this way the black silhouette of the Zombie group was still fully visible - and what a fabulous silhouette it is!!!
My zombies were finally ready to get hanged!!! Yay!
I hope you've enjoyed your visit!
Happy Halloween crafting!
Claudia
xxx


Creepy, zombies on tour, love your color design and your attention to detail, added elements make it come alive! Hugs, Kerstin xxx
ReplyDeleteZombies on tour... :) - genau das, liebe Kerstin!
DeleteSchön, dass es so bei dir angekommen ist. Freut mich total! Danke!
Liebe Grüße,
Claudia xxx