Hi everyone, I am delighted to be asked back to do another guest spot for Calico Craft Parts blog page. Today I am posting two 'Kat makes'
I thought it would be lovely to kick-start the beginning of Autumn with a nod to the pumpkin fields growing up and down the country. A sure sign that Halloween is around the corner. So my first 'Kat make' is a friendly Scarecrow called Pumpkin Jack.
Jack stands proudly guarding the pumpkin patch in the local farmers field. Jack is a kind and gentle soul though maybe a bit too kind as the crows instead of being scared by him like to nest in his waistcoat pocket.
To make Pumpkin Jack you will need.
Art Doll Kit
Carved Pumpkin Skull Shape
Mini Wood Shapes - Birds, Crows & Ravens
Selection of paper and fabrics
Scissors, string, glue, crayons or orange paint, black paint, pencil, drawing pens, card, paper and buttons.
To make Jack's clothes I drew around the art doll pieces to give a guide to form a pattern. I created sleeves, shirt body, waistcoat and trouser legs. I used a range of handcrafted papers you can use felts, fabrics or patterned paper.
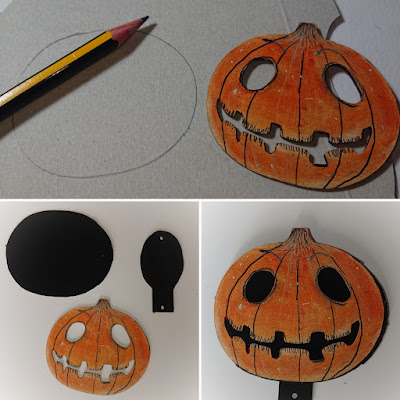
To create Jack's beautiful head I coloured the mdf shape with a distresed orange crayon and added fine details with an art pen. To give Jack deep dark black eyes and mouth I drew around his head onto a piece of card. Which I cut out and painted with matt black acrylic paint. I then glued Jack's head onto the cardboard backing and then onto the mdf head shaped that came with the kit.
Those little details, to make Jack's clothes look more scarecrow I drew on little stitches with a white pen. I also added little pockets, patches, buttons, handkerchief and straw. The straw is dried sweetcorn husk. Notice the little crow has already moved into Jack's pocket. The crow was coloured in with a black crayon and highlighted with a white pen.
To put Jack together I used string threaded through the pre-drilled holes.
For that added touch I made Jack a scarecrow perch by gluing two sticks together.
Jack is now ready to watch over the farmers pumpkin field until harvest time.
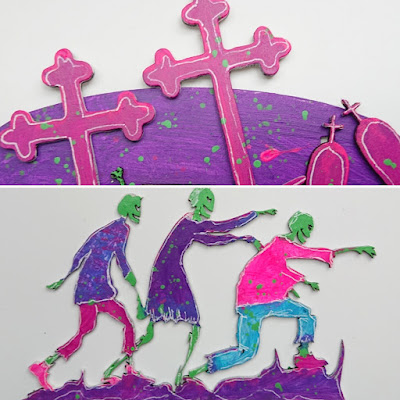
My second 'Kat make' is a fun light hearted take on Halloween Zombies. Instead of scary flesh eating Zombies you see in the movies these Zombies are a group of happy Hippies from the 1960's! They enjoy dancing, picnics, and picking giant groovy flowers! Oh and they are all vegetarians so you are all safe.
To make The Groovy Zombies you will need.
Bright coloured acrylic paints, white paint and a white pen for adding details.
Assorted papers flowers, glitter, gemstones, moss plus ribbon for hanging
Firstly I detached the mdf shapes and painted with a base coat of white acrylic paint.
Once dry I painted them with bright acrylic paints. Then added fine details with a white pen.
Using the same paint I splatter my paper flowers and added a sprinkle of glitter.
My Zombies now painted are ready to assemble.
Once assembled I decorate the base with flowers, moss and added a ribbon for hanging.
My Zombies are all done and having fun!
Well I hope you enjoyed both 'Kat makes' and I hope they inspire you to have a go at creating. If you have any questions please get in touch I am always happy to help if I can.
Happy making,
Kat 😊
My next 'Kat make' will be on the 25th of September! This one will be an extra spooky Halloween one wahahahahaha! (Evil laugh) 🦇🦇🦇🦇🦇🦇🦇🦇🦇🦇


Amazing double tutorial. Loved the scarecrow, he is fantastic.
ReplyDeleteThank you for your lovely comment, much appreciated 🎃😊🎃😊
DeleteLove both - your groovy zombies AND pumpkin jack! What a fun approach to using the hanger kit!
ReplyDeleteClaudia x
Thank you so much for your lovely feedback.
ReplyDelete