Saturday 30 October 2021

Beware Dementors by Kerstin

Welcome everyone!


Have you seen the latest Hanging kits on Calico Craft Parts???

Awesome 🎃👀🎃, such a lot of creative possibilities!!

 Today the third variant


 Some of you may remember on my Pirate curse project

for which I also used this Skull & Ghosts Hanging kit.


These floating ghosts reminded me of dementors known from the Harry Potter movies. 

I was inspired to create a shadow frame with an illuminated 3D effect in mixed media style. For this special effect I used half a transparent acrylic globe 

and thought about the magical shield around Hogwarts.


Skull & Ghosts - MDF Halloween Hanger Kit


 one becomes two 😀


Beware Dementors

They have the ability to drain men of their happy memories

 until they have to relive their worst moments over and over again.

! Maximum scary factor !

- only happy memories can help -


some close up's


used MDF shapes from Calico Craft Parts


Skull & Ghosts - MDF Halloween Hanger Kit

Mushrooms - Fungi MDF Wood Shape - Style 12

 Zombie Arms and Boots - MDF Add On Sheet


Thanks for your visit!


Happy crafting!

Kerstin


Wednesday 27 October 2021

Little gothic story plaque. By Zuzu (Louise Crosbie)


My last Halloween project of the year (on to twinkly winter and Yule). 
It’s almost Halloween and I’ve got friends coming over. I love this time of year and I love the traditional telling of spooky stories to try and scare your friends (regardless of our adult age lol).
But I don’t see Halloween as only scary. 8 love the traditional Celtic version of “day of the dead” that it represents. Setting an extra space at the table for any visiting ghosts of your loved ones who have died. Although that’s just a metaphors for taking time to remember that love and how we miss them. 


But as it’s a t8me when the veil between the worlds of the living and the dead is at its thinnest, then obviously there’s room to enjoy the spooky side as who knows what will get through that veil. 
Woooooooooooo (spooky noise lol)


I made this before seeing Kerstin’s fab tag earlier in the season but hopefully they are different enough.
There’s a LOT of glitter involved here so it’s very sparkly. Sadly the camera can’t show glitter as the twinkle is all about motion.  


I have used “parts” of some bits, as I often seem to do. I like to cut them to fit with what I’m making and this also means the shapes go further. 


list of craft parts used

Gothic window: https://www.calicocraftparts.co.uk/stone-mullion-gothic-arch-window-mdf-wood-shape.html

Grass: https://www.calicocraftparts.co.uk/wild-grass-mdf-wood-shape-style-4.html

Toadstool: https://www.calicocraftparts.co.uk/curly-double-toadstool-plain-or-engraved-mdf-wood-shape.html

Red oak leaf twig:  https://www.calicocraftparts.co.uk/red-oak-leaf-and-twig-mdf-wood-shape.html

Bird on a branch: https://www.calicocraftparts.co.uk/bird-on-a-branch-mdf-wood-shape-style-1.html

Grave stone/cross: https://www.calicocraftparts.co.uk/tilted-gravestone-cross-mdf-wood-shape-style-1.html

Flying Bat:  https://www.calicocraftparts.co.uk/bat-mdf-wood-shape-style-1.html

Birch plywood Plaque: https://www.calicocraftparts.co.uk/rectangle-birch-ply-wood-plaque.html


Sunday 24 October 2021

The (not so) Grim reaper.


The reaper has hung out the bunting and the fairy lights for his favourite night of the year. All his dead pals are going to be visiting and partying until dawn. 


I assembled all the parts then painted it over with black gesso. Then I put on patches of rust paste and sprayed with a water mister to make it run down in streaks. I did the same with some metallique paint in a


nice flame orange. 

I decided to give the reaper more detail so I used a resin bird skull I cast from a mould. Once it was glued to the reapers face, I used black contour paint to make him a hood so his skull face blended in more and I used the contour paint to add some details to his robe. 

I also added an extra row of gravestones using a die cut I cut from black card  


It is categorised as a hanger as it can be suspended by a hook or ribbon if you use them, but as I need daylight to get decent photos and I’ve nowhere to hang it in the garden, I’ve placed it on four large, wide chunky beads to act as feet. 

I’ve used the skeleton tree & graveyard Halloween hanger.


Saturday 23 October 2021

Skulls and pumpkins and ghosts, oh my! by guest designer Lori Woods

 Hello friends! I'm back with my second guest designer post for October!


When I got the Skull & Ghosts Hanger kit, I knew I wanted to keep the decoration quite simple and concentrate on making it look as creepy as I could!

For the skull I painted the base a cream colour and then added areas of crackle paste, which I made quite thick so that the crackle would be more obvious. Once dry, I went over the skull with a watered down brown acrylic so that is filled all the cracks and also pooled over the other areas to create an old and dirty look. I then covered the back with black card to really emphasis the eye, nose and mouth holes.


The pumpkins were painted pale orange and again, I used watered down brown acrylic to create an old, shabby look and black card to emphasise the eyes.

The ghosts were covered in cheesecloth, painted with black gesso and then dry-brushed with white gesso to bring out the texture and give them a more ethereal look.


I hope this gives you some ideas on how you can make a spooky decoration with just a few simple techniques!

Thursday 21 October 2021

School Of Magic by Liz

 Hi all, I'm here today with my last Halloween project for

Calico Craft Parts,

as I've said before I love creating Halloween projects and I love the way this one came together,


I've created an exploding box with lots of the fabulous MDF Calico Craft Parts pieces. both outside the box and in,


So on the lid I used the spooky Halloween letters, these I gave a coat of white Gesso too, going very lightly and not worrying if it missed parts, it all added to the distressed look,

I also added one of the Spider webs, this I painted with black Gesso then when dry sprayed some silver waterbased paint over,


On the back section I added one of the Ghosts, placing it so it would show behind the House (school) in my case!! lol


On the left hand side, I added a couple of bats,


The front sections, have the fabulous RIP which I kept in it's original colour, then adhered the Spider and Owl corner on the inner section, this is just painted with Black Gesso,


Yet another Ghost is used on the right hand side,


My main image is made up of the haunted House, which again I decorated as the Spider web and added some vellum on the windows,


In front of the house I used the Skeleton trees,


After adding some moss I places some bones here and there,


To give a scary effect for at night, I added a battery tea light behind the house, 

SOOOO SPOOKY!!!

Haunted House with Tower

Skeleton Tree Duo

Bones

Flying Bat Colony 

Spider Web

Owl and spider Corner

RIP Gravestone and Pumpkin

Ghost style 2

Ghost style 3 

Happy Crafting!!

Hugs Liz 

Tuesday 19 October 2021

Zombie Fright Night - by Claudia

Hi, servus, boo, how do you do and thanks for stopping by today! 

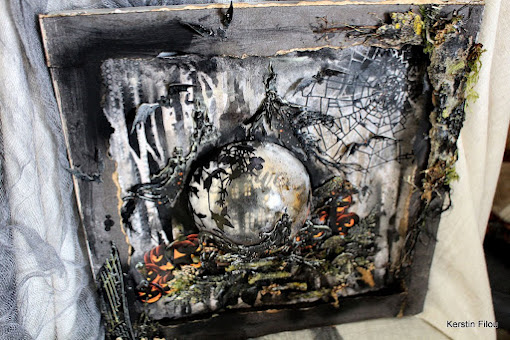
Who could resist some deliciously wicked Halloween crafting? Definitely not me - so here comes my "Zombie Fright Night" - Halloween Hanger Diorama...or whatever you'd like to call it.


These guys are definitely up to no good! Obviously they're just on their way out of the cemetery to haunt the hapless neighbourhood. 


Golly! Who knows how many innocent victims will be crossing their path tonight?!


And even more of these grizzly creatures seem to arise from their graves! Beware!!!!


And where does all that ghastly blood on the tombstones come from?! I am not sure I really want to know...


What YOU might want to know though is which Calico Craft Parts I have used to create my little diorama of horrors and how I did it...

Of course the hanger kit by itself is already really cool - but I wanted to add a little more storytelling and liveliness to it by combining it with some of the other fabulous Calico Halloween Craft Parts (and believe me - there are oodles to choose from!!!)

Calico Craft Parts used: 


But for now don't let yourself be followed by Zombies - rather follow me through the how-to! ;)

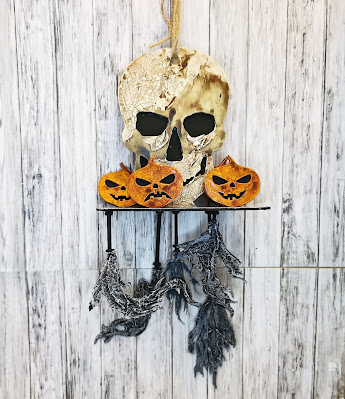
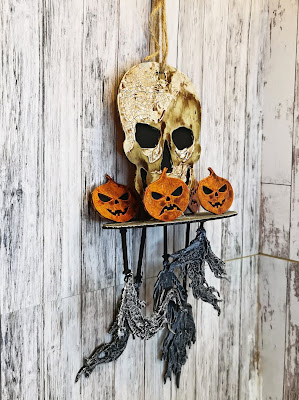
These are all the Calico Craft Parts I played with - the hanger kit consists of the three Zombies (which form one single piece), the oval shaped platform, two small tombstones and two large crosses as well as two Zombie boots. 


The slots in the platform can be used for other parts though - if you want to add any like I did with the Zombie arms. I played around for a while - the picture below shows only one of the possible combos I liked - moving larger parts (like the giant cross) to the background after I decided to add the beautiful log fence to the scenery. 


I also chose to add a little bat and separate it from its colony, the Zombie Wood Word and the Fright Night Word Element but to not use the second large cross (I am sure this will find a new home in a different cool Halloween project). 

I started with priming both sides of all the Craft Parts except the backs of the log fence and the Zombie wood word with DecoArt premium Carbon Black acrylic paint. Once that had dried, I fetched my largest stipple brush and - while mixing black and white (DecoArt premium Titanium White) on the go on my palette - created a base layer of various stippled on shades of grey. This formed a kind of rotten looking texture to go over with some paint washes and/or transparent acrylic paints later in the painting process! 


While the stippled on paint was still wet, I went in here and there with a mix of DecoArt Americana Festive Green and some grey (which gave a lovely ghoulish green) from my palette using a smaller stipple brush. 
The log fence and Zombie boot were dry brushed though - otherwise I would have lost the beautiful engraved patterns on these pieces. 


For the fence I mixed some of the grey on the palette with DecoArt Raw Umber Student Acrylic paint. I made sure to have several shades of the mix while dry brushing! 


Once the paint had dried I started adding more colours - using them mostly as transparent washes (=heavily diluted) on top of the stippled on base (so it would still show through) and only some of the brighter pale green and light grey mixes as opaque highlights. Colours used were DecoArt Americana Celery Green, Deep Burgundy, Lavender, Milk Chocolate and a lot of mixes that evolved during the painting process.

The left over diluted Burgundy on my palette got sprinkled onto the cross and the tombstones using a heavily loaded detail brush flicking the paint on randomly.

So far, so good. 


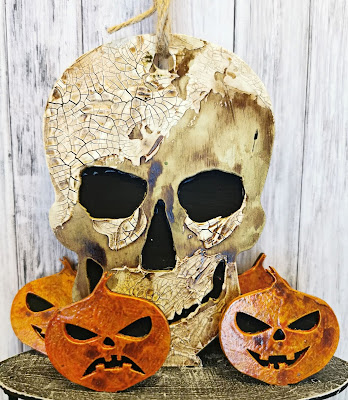
To have some of the green and orange tones pop more, I went in with another layer of paint - this time DecoArt media fluid acrylic paints Green Gold and Transparent Yellow Iron Oxide. I added these as washes to some of the Zombies' clothes and the Zombie Wood Word. 


Finally I glued everything in place (using the slots in the platform to put the Zombie hands in) - except for the log fence - and then added model railway grass to the platform. I used DecoArt matte Decou-Page for that - my all-time go-to glue and sealant. The log fence got glued in place on top of the added grass - I used the right tombstone to have the fence kind of lean against it and added some Decou-Page there as well as to the two outer fence posts and that did the job perfectly. All I had to do was leave everything alone until the glue had hardened. 


Time to test if the hanger kit was still in balance (as I had added pieces that weren't originally part of the kit) - nope! Of course it wasn't. To fix this, I added two pieces of collected driftwood in the needed spots at the back of the scenery. 


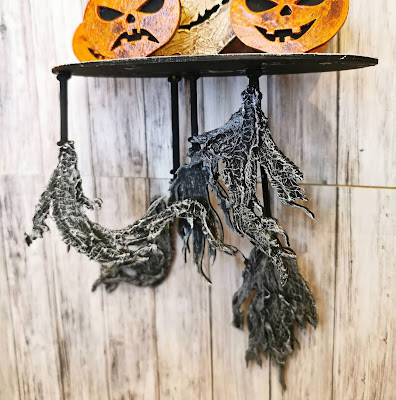
This picture also shows why I hadn't painted the backs of the log fence and the Zombie word - this way the black silhouette of the Zombie group was still fully visible - and what a fabulous silhouette it is!!!

My zombies were finally ready to get hanged!!! Yay!


I hope you've enjoyed your visit!

Happy Halloween crafting!
Claudia
xxx