Saturday 26 June 2021

ATC's with texture by Kerstin


 Hello!

Today a new inspiration with MDF shapes. 

I created two artistic trading cards in nature style.

 Love to use and play with textures for interesting effects. 


  Use some outcast's made with silicone moulds, textile ribbons, 

and some small suitable MDF shapes. 

Worked with chalky paints and highlighted with creme waxes.


 used Calico Craft Parts 

Plain ATC Wood Blank

Wild Flowers & Butterflies

Bluebells - MDF Floral Wood Shape Style 48

 Happy crafting!

Kerstin

Saturday 19 June 2021

Steampunked cigar box: by guest designer Lori Woods


Hello everyone! I'm very happy to be back for my second guest designer post and this time I've gone steampunk! Normally my steampunk project are covered in gorgeous rust and patinas but I wanted to really showoff these fantastic steampunk shapes so I went for a metallic colour palette instead.


 I started with an old cigar box and used a stencil to create some texture. I added two of the Ornate Decorative hinges to the side to recreate a box effect and then covered everything in a mix of gold and bronze metallic paints. 


I used the Steampunk Mechanical Clockworks motif and Steampunk Mechanical Clock shapes, along with Mini wood cogs to create a focal point, layering them together to give the piece dimension. I painted this with silver metallic paint and attached it to the box.


Although I loved the mix of metallic colours, everything was too bright and clean so I took some watered down black acrylic paint and used this to create shadows around the shapes and give the box a slightly dirty and worn look. I finished off with a word element from the Apothecary set and my steampunked cigar box was done!


I hope this gives you some inspiration- these steampunk pieces are fantastically detailed and could be used in so many ways on different projects.

I used:

Ornate scroll decorative hinges

Steampunk Mechanical Clockworks motif

Steampunk Mechanical Clock

Mini wood cogs

Word elements- Apothecary

Thursday 17 June 2021

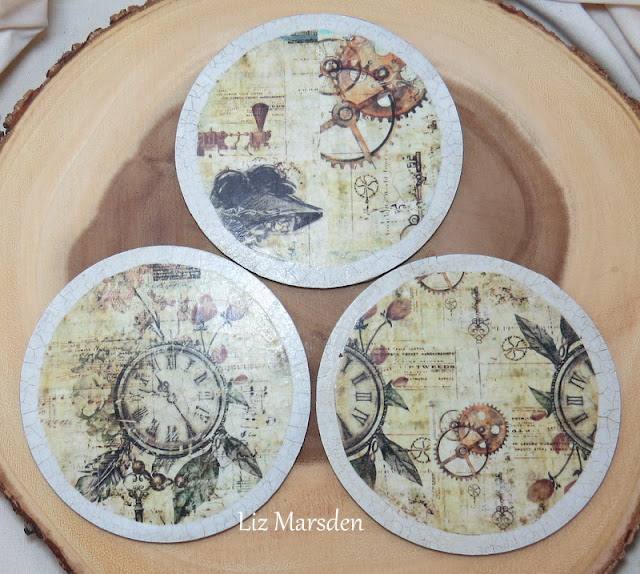
Vintage Coasters by liz


Do you love to create items you can use for the home? 

I do occasionally and when I saw these MDF round beer mats from the

Calico Craft Parts online shop,

I knew I had to use some, but as Coasters,

I needed to replace my coasters as I have a puppy and it ate nearly all my coasters when younger, not a good look I can tell you, so thes are to replace those as she now behaves,!! lol


You can decorate the coasters in so many ways, but this time I had some vintage themed Rice paper in my stash so following on from that I also added some crackle to add to the vintage look,

I started them all off by first painting a couple of fine layers of white Gesso to one side of the coasters,

While these dried I had some cork type material in my stash so I cut one circle each for the bottom of each coaster, this will help the coaster stay in place while being used,


I did the same steps for all the coasters but I will show you the 3 different coasters as I tell you what I did,

So the gesso is dry and I've cut out the Rice paper design, taking a soft brush and some all purpose medium, or you could use decoupage medium too, glue the Rice paper down in the centre of the coaster, I popped some of the all purpose medium on the top half of the coaster and went over the Rice paper with a fine brush with a little more of the medium on so that any air bubbles was got rid off, then I did the lower half of the Rice design following the same steps, then again going over with some of the medium, this makes sure it sticks well on the edges too,

Let these dry completly, I then took some 2 part fine crackle varnish which I painted over the whole coaster including on the Rice paper, I went over in one direction up and down then right and left to get the desired crackle effect, I let this first stage dry for 2 to 3 hours, then went over with part 2 of the crackle paste, using the same method as the first, I let this dry again for a few hours,


The next stage was to add some antiquing paste I have again in my stash, this fills in the cracks, I then went over with a clean soft cloth to remove the excess, 

Then I gave all 3 a coat of matt varnish to add some protection, and adhered the cork circles on the back side of the coasters,

I do hope I've given you some inspiration of one way to decorate the coasters, or of course they can be used as Beer Mats or soft drink mats,

MDF Beer Mats

 Happy Crafting!!

Sunday 13 June 2021

SciFi police box with a steampunk twist.


Hi everyone. 

When Helen told me they were going to be adding a “Police Box” kit to the range I was super excited. I am a geek... there is no denying it. 

I was very lucky to be sent an advanced one before the shop even had them online to buy and my steampunk pal (our extended household bubble person) and I wasted no time in constructing and decorating it. 

It was so much in advance that there was no pdf with the construction guidelines which did leave us expecting some fun mishaps as there were a lot of parts.  But we still managed it simply by looking at the photo Steve sent of an example he had constructed to make sure the kit worked ok. 

So in honour of a well known SciFi tv series and with a bit of a steampunk twist, here is the completed police box. 


For my engine, I’ve used some resin mould pipes and a propeller, some calico craft parts gears/cogs, a kitchen shape cutter and a little bulb.
I’ve added a sort of fake rivet effect using little hardware screw heads from a mini sheet and as a little vintage Victorian detail,I used a couple of paper fasteners that look like old door pulls/handles.
 Needless to say I predict ordering a second one 😄

Supply list.

A selection cogs (gears). 

Saturday 12 June 2021

Red poppies by Kerstin


Welcome creative friends!


Everywhere you can now discover poppies blooming again 

in fields and meadows, beautiful! 

unfortunately they always fade far too quickly. 


That's why I was inspired to create a mixed media layout

 where the beauty stays a little longer. 


Tip to all scrapbook fans 

here you can see that you can combine 

MDF shapes and papers very well


some close up's


I created a window in weathered wood style with awning 

and framed by two columns made with silicone mould


Wild Poppies shapes 

have been divided into individual flowers and 

arranged to the right and left side of window


painted with two shades of red acrylic color

stamens with glass microbeads and black acrylic color


 completed with cut out paper poppies 


and dryed leaves and grasses 


used Calico Craft Parts


Wild Poppies MDF Wood Shape - Style 55

Arched Window - MDF Wood Shape


Thanks for your visit!

Kerstin


Friday 4 June 2021

The Kraken Shrine: by guest designer Lori Woods

Hello everyone! I'm Lori and I'm thrilled to be the guest designer for Calico Craft Parts this month. 

As soon as I saw the Nautical Shrine kit I knew it would be perfect for a piece dedicated to my favourite sea creature, the kraken! Once I had assembled the shrine, I used textures pastes and stencils on the outside to create some areas of interest and then I painted it with cream, browns and red to give a weathered and aged look. To finish decorating the outside I added elements from the Mini Nautical motifs set, an Art Deco Ornament shape and a Compass shape, gave these a splash of colour and then dry brushed white gesso over everything to highlight all the different textures and details.


For the inside of the shrine I painted a very rough sea and sky in two different colours of blue, then added a crackle glaze over the top to give it an antiqued look. I coloured the Galleon Boat shape with paints and glued this into the shrine, using some pieces of card to raise it off the background and create a more dimensional look. Then, the tentacles! I rolled some lengths of air dry clay into tentacle shapes and once they'd dried, coloured them with some metallic paints to give that glistening wet look. I mixed a blob of gel medium with some blue paint to create the water effect on the bottom of the shrine and used this to secure the tentacles in place. A little white paint dabbed on top of the gel to simulate the look of waves and voila, my shrine to the kraken was done!

Supplies used:

 Nautical Shrine kit 1

Art Nouveau & Deco ornament 7

Mini Nautical motifs 6

Galleon Boat 6

Compass shape

Thursday 3 June 2021

We're All A Little Mad Here/ Liz Marsden

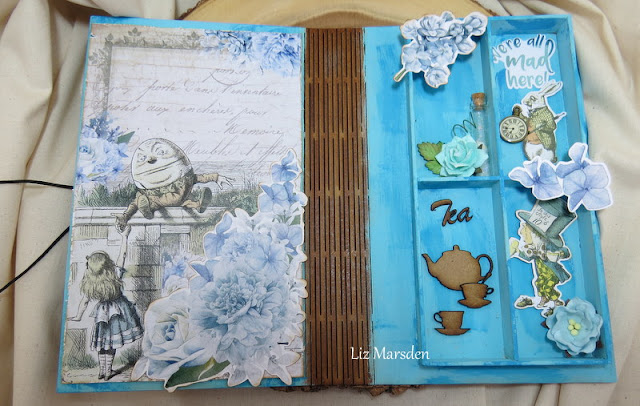
  Hi guys, I saw this fabulous Mdf Journal book on the Calico Craft Parts website, you can buy it with inner sections for 5 different layouts, I chose the one with 2/ 4 sections this time, these I glued together and adhered into the base inside,

I will start with the outside front cover, which I painted with some acrylic paints in a couple of shades of blue, I painted the lighter shade first, then when dry went over here and there with the darker one, I let these dry completely, I painted the inside sections at this stage too,


I wanted to make the journal with an vintage Alice in Wonderland theme of which I had in my stash some images and a stencil, so taking the stencil and some modelling paste I stencilled through the word stencil placing it towards the top so I could adhere an image lower down,

I also used a hearts and clock stencil at the opposite corners of the journal front to balance it up,

when all the stencilling was dry I went over the top using some waxes in blue and gold, this highlights the stencilling, and kept the vintage look,

I then added these fabulous small Fleur-De- Lis hinges on the front,I kept these in the colour they came in to match with the book spine which I had left as it came too,


The journal comes with a piece of Mdf you can use to close the journal with, I haven't used it this time though as instead I used some stretchy string to go around the cover and back,


I cut down a scene of the Alice papers I had in my stash along with some Emphemera which I adhered onto the back of the front cover, this gave interest with out being to bulky,

I gathered together some more die cut images, flowers, another saying and a bottle which I had filled with glitter to look like the Potion Alice drinks, then on one of the sections I used the adorable caddy kit add on in small, for the mdf Tea, teapot and cups which of course fit brilliantly with the Alice theme, these I again kept in their natural colours as the inside spine to make it all mix and match,


These are so useful !!!and can of course be painted etc if needed,


I created this for my Granddaughter who loved it!! 

Calico Craft parts:

Journal tray 

Caddy Kit add on sheet - Tea Set

Hinges - Fleur-De-Lis


Do check out these and lots more Mdf and Plywood products at reasonable prices,

Happy Crafting!!

Hugs Liz xx