Wednesday 23 September 2020

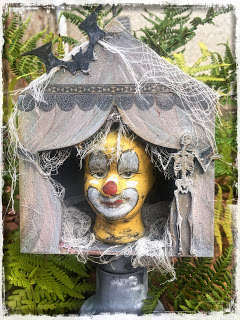
Cirque Du.... Spooks

This is one of those projects that started out as one thing, but due to some mishaps, it became something else. 

This time it was because I failed to test my little battery operated tea light before forging ahead. 

Firstly my little Halloween circus tent was going to have the orange glow of a tea light popping up through a carefully planned hole right next the the cauldron to emulate the warm fiery glow.  

Without the light, it was simply a bit too dark and dull. So plans B. I put in the china doll clown head. 

This is a Roughly done photo edit of what I had originally planned... Lol. 


Craft parts used:

Circus tent

witches

Skeleton 

Halloween corner ornament


Monday 21 September 2020

An Autumn Visitor by Jannet


I hope all is well with you. Today we have a  little friend visiting us, a red squirrel sadly they are very rare in the UK now. I invited him in, and he sat him happily on a toadstool. 


My squirrel is enjoying nibbling on an acorn, I painted him with acrylic paints, and used some needle felting wool to give him his all important bushy tail. I also painted a toadstool and some leaves.


After coating the tag with white gesso I inked up a gelli plate, and laid some old lace over it which left a lovely pattern when removed. I pressed the tag onto it so the lace pattern was transferred. I used a stencil to add some tree branches.


On the lower half of the tag I added layers of texture paste keeping it thinner at the top and then adding a little marble dust as I bought it down to the base of the tag. I added art stones nearer the bottom to give  even more texture.I adhered my painted pieces  onto the tag, and added some autumn coloured  moss onto the tree branches. To complete the tag I found a suitable sentiment to stamp out onto a scrap of card and adhered it onto the tag 


Calico Craft Parts used


Saturday 19 September 2020

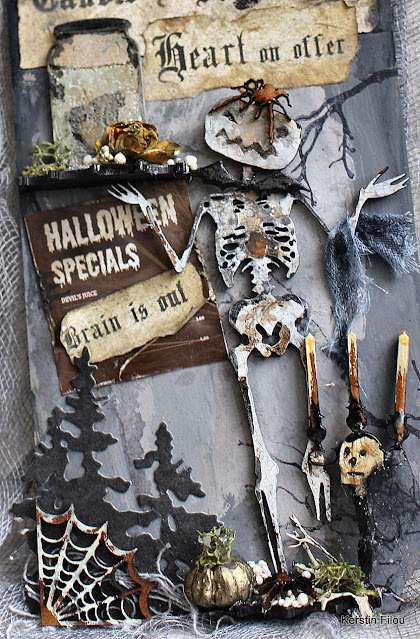
Today: Brain is out - Halloween sign by Kerstin

 Hello creative friends!


I was inspired to create a funny Halloween tag. 

May I invite you to a candle light dinner???

 a view at the Halloween Specials Menu card tells you 

- Heart on offer - unfortunately brain is out - ๐Ÿ–ค๐Ÿงก๐Ÿ–ค


background design with 

cutting dies (T. Holtz Sizzix); stamps (Stampers Anonymous); chalky paints (DecoArt)

as base

Rectangle Shape with Notched Corners - MDF Mixed Media Board


some close up's


here I used only a part from Candelabra MDF Wood Shape - Style 4


3D shelf as tablet

menu card

Speciality of the house - Heart - sweet, sour

he had to run so much that he already lost a piece of his leg ;-)

the head was exchanged

 
he sacrificed not only a part of his leg,
 but also his heart, because he had already given his last shirt
 

Calico Craft Parts used :


Rectangle Shape with Notched Corners - MDF Mixed Media Board

Creatures of the Night - Sheet of Halloween Mini Wood Shapes

Skeleton MDF Wood Shape Style 2

 Spider Web - MDF Corner Wood Shape

Sheet of Mini Insects - MDF Wood Shapes Style 1

Apothecary Jar with Heart

Candelabra MDF Wood Shape - Style 4

Candelabra MDF Wood Shape - Style 2

Trefoil Border Shape - MDF Mixed Media Board 50 x 35 mm as shelf (cut in half)


I will gladly answer questions about individual creative details.


Many thanks for your visit!


Happy crafting!

Kerstin


Wednesday 9 September 2020

Where words fail, music speaks...

I don’t do too well at making cards but I like to hand over some substitute when I am able. This is for a talented, music Making and music loving friend For her birthday to go with a small gift I made. 

The bonus is, if she wants to keep it she can display it after her birthday. If she doesn’t, she can give it back to me to recycle...win win. lol

I used one of the little PRINTERS TRAYS

 It was Very much a case of leaving the external tray just wood and painting the internal compartment section a shabby chic duck egg kind of colour. Then most everything else was cut out from scrapbook paper and scraps of sheet music and I added a few metal and paper embellishments I had in my stash.

Z x
 

(* PS...The little quote in the title is by Hans Christian Andersen.)


Monday 7 September 2020

Celebration Garden by Jannet


Hello, I hope all is ok with you. Today I am sharing a special miniature garden which I have created for someones  90th Birthday ! In his younger days the recipient was a Farmer, and is still a keen gardener today. I began by selecting my  items for the special garden, a shed was the obvious first choice, and then I picked sunflowers, blackberries, and other exciting garden goodies to work with. 


To try and make the shed look similar to the recipients own shed I  painted it with blue and yellow stripes. To create a metallic look  I used silver embossing powder on the chimney, and also around the tiny shed sign. I found some lovely gardening tools on a dolls house miniature site. I strung some string across the back of the shed before gluing the sides on which held the string tightly in place. I made a little knot around each tool to hold them securely, we don’t want those little tools falling on anyone!


For the fence I used a coat of gesso followed by white acrylic paint and then Decoart crackle paste. After painting the sunflowers I added some brown fun flock to the centres, which gave them some lovely soft texture. 


I used some air drying clay to make some tiny pots, and various fruits and vegetables. After they were all dry I painted them with acrylic paints. 


I used a circle Mixed Media Board for the base of the garden, and I covered it in green 3D paint which I heated with a heat gun after applying. It gave a lovely texture.I added various dried and pressed flowers to the garden, and also a few chosen dolls house garden bits and bobs. 


I completed the garden with the number 90 painted in gold and planted in the largest of the clay pots and ...


... a sleeping doggie on the other side of the fence.

Saturday 5 September 2020

In the Witch's Kitchen by Kerstin

 Welcome !


BEWARE -  the witch's cauldron is bubbling!!


I was inspired to create a shadow frame in a mixed media grunge style 

with a lot of awesome Calico Craft Halloween MDF wood shapes.


How was it done ? - some tips:


I used a piece of cardboard that fits the size of the canvas and cut out the centre with a precision knife.

Afterwards in some places I removed the top layer of paper with a little water only, so that some structures became visible, which made the whole thing look worn and old.

With  a little bit of Texture Paste the worn effect was intensified -

now the frame was coloured with grey and black


Background design with stamps and diluted distress ink


First ideas to arrange the MDF shapes in combination with 'The Cauldron' (die cut with Sizzix die, designed by Tim Holtz)

Later I added the 3D shelf and the alien head

 
There are so many variations to alter the shapes; 

for example with embossing powders, or with Antiquing creams!


Some close up's


Calico Craft Parts used :


Apothecary Jar with Brain 

Apothecary Jar with Heart 

Long Stemmed Field Mushroom 

Flying Bat Colony 

The Cats Behind 

Alien Skull 

Witch on Broomstick MDF Wood Shape - Style 3 

Zombie Arms and Boots - MDF Add On Sheet 

Beware - Halloween MDF Wood Word

Fleur De Lis Fence Panel MDF Wood Shape - Style 4 

Pile of Eyeballs


I will gladly answer questions about individual details.


Many thanks for your visit!


Happy crafting!

Kerstin