Monday 29 June 2020

Buzz, Buzz, Buzz by Jannet


Buzzing Bees speak softly of all things summer. I have used the lovely mini bees and beehive set, to make a 7 x 7 card, and a media board, with lots left over too. 


The bees didn’t want to stay still for very long so I painted them quickly with acrylic paint. To add some glimmer to their wings I used some white mica powder mixed with a little water. After water colouring the background I stamped honeycomb around the edges of the card. I am not sure if it shows in the photo, but I clear embossed over the top of the honeycomb to make it look glossy and honeyish. I stamped the be kind sentiment in the centre, and adhered the bees, and hive. I wasn’t stung once in the process!


I repeated the same process as above this time with a mixed  media board, you can select to have holes put into your media board if you wish. I threaded some faux leather cord through the holes so I could hang it in the porch.  I even have several bees and a hive left over to make another card or whatnot.

Stay safe xx 
Calico Craft Parts Used

Saturday 27 June 2020

Altered Art Bottle - Mystical Forest Stories by Kerstin

COUNTERFEITING ALERT!  It's been brought to our attention that an unscrupulous manufacturer has ripped off Kerstin's beautiful bottle design by stealing the photographs and making fake copies - these tainted trinkets have popped up in various shops. Please support the original creator/copyright holder (that's Kerstin!) by reporting any rip off copies you see - thank you most kindly.

-o0o-

Hello, creative friends!

I was so inspired from Claudia's romantic project 'Be still and listen', where she created a little, forgotten garden arbour, that I thought on mystical forest stories with a door to another world.


I created an illuminated mixed media bottle in shabby chic style with some natural structures. 
I love it to use only a few colours and let textures and patterns speak for themselves.

Tips & Tricks


The

 Russian Revival Style Window 

is simply beautiful, but I prefer to look at it as a door with more liveliness.

I used a silicone mould (Katy Sue design) with air hardening modelling clay, but I did only the outer frame from the mould.

That cast was glued to the MDF shape with construction adhesive. 


As some of you may already know, I have a passion for shelves ;)

Here I created a shelf with the

Trefoil Border Shape - MDF Mixed Media Board

 I simply sawed it apart in the middle and used one part of it as a support and the other as a support surface. With construction adhesive and a little patience it hardens and then holds well onto the glass bottle.


some close up's


 Calico Craft Parts used: 

Russian Revival Style Window 

Bluebells - MDF Floral Wood Shape Style 48

Ivy Leaf Garland

Fungi & Mushrooms Wood Shapes

Trefoil Border Shape - MDF Mixed Media Board


My bottle in illuminated state:


If you would like to know how I created the up-cycled glass bottle,
then, please, feel free to ask!
Thanks for your visit!

Happy crafting!

Kerstin

Thursday 25 June 2020

Quick coasters- by Magda

Hello crafty friends,
Long story short, I’m in the process of moving houses.
My studio is almost packed, I haven’t got much time to create but my mojo is back and I really want to create something. I found a cardboard with acrylic paints and fantastic MDF coaster shapes - beer mats. Not much choice here, I painted them!


Magda :)

Monday 22 June 2020

A Tribute to Bee No. 2647! - by Claudia

Hi, servus and thanks so much for stopping by!

I've just read the fabulous and touching book by Maja Lunde - "The History of Bees" - and that inspired me to create a tag that shines a light on our busy bees without whom mankind could not exist. It's working bee No. 2647 and if you  - like me - have read one (or all) of Professor Dave Goulson's highly entertaining and informative, loveable books about bees, bumble bees and other insects, you maybe share my (and Professor Goulson's) love for all kinds of bees too. ;)


I've used a lot of gold and shiny bling to stress the importance of my bee - and of all her busy colleagues all around the world!


Calico Craft Parts used: 

- MDF Tag Shape - Classic
- just the frame of the Shaped ATC Wood Blank with Flourish Cut Out Frame
- Sheet of Mini MDF Bees & Beehives
- Art Deco & Nouveau Floral Ornament - Style 46
- Sheet of Mini MDF Hardware Woodshapes
- Sheet of Mini MDF Hinges Woodshapes
- Sheet of Mini MDF Label Holders Woodshapes


This is how I combined all the pieces on the tag. To the left there's the left over background panel from the ATC Wood Blank (that I will use on another project at some other point).


I used matte DecoArt Decou-Page to glue everything in place and let that dry.


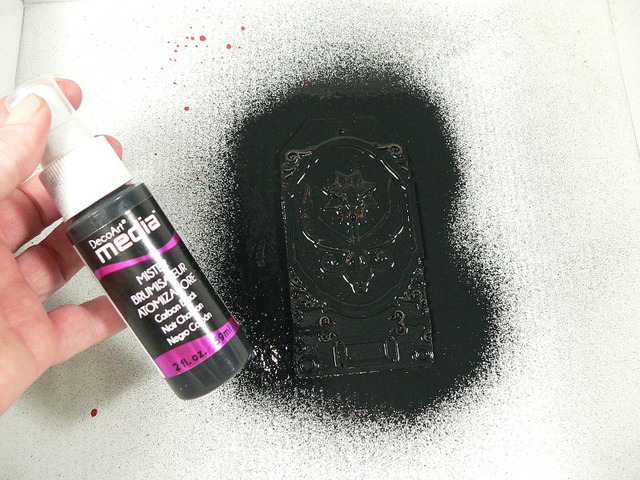
Afterwards I sprayed the tag with Carbon Black DecoArt media Mister and heat dried that (as I am quite an impatient person when it comes to drying times).


With the very tip of a small palette knife I spread DecoArt media white Crackle Paint on top of the ATC frame and label holder and as it was only a thin layer that crackled quite quickly. Once the crackling has started you can also go in with the heat tool.


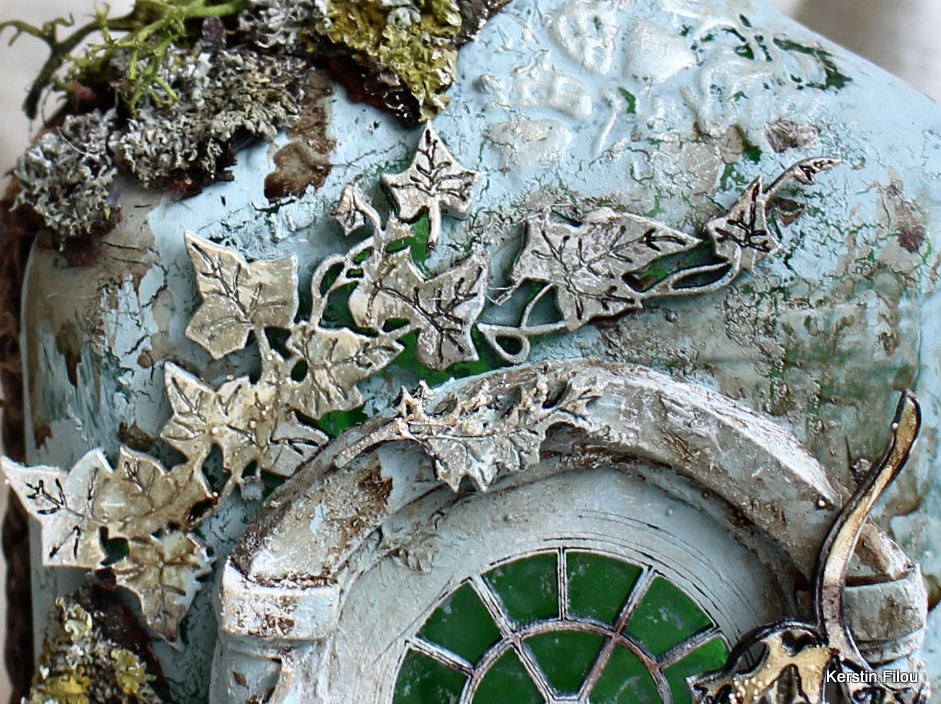
Titanium White DecoArt media Antiquing Cream was diluted and spread on top of the bee and the floral ornament with a soft brush - this made the laser engraved texture and patterns more visible.


Diluted media fluid acrylic paint Raw Umber was painted on top of the crackled frames.


Time to add some bling! I randomly spread traces of DecoArt media fluid acrylic Metallic Gold here and there. Some of it was going to be painted over during the process - but for now I wanted to see how it looked in the different spots.


More diluted Titanium White Antiquing Cream was added all around the ATC frame section, but not on top of the hinges and the other glued on bits.


Primary Yellow DecoArt Americana acrylic paint was sprinkled onto the tag and also used to paint the bee - my tag definitely needed some bright pollen, right?


The dull black from the background inside the ATC frame was much improved by adding a layer of Turquoise DecoArt media fluid acrylic Interference paint.


To make the bee pop from the blossom it sits on, I painted the petals with Bahama Blue acrylic paint.
A layer of Gold Interference paint was also added on top of the white areas for additional depth and bling.


Voilà! Ready to buzzzzzzz!!!!


And this is a picture I took to show the cool effect from the media Interference Paints - if you look at the tag from a special angle there is subtle gold and turquoise metallic bling everywhere.


Some close ups: 


...and once more the finished tag: 


I hope you like it - and Bee No. 2647 (and all the others) too!


Hugs and happy crafting!
Claudia
xxx


Monday 15 June 2020

Beside The Seaside - Beach Scene by Jannet


Dreaming of the Seaside is my inspiration for this months project. My little art doll is happily sitting next to her beach hut, and enjoying a yummy ice cream. Let’s hope the seagulls don’t come and pinch it out of her hand! 


After painting the beach hut I used a pokey tool to make a small hole in the front of the hut and pushed a piece of wire into it. I have a collection of shells, and picked out a tiny one to hang from the wire, and adhered another one no the very top of the roof. The beach hut also comes with a lifebuoy ring which I adhered to the top. 


I glued the beach hut together and hung some shells inside and painted a bucket and spade, and a sea shell to sit inside. I used a piece of wood as a base and adhered the beach hut onto it, and surrounded it closely with some shells. I used Decoart Sand Texture paste in between the shells to hold them together. I applied the texture paste quite thickly so I left it to dry overnight. The following day I painted over it.


My small art doll said she wanted to wear a summer dress to the beach, so I found some scraps of fabric and made her a little dress, and used some fibres around the hem. She reminded me that she needed a Beach bag to carry her towel, sun cream etc to the beach, so I quickly made her one with some ribbon. It was a hot day so she wore her needle felting wool hair up in a bun.  After painting the cone, I added some cream paste to the ice cream which swirled nicely like a real ice cream - yum! 


I adhered the little lady in place, and set her beach bag next to her, she is there for the day now! 

I love Calico Craft Parts art dolls, there are lots of different shapes and sizes to select from, and you can easily transform them into so many different characters.

Calico Craft Parts used


Saturday 13 June 2020

Ocean Bliss - Home Decor by Kerstin

Hello, creative friends!

Today a new SEA inspired project - it's a centre piece in vintage shabby chic style.


Have you seen the versatile mixed media boards in the Calico Craft Parts shop?
 In spring I had already created a project of a similar kind with one of these.


I love it to use  a crackle medium on the MDF shapes, here it is Weathered Wood from DecoArt.

The projects become a used old look, which is perfect for pieces that should spread a lovingly individual charm. Together with some Distress Spray Stains the background is quickly made - below the foaming sea and above the sky .

some close up's


 I had a ship in mind whose sails have already been worked by wind and weather. The hull was painted with brown metallic paint and the sails were first painted with a little texture paste, crackle medium, white acrylic paint and after drying highlighted with light golden metallic wax.


My project also needed an old compass that still points the way.
I broke the lid off the wood shape and  glued it back on at an acute angle with cold glue to create a dimensional effect.


 A baroque shell element was the perfect addition for this project. I first primed it with crackle medium and then coated that with white acrylic paint. 


The title word shapes were embossed with a very special embossing powder, matching the maritime theme.  


Calico Craft Parts used:  

 Tudor Arch Shape - MDF Mixed Media Board

 Jagged Edge Birch Ply Wood Plaque 

Galleon Boat MDF Wood Shape - Style 9

Art Deco & Nouveau Style Ornament Shapes - Style 7

  Pocket Compass MDF Wood Shape

 Dolphin Duo MDF Wood Shape - Style 03


This new maritime project found its place on 
a handmade fret saw shelf and now adorns my living room table.

I hope I could inspire you to try your very own versions and ideas !

Happy crafting!
Kerstin