Saturday 30 May 2020

See possibilities everywhere by Kerstin

Hello, creative friends!

Today I want to share with you another view on projects that you can create with Calico Craft Parts wood shapes. I was inspired to work on a new art journal  page in a natural vintage and grunge style. I love to combine materials with different structures and textures.


 Here I used dried flowers and leaves, paper and fabric leftovers, stamps and stencils, distress inks and for a kind of 3D effect some wooden shapes.


some close up's


The

Wild Grass - Flora & Fauna Flourish Style 5

only got covered with white Gesso in some places for

 an old weathered look 


 I've used the same technique for the mini windows
from the

Sheet of Mini MDF Window Wood Shapes


I hope I could inspire you to think out of the box when it comes to using wood shapes in your art. There really are a lot of possibilities of what to do with the very wide range
 of beautiful Calico Craft Parts products.


 My  teamies at Calico Craft Parts have also come up with many

inspiring and different versions
on what you can do with these wooden shapes.


We are looking forward to see your new creations! 


  Happy Crafting!

  Kerstin

Thursday 28 May 2020

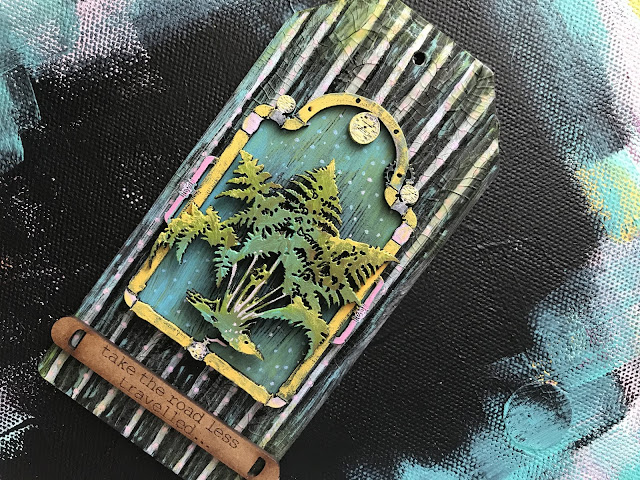
Fern tag by Magda

Hello lovely people,
I hope you are all well and creative. I’m trying to find my mojo and it’s still very hard but I decided to challenge myself and use as much acrylic paint markers as I can to create background on a tag and colour other pieces. I managed but I also added a little bit of acrylic paint and some crackle glaze to finish the project.

For this project I used:
MDF tag shape - classic
ATC steampipe clock frame
Word elements travel
Maidenhair fern shape


Magda

Monday 25 May 2020

Steampunk ATC #11 - by Claudia

Hi, everyone! I hope you're all fine!

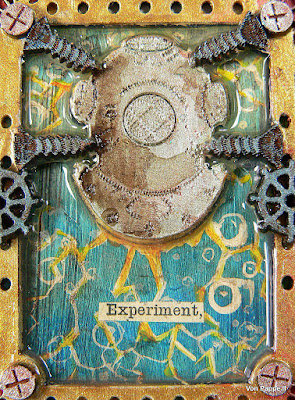
As I mentioned two weeks ago I had an idea for another cool steampunk ATC - mainly inspired by the awesome ATC frame and one of the little diver's helmets from one of the nautical themed Mini MDF Sheets.


In my head there formed a story of a mad scientist doing crazy experiments in a water tank using electricity and a diver's helmet that was later meant to go onto the head of...a poor creature obviously...

...flashing light bulbs indicating electricity, turning cogs and gears, someone adjusting water pressure in the tank, adding a kind of gas and switching gears outside the tank, flashes from discharges...maybe this was how this octopus with the diver's helmet head came into being...


I am still amazed by how much can go on in a format so small as an ATC! And the fact that all of the Calico Craft Parts come in sizes from small to large gives you the possibility to create whatever steampunk (or other) story you want in a wide variety of ATC frames.


Calico Craft Parts used:

- Sheet of Mini MDF Nautical Motifs Style 2
- Plain ATC Wood Blank with Cogs & Steampipe Frame
- Sheet of Mini MDF Hardware Wood Shapes


I painted the backgrounds for the water tank and the lit bulbs and the cogs and the frame separately before I glued everything in place. Used paints were DecoArt media fluid acrylics Primary Cyan, Cobalt Teal Hue, Hansa Yellow Light and Medium, Titanium White, Diarylide Yellow and Raw Umber (the latter as a wash on top of the painted helmet).

The "metal" parts and frame were painted using DecoArt Moss Pearl Dazzling Metallics and Pewter and Vintage Brass Matte Metallic paints.


The light bulbs were painted and then I added DecoArt Liquid Glass on top.


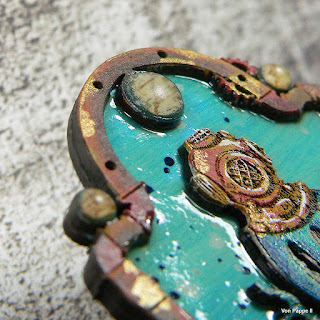
Once all the parts were painted and glued in place I poured DecoArt clear Pouring Topcoat into the frame to make the helmet look like it was floating in a tank. The pouring topcoat took about a day to totally dry and harden - but the effect definitely was worth the wait!


I hope this picture shows the different surfaces I have created using the different DecoArt media and paints.


And finally once more the finished ATC - my #11. I hope you like it! 


Hugs and happy crafting!
Claudia
xxx


Monday 18 May 2020

Alice In Wonderland Tea Party by Jannet

.

I am sorry that I have been absent for a little while, the post in London has been very random which is understandable in these very sad circumstances. So my Calico Craft goodies took some time to find their way to me, but oh my goodness  they were well worth waiting for! 

As soon as I saw the 100mm tall art doll, I knew it would be perfect for Alice In Wonderland of course after she had consumed  the “drink me”  drink. 


I began by painting her face and arms, and giving her legs stripes for her traditional stockings. She needed golden locks which I made from some needle felting wool.I used her body to measure, and cut a dress from blue felt.I added a ruffle of ribbon to give Alice some dimension. Her famous white pinny completed her look. 


As soon as she was made Alice decided that she needed to have  tea. I found the lovely tea set which comes with lots of cups, teapots, and little tiny spoons too! To give the spoons a metallic shiny look I foiled them with some silver gilding flakes. I covered the spoon in glue and then laid the foil over, and after it adhered I buffed it up to get a silvery shine.I then  painted the cups and teapots and added some Decoart texture paste to the sugar cubes to give them a gritty sugary look.  You can paint any design you like to the tea set, I choose to do a simple blue heart. 

The tea set needed a table, so Alice could sit down and enjoy her tea. I used a 100 mm mixed media circle for the top of the table and a cotton reel for the pedestal. After painting some mini hearts I hung them with some golden thread and adhered them onto the top of the table so they would dangle down from the table.  A doily made a pretty table cloth. I adhered Alice and the tea set in place. I used a plastic bottle to sit Alice against for support. I added lots of little Alice embellishments, a clock, a bottle with “drink Me “ stamped onto it’s label, and some playing cards. There are many things you could make to go with Alice, roses, jam tarts, toadstools..... so many possibilities. I finished by painting the word Tea, and adhering it to the pedestal 


Of course you can turn your art dolls into any character you want to, maybe you could make one to look like a friend or relative that would be a very personal and lovely gift. The art doll kits  come in various shapes and sizes, you are sure to find just the one you need. 
Take care xx

Calico Craft Parts Used


Saturday 16 May 2020

Decoupage with 3D by Kerstin

Welcome, creative friends!

I was inspired to create a canvas in Decoupage technique and with 3D effect. 
I used a beautiful still life on a tissue from my stuff as a base. 


Tips & Tricks


How I started:


I love special effects with depth! 
Here I used some 
as drawers, some in closed position - sawed and glued in suitable size - or
in opened state with two additional small side panels.

Afterwards they were covered with napkins and painted in matching colour.

Finally I added some drawer handles:

 (Fancy Plaques and a metallic lion head)

Some close up's


 The ATC frame was used as picture frame for a word which is sadly used very often in these difficult times


 Calico Craft Parts used: 

Ivy Leaf Garland

Plain ATC Wood Blank with Fancy Cut Out Frame

 Sheet of Mini MDF Hinges 

 Fancy Plaques - Mini MDF Wood Shapes

 Rectangle Shape - MDF Mixed Media Board or


Happy crafting!
Kerstin

Monday 11 May 2020

Steampunk ATC #10 - by Claudia

Hi, servus and thanks for stopping by today!

I would like to share with you #10 from my slowly growing collection of steampunk themed ATCs.
Maybe some of you remember the ATC holder I've done using one of the cool Calico Craft Parts ATC Display Box Kits...it's this one HERE and it seems I will need to do another one as this one can only take maybe one to two more ATCs. I also did another ATC display box (over HERE) that is wider and holds ATCs with other themes.

But today's post sees Steampunk ATC #10 starring. 


(for larger view click on images)

I just love this steampunk octopus with the diver's helmet (I have used this wood shape in a larger size on this project HERE one and a half years ago and it still is one of my favourite projects being displayed on my "own (and dear friends') projects shelves") - it's so cool, isn't it?
But the ATC frame is equally cool from my point of view! And the smallest size octopus fit in there just perfectly - YAY!


Calico Craft Parts used: 

- Deep Sea Diver Octopus - MDF Wood Shape
- Plain ATC Wood Blank with Steampipe Clock Frame

The cool thing with the Calico Craft Parts ATC Frames is that they take a lot of mixed media and really heavy stuff like for example a very thick coat of DecoArt Triple Thick - which was what I added in and around the octopus wood shape to create the impression of water on top of the painted background.


On top of the three clocks I used a good dose of DecoArt Liquid Glass and let that dry over night.


The steampipe frame was painted using DecoArt media fluid acrylics and dabbed on hints of DecoArt Vintage Brass Matte Metallics.


The octopus was painted using Titanium White, English Red Oxide, Phtalo Turquoise, Cobalt Teal Hue and Diarylide Yellow DecoArt media fluid acrylic paints. All the craft parts were primed by dry brushing them with two layers of DecoArt "lace" Chalky Finish paint. 


The background was painted using Phtalo Turquoise and Titanium White (mixing the paints wet on wet on the ATC background plate) media fluid acrylics. On top of the dried paint I sprinkled DecoArt Shimmer Misters Turquoise and White using the unscrewed nozzles to sprinkle the paint on.

I had a very relaxing ATC painting session creating #10 and I already have an idea for #11 ;)


Hugs, stay safe and happy crafting!
Claudia
xxx


Saturday 2 May 2020

Maritime scenes - 3D Shadow canvas by Kerstin

Welcome, creative friends!

 I love projects with a 3D depth and wanted to make a shadow frame from a canvas.
As you could already see in my last project, 
I love the combination of the sea theme with a touch of steampunk, so
today I am sharing a new inspiration with some casts, MDF shapes and a wonderful delicate background paper.

I created my canvas in a vintage grunge style in rusty appearance.


 In the Aquatic & Marine Wood Shapes department of Calico Craft Parts' store you can find a lot of awesome corals and other extraordinary maritime parts - 
 a veritable treasure trove that I can highly recommend!


Tips & Tricks


1 I used a discarded wedge frame that our kids hadn't wanted to paint.
With a carpet knife I cut out the middle part

2 I wanted to have a very old frayed looking edge and used a burning candle

3 I glued on some casts matching the MDF jellyfish, also cats that were made with the help of moulds

4 Then everything was primed with a Chalky Finish paint (DecoArt 'Yesteryear')


5 I left everything to dry thoroughly

6 Next I added some paper coloured laser cuts

Nautical Multi Frame


7 Firstly I added some Crackle Glaze. Onto the still wet medium I sprinkled some mini Artstones here and there 

8 After that had dried, I highlighted the frame with brown and black metallic waxes and glued a curved paper band onto the frame

9 Finally I added some natural elements like sea shells, lichen, gauze and some Artstones


some close up's


Calico Craft Parts used: 

Nautical Multi Frame - Seahorses & Seafoam

 Bull Kelp - MDF Seaweed Wood Shape Style 4

 Jellyfish MDF Wood Shape Style 3 in two sizes


 Thanks for your visit!

Stay safe everyone and take care of yourselves and your loved ones…

Kerstin